Sentinel One
Workflow for Building Agentless Microsegmentation with Sentinel One
Onboarding
This section describes the steps required to integrate Sentinel One with the Xshield platform to enable advanced endpoint visibility and telemetry ingestion.
By connecting your SentinelOne environment, Xshield can:
- Import your sites, groups, and selected Sentinel One endpoints
- Ingest real-time XDR telemetry through Cloud Funnel
- Provide deep visibility and insights of the traffic flows between endpoints
This integration helps enhance your organization's security posture by enabling threat visibility and forensic analysis across your network without the need for any additional agents or footprint.
Prerequisites
To successfully integrate SentinelOne with Xshield, the customer needs to provide the following details:
-
SentinelOne Console URL: This is the base URL of your SentinelOne environment. Example:
https://usea1-partners.sentinelone.net
⚠️ Note: Your console URL may be different based on your region and deployment. -
API Token: This is used for authenticating Xshield with SentinelOne.
The Console URL and API Token are required for Xshield to import sites, groups, and endpoints from your SentinelOne environment.
To generate the API token, follow the instructions in the API Token section.
- Cloud Funnel Configuration: This enables streaming of IP-related XDR telemetry events from SentinelOne to Xshield.
Configuring SentinelOne Integration in Xshield Platform
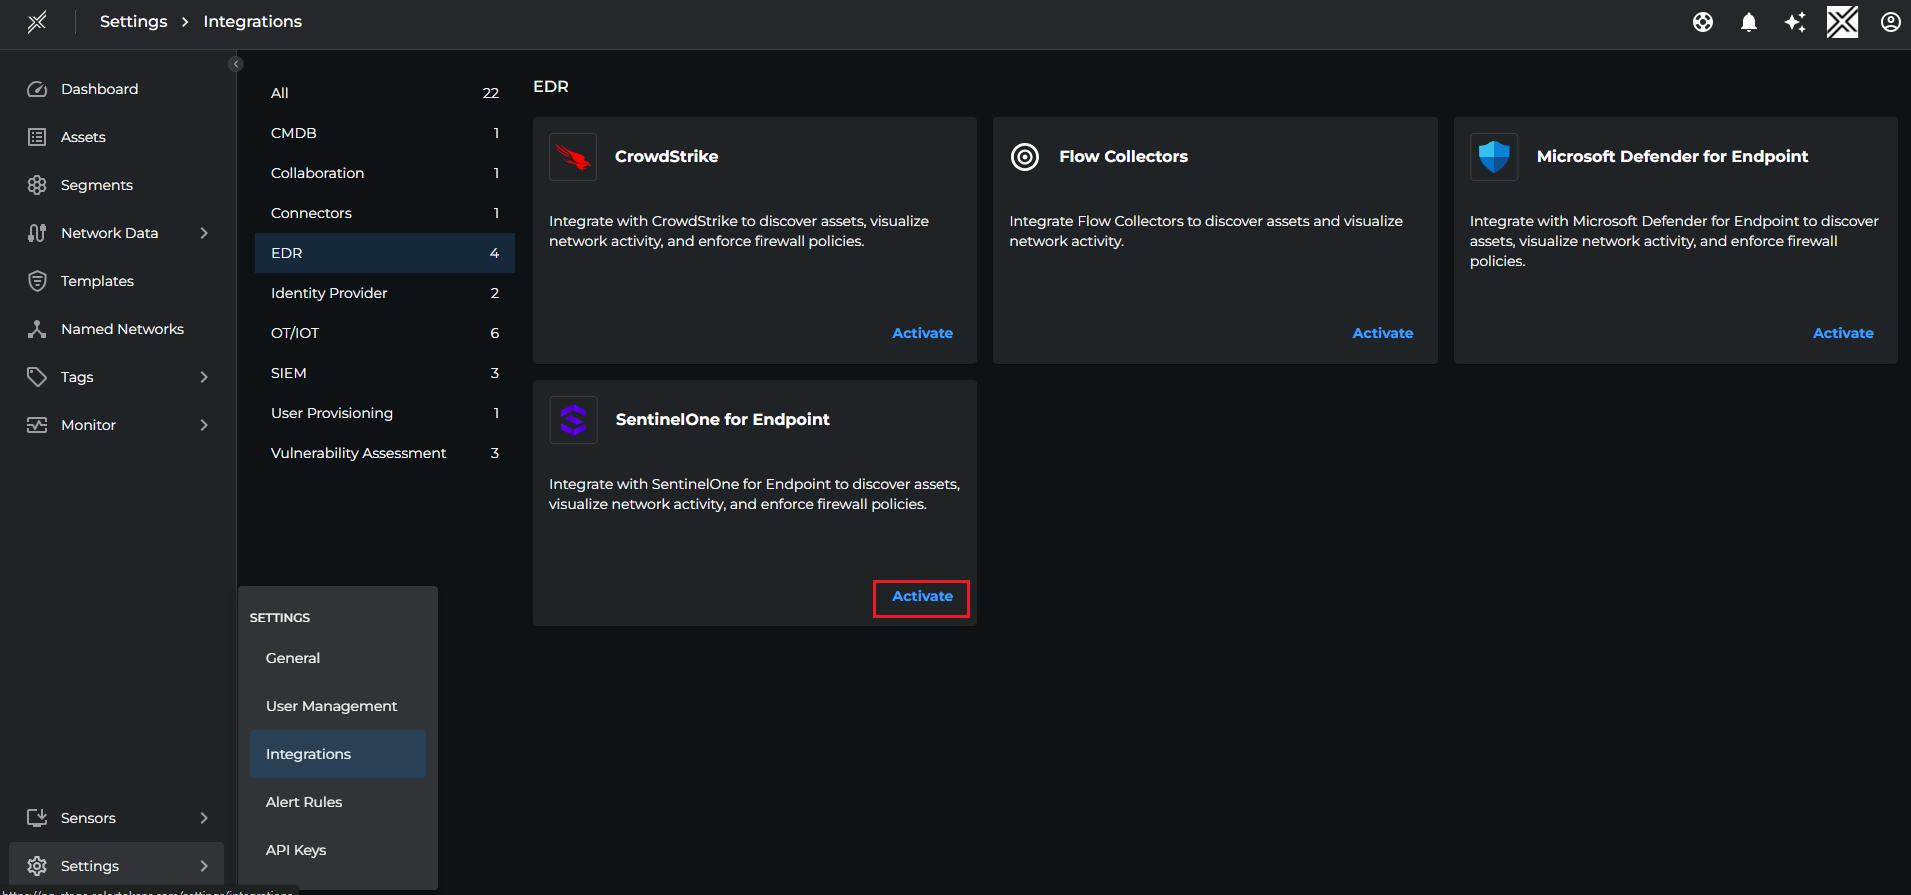
- Login to Xshield console and navigate to Settings > Integrations > EDR > SentinelOne. Click on Activate button.
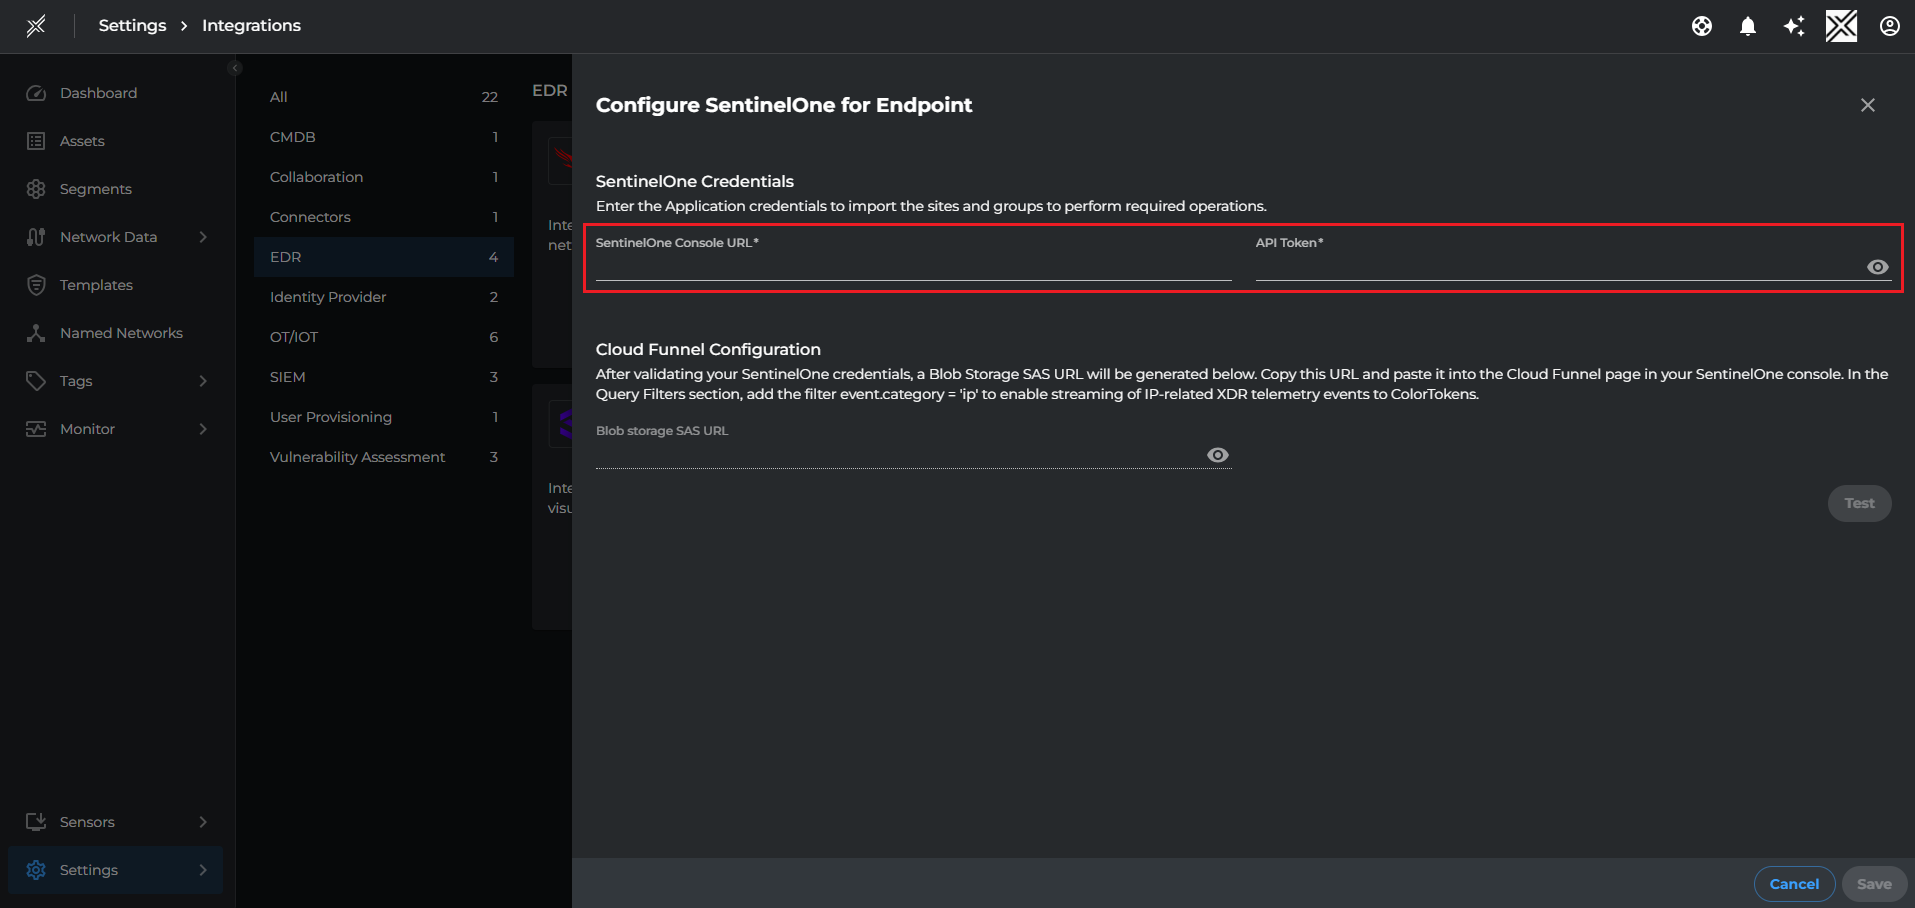
 2. Fill the SentinelOne Console URL and API Token in the popup window and click Test to validate the credentials then click Save
✅ Once saved, Xshield will begin syncing your SentinelOne sites and groups. You can go to the next step to configure Cloud Funnel in SentinelOne
Configure Cloud Funnel in SentinelOne
To stream telemetry data from SentinelOne into Xshield, you must configure the Blob Storage SAS URL inside the SentinelOne console's Cloud Funnel settings.
-
Login to the SentinelOne console
-
Navigate to Settings > Integrations > Cloud Funnel
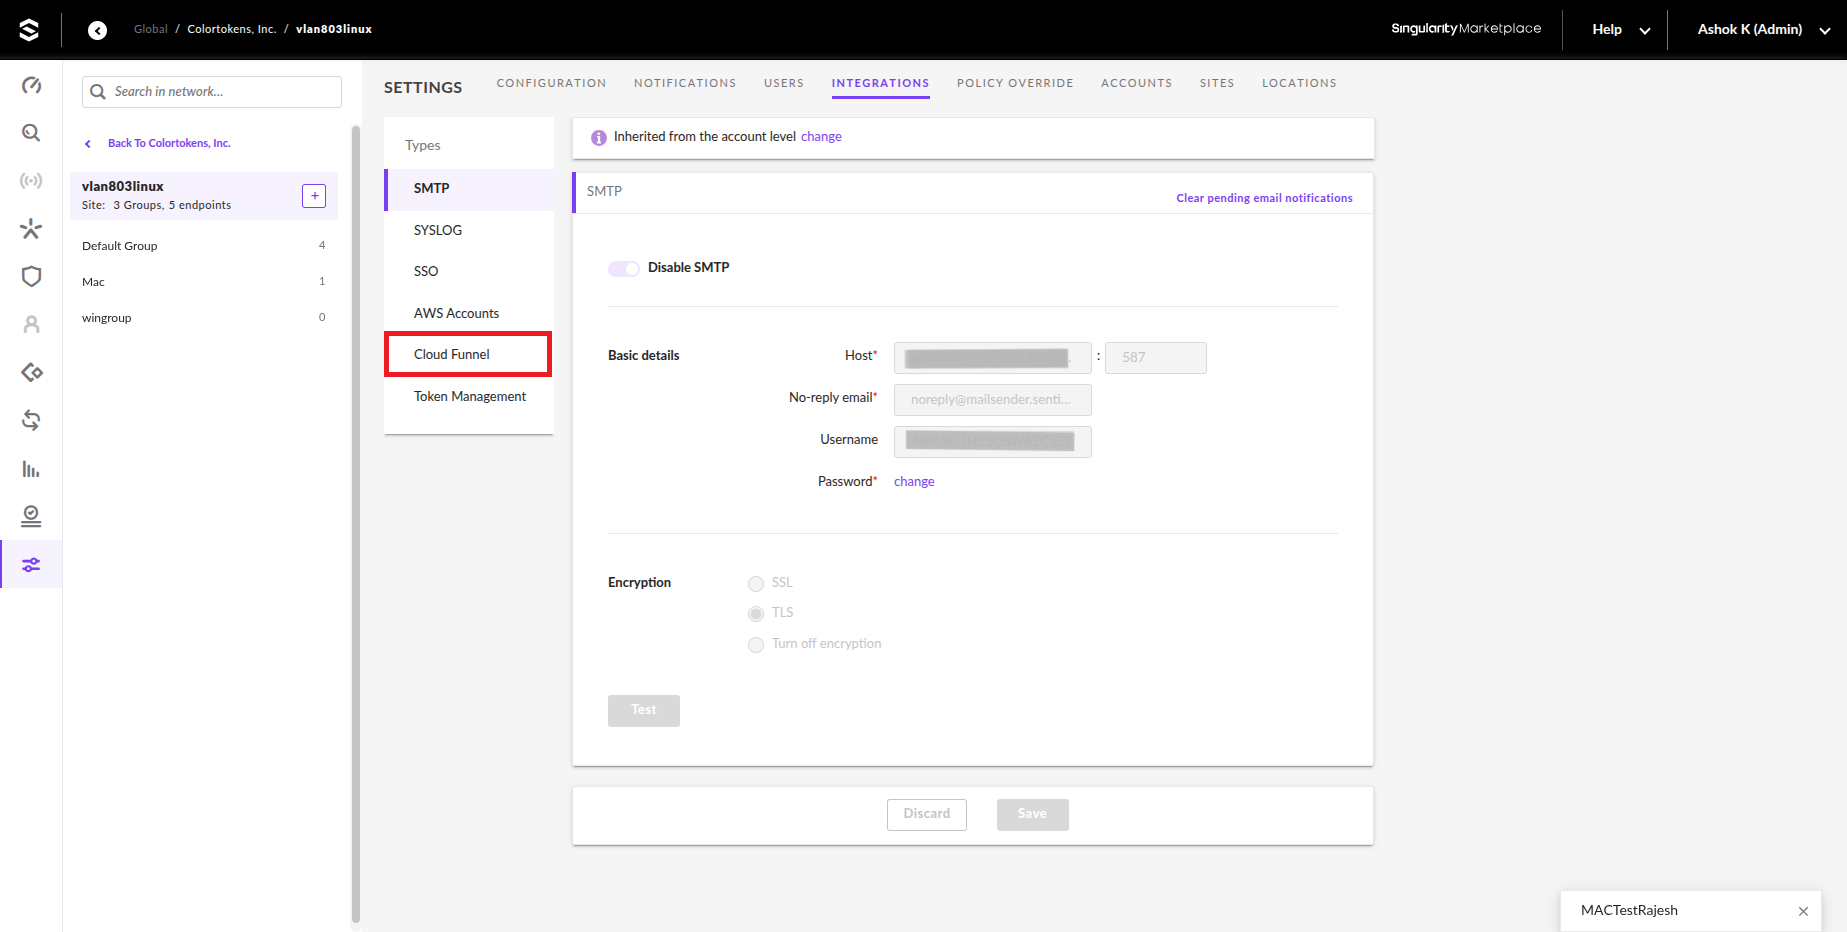
- Select the Cloud provider as Azure
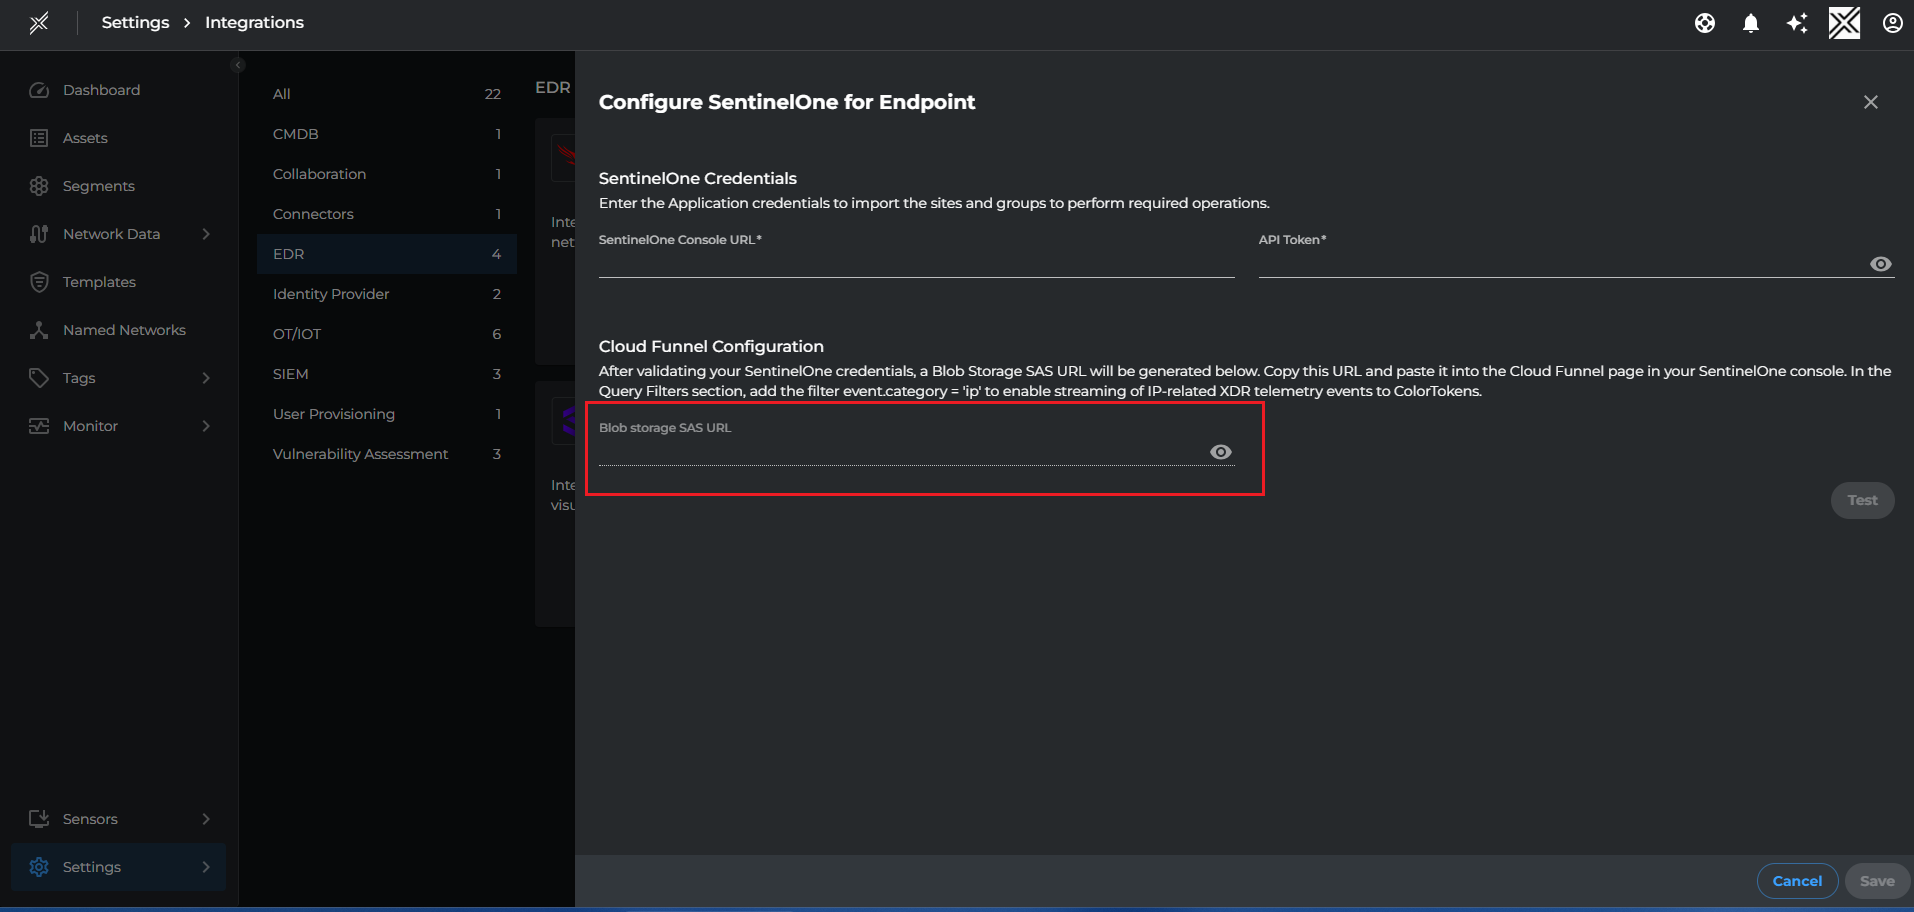
- Blob Storage SAS URL: Copy the SAS URL from Xshield > Settings > Integrations > EDR > SentinelOne > Cloud Funnel Configuration
Paste the value in the Blob Storage SAS URL field in SentinelOne console and click Validate
- Enable Telemetry Streaming
- Query Filters : Enter the filter
event.category = 'ip'and click Validate - Click Save
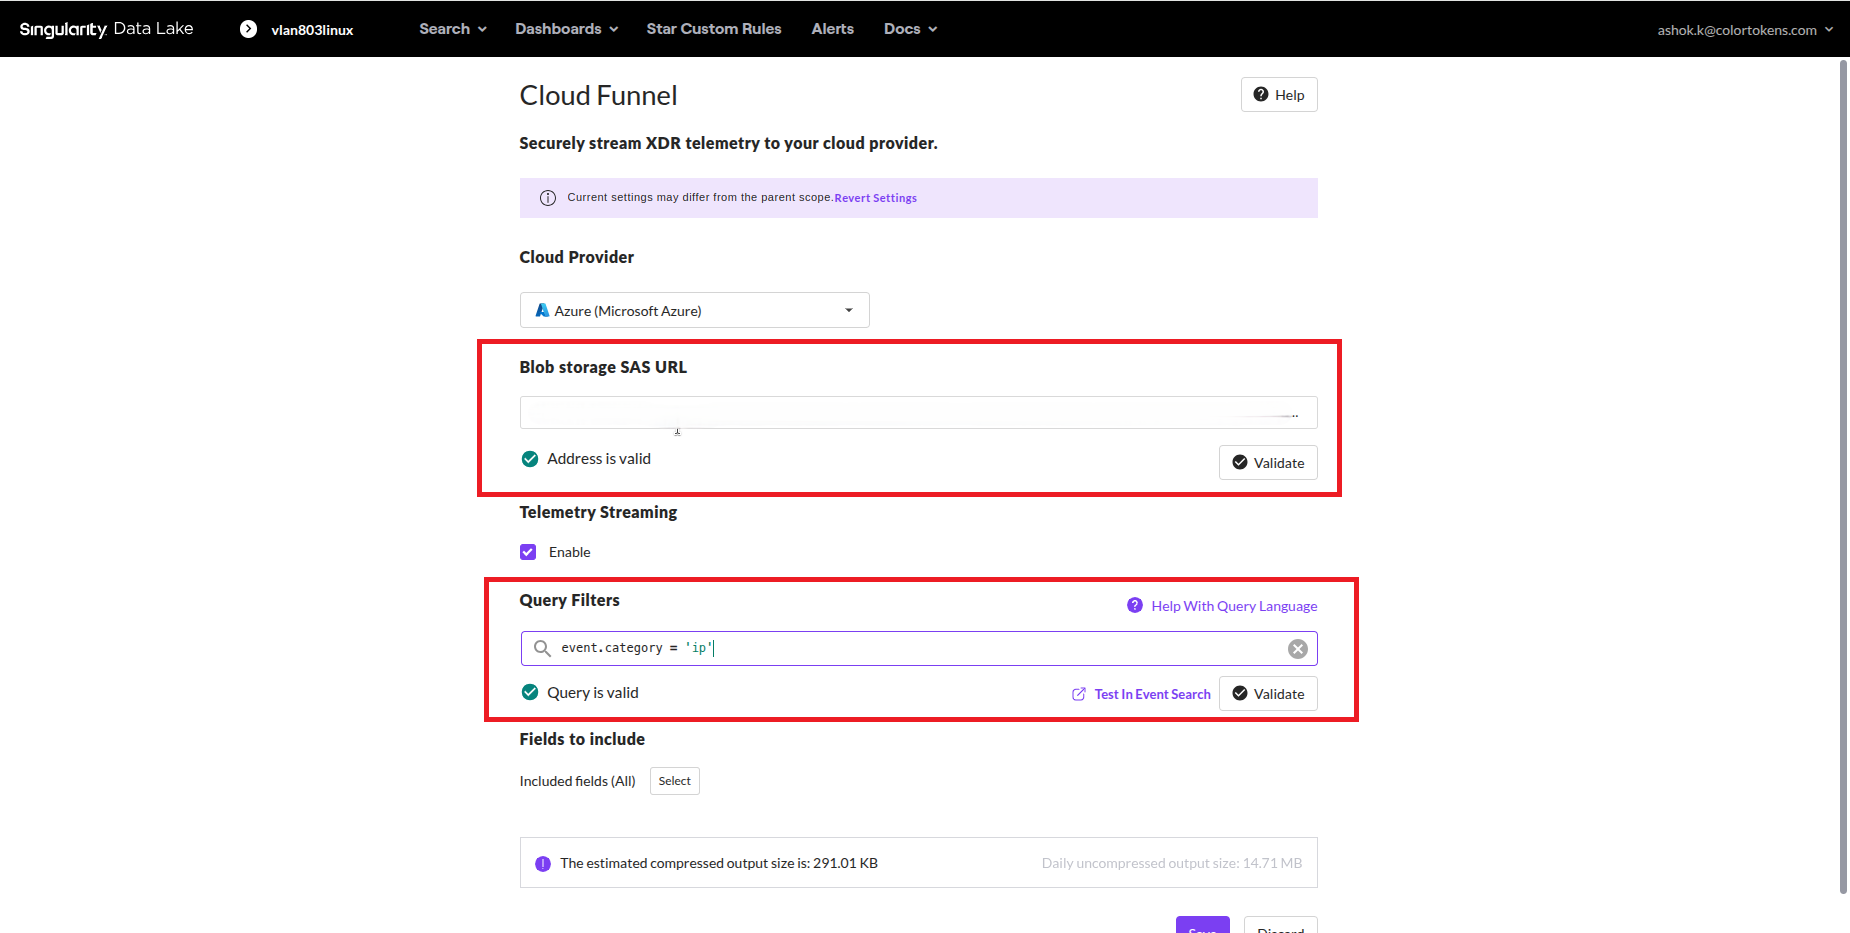
You can set the Cloud Funnel at the Account level or at the Site level. If configuring at Site level, you must repeat the setup for each site, using the same SAS URL (From SentinelOne Integration tile)
After configuring the Cloud Funnel settings,
- SentinelOne begins streaming IP-related XDR telemetry to the specified Azure Blob Storage.
- Xshield consumes this data to provide rich traffic visibility. Customers can view the entire traffic flow in a user-friendly manner, enabling enhanced security analysis and effective policy enforcement.
Discovery
- A list of discovered groups from SentinelOne will be shown under EDR Groups > SentinelOne in the Xshield Tenant. The operator needs to select the desired groups and click Activate to import the corresponding endpoints into Xshield.
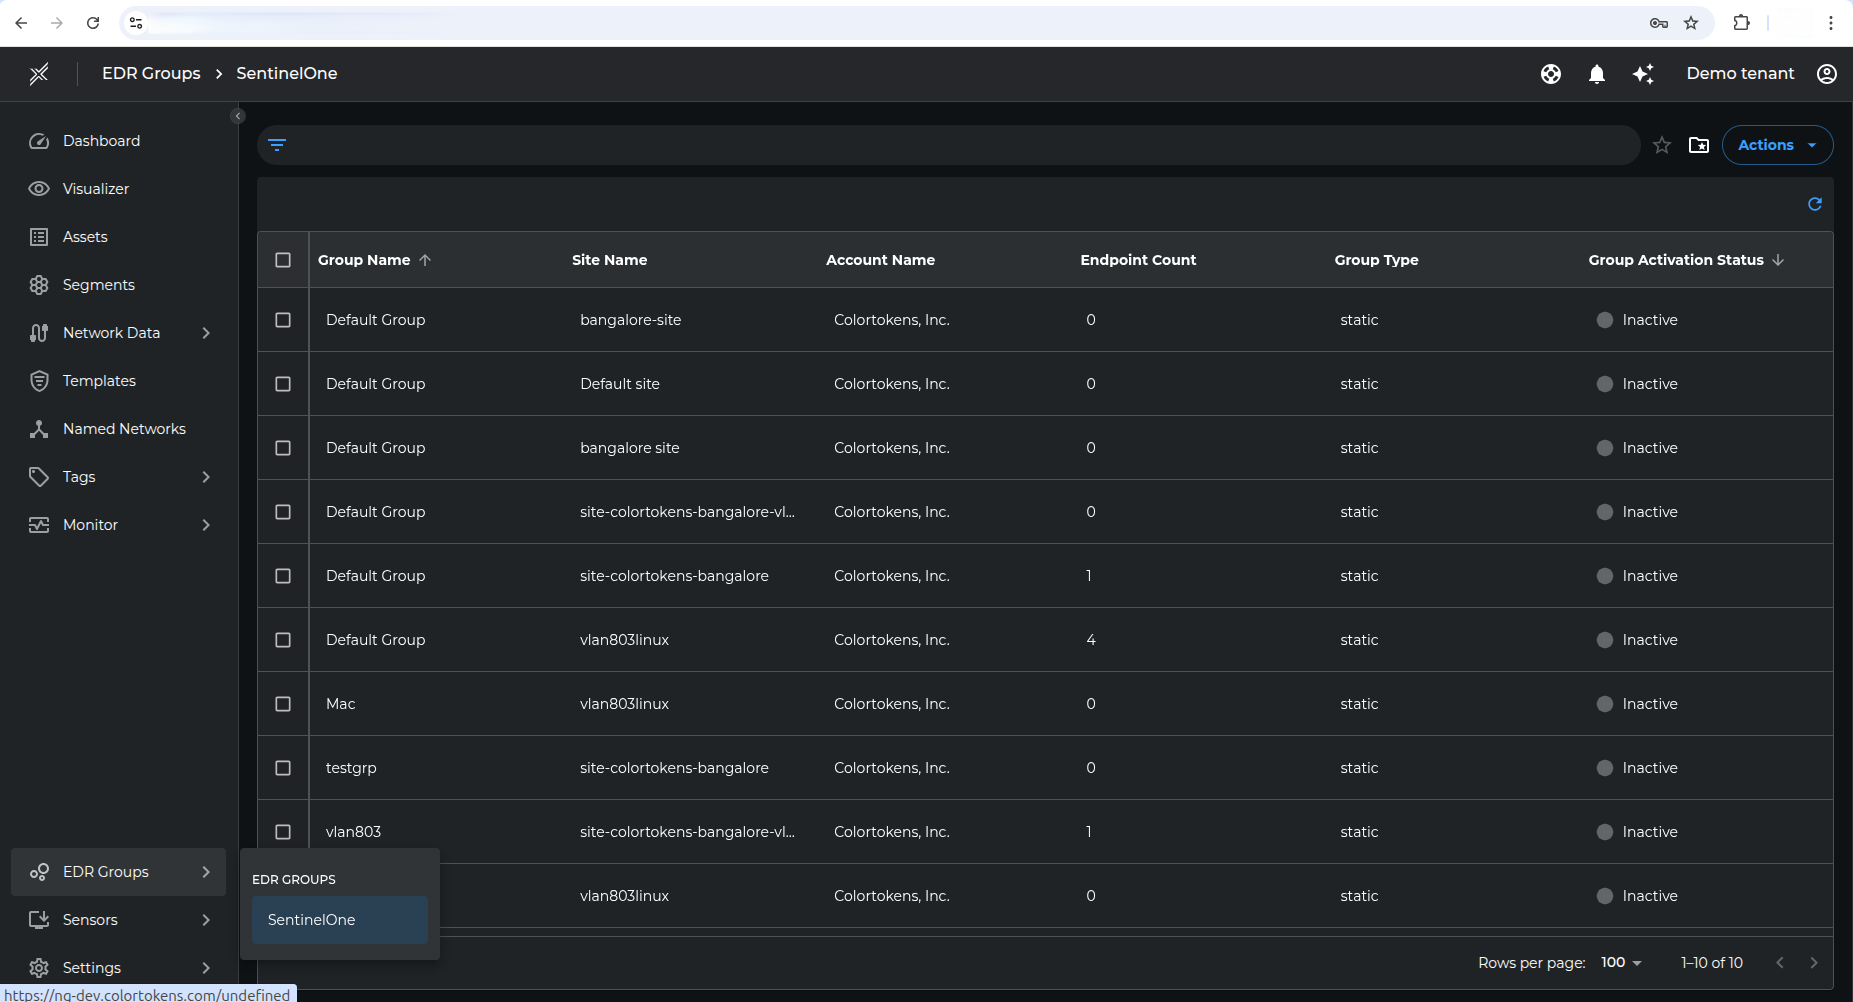
This option is provided as Customers might have a large number of hosts managed by SentinelOne platform and can decide which set of hosts needs to be imported into Xshield platform.
Confirm Activation: A confirmation popup will appear. Click Confirm to activate the selected groups.
Group retrieval may take 1–4 minutes. This is because the system triggers a background work request that is processed asynchronously. Please allow some time for the groups to appear after saving your SentinelOne credentials.
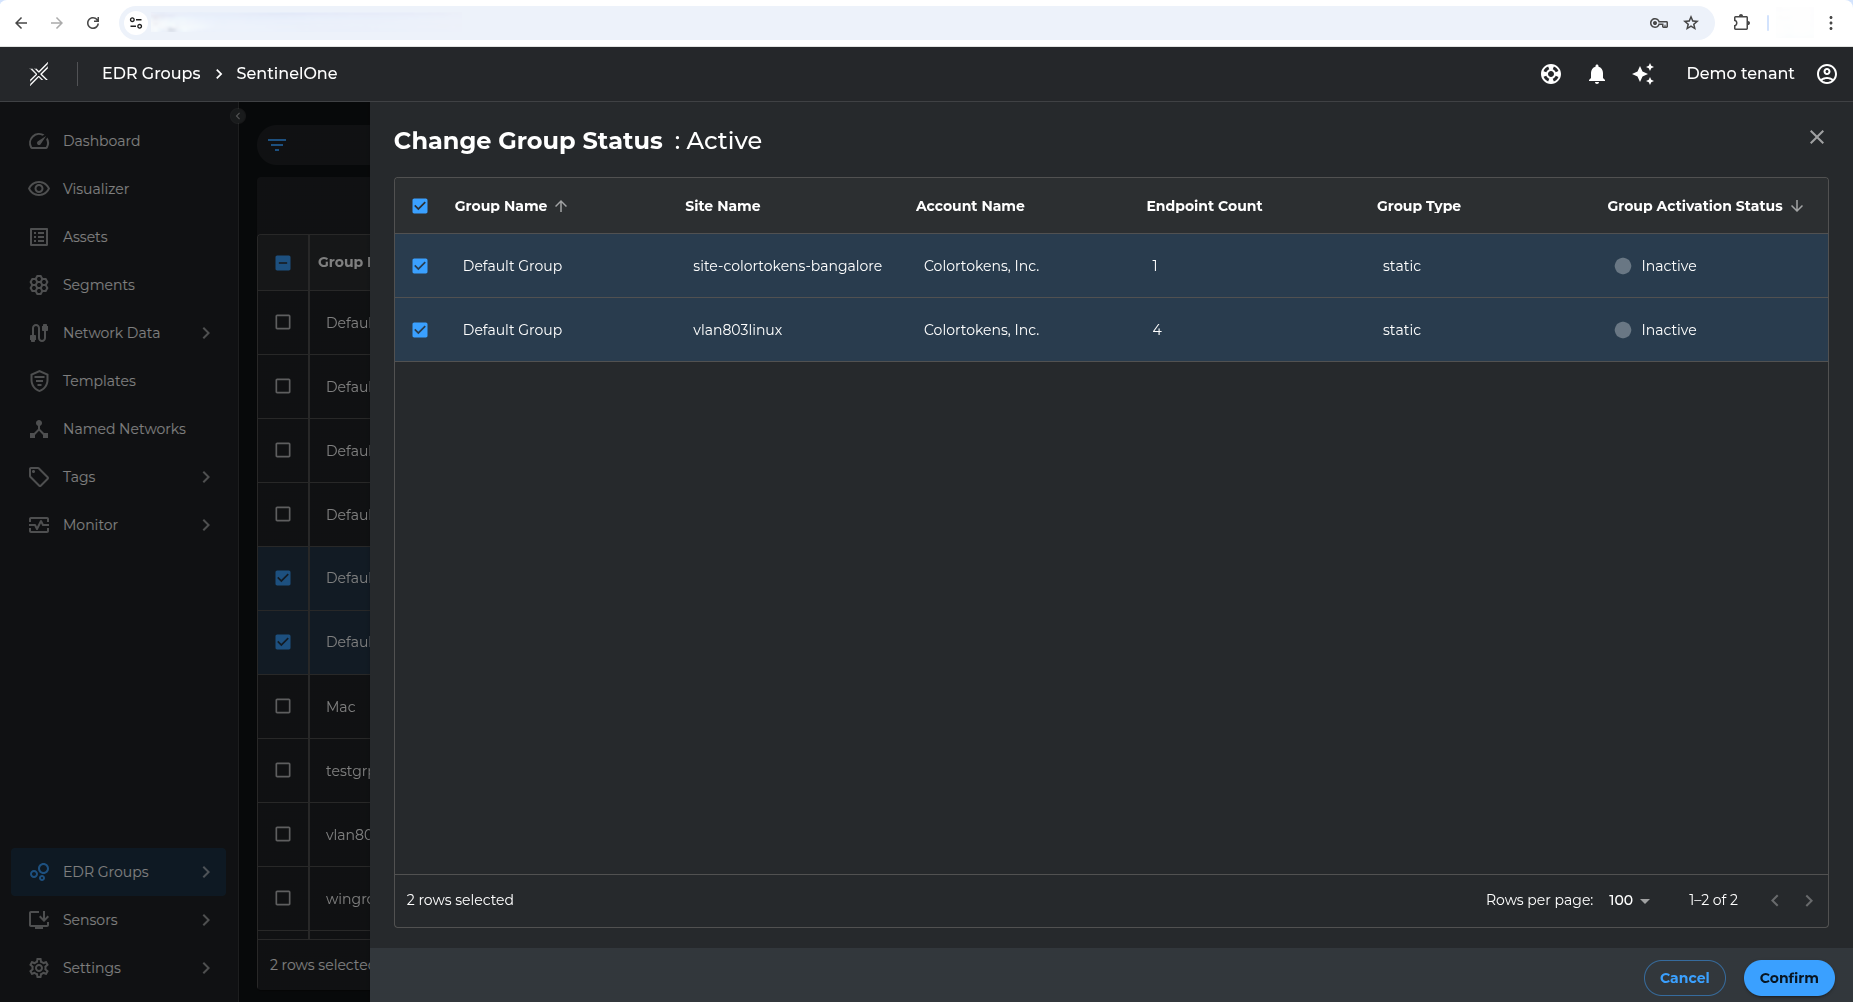
- After the groups are activated and synced with Xshield, the corresponding endpoints will be available in the Assets tab in Xshield. The Sentinel one endpoints can be filtered by using the filters Tags > Managed By > SentinelOne
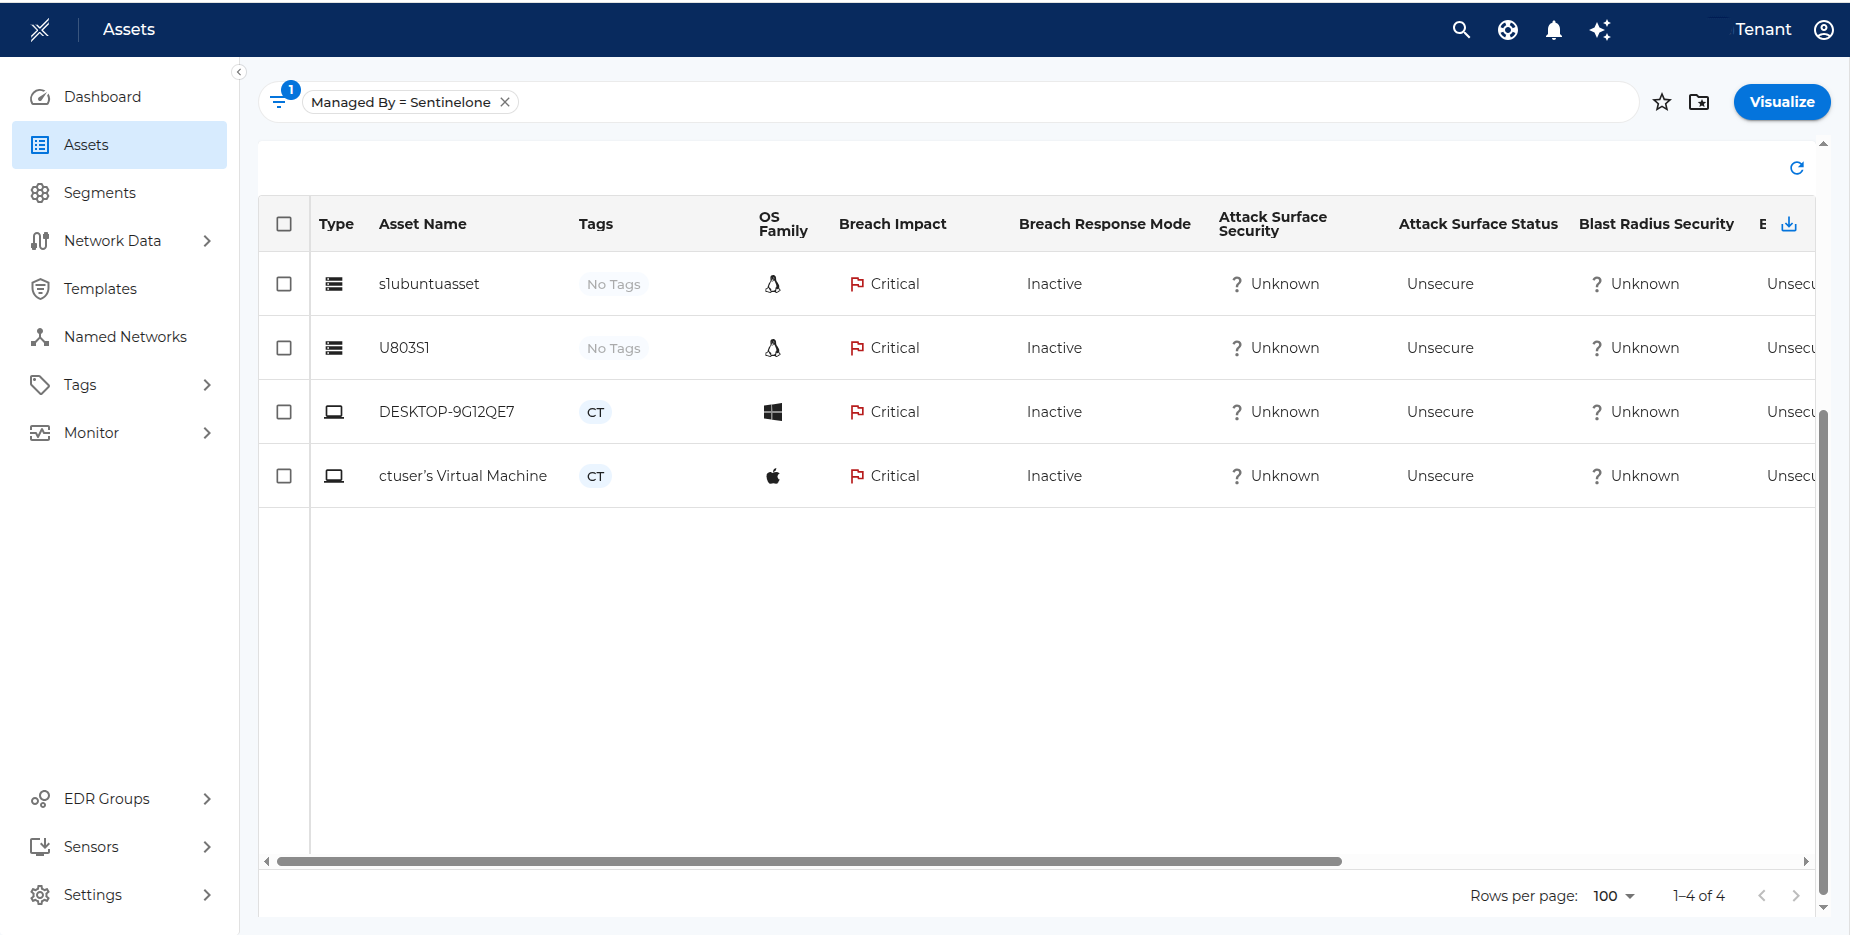
Clicking on any asset name will take you to the details page. The asset details page will display information like IP Address, Operating System, Tags, etc.
Visibility
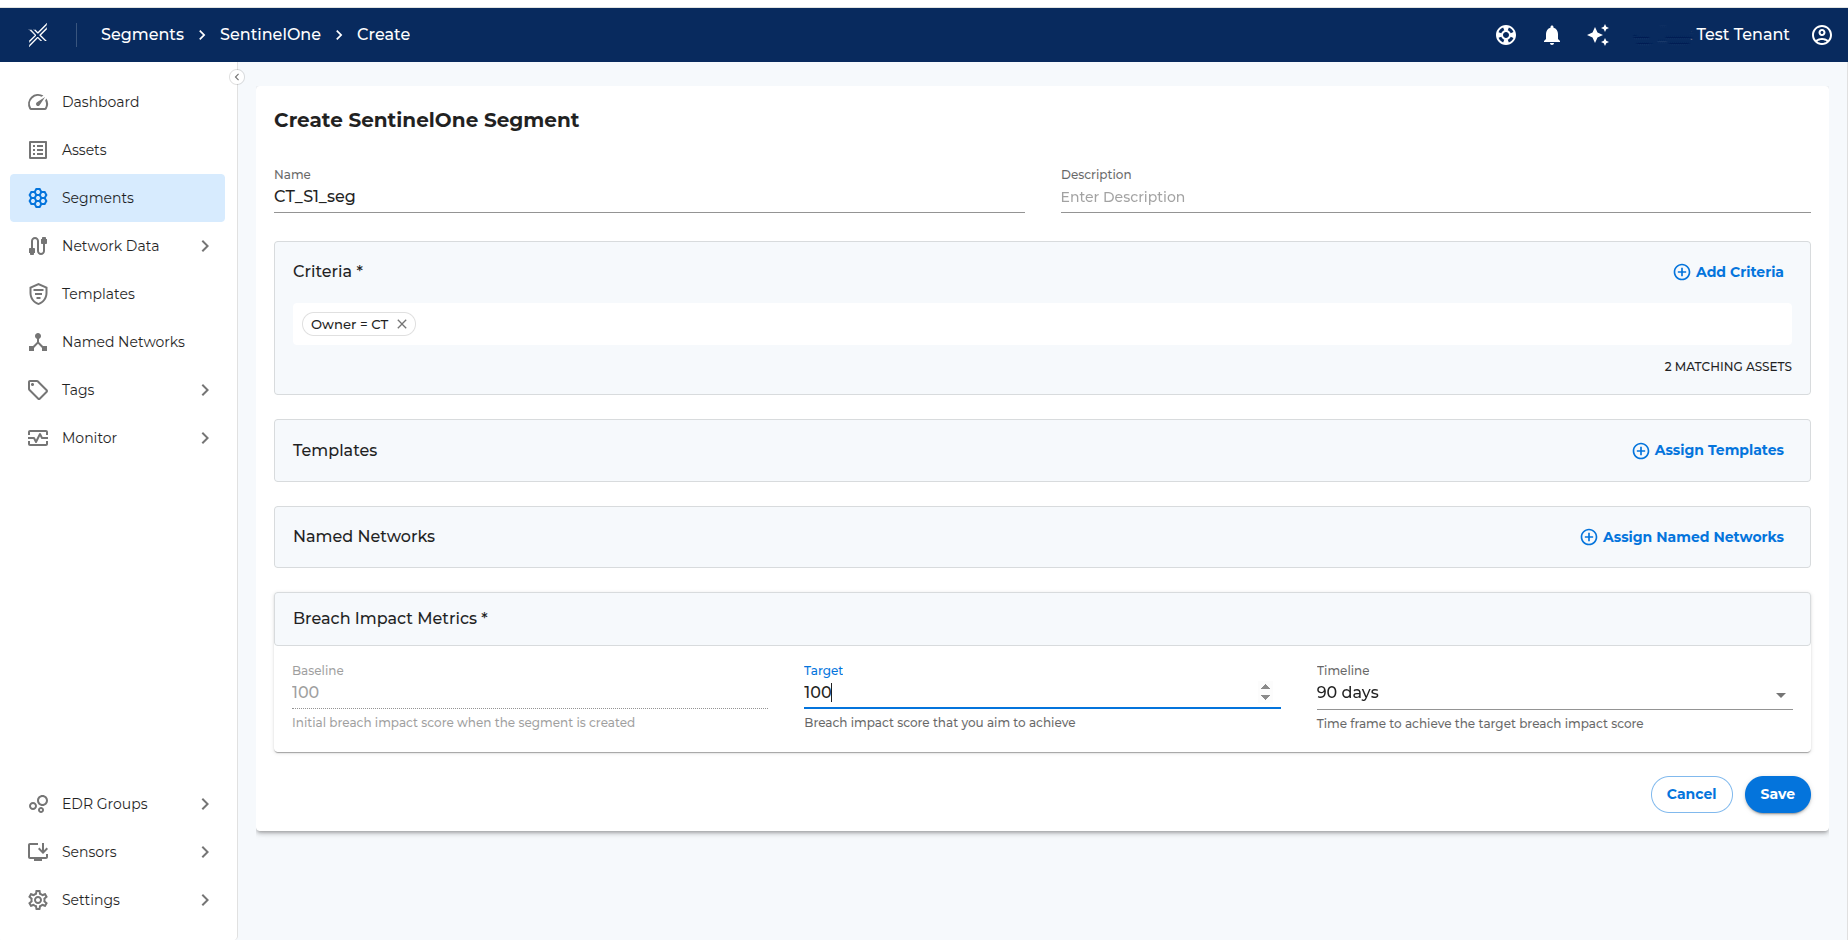
New SentinelOne segments (based on tags) can be created in Xshield for assets imported from SentinelOne. This follows the standard segment creation process in Xshield.
Click on Segments menu item in the left navigation bar. Select SentinelOne tab and click on Create Segment button. Provide the segment name, description and choose the criteria to add the respective endpoints to the segment.
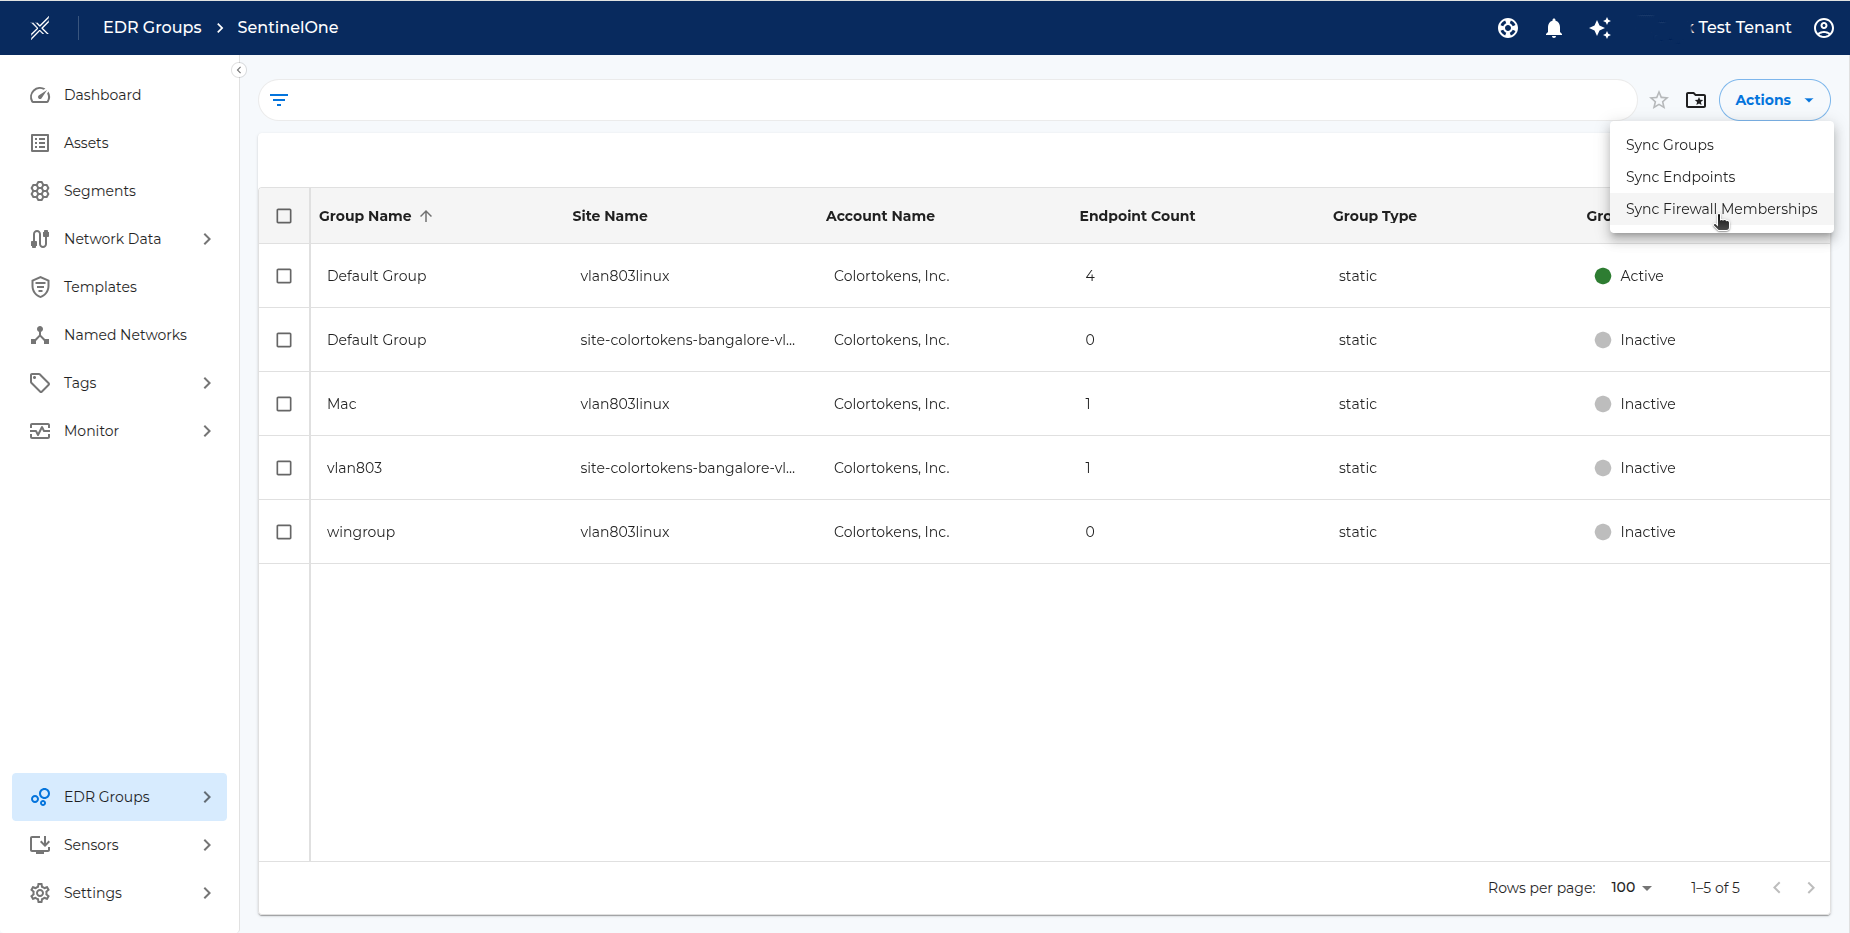
After the segment is created - operator can wait for the assets to get grouped under the segment or can click on the Sync Firewall Group from EDR > SentinelOne to manually sync the assets.
Named Networks can be added to the segment during segment creation time or can be added later. To add Named Networks after the segment is created, click on more options ellipsis icon of the segment in the Xshield segments page and select Manage Named Networks. Add appropriate Named Networks and click Assign button to save the changes.
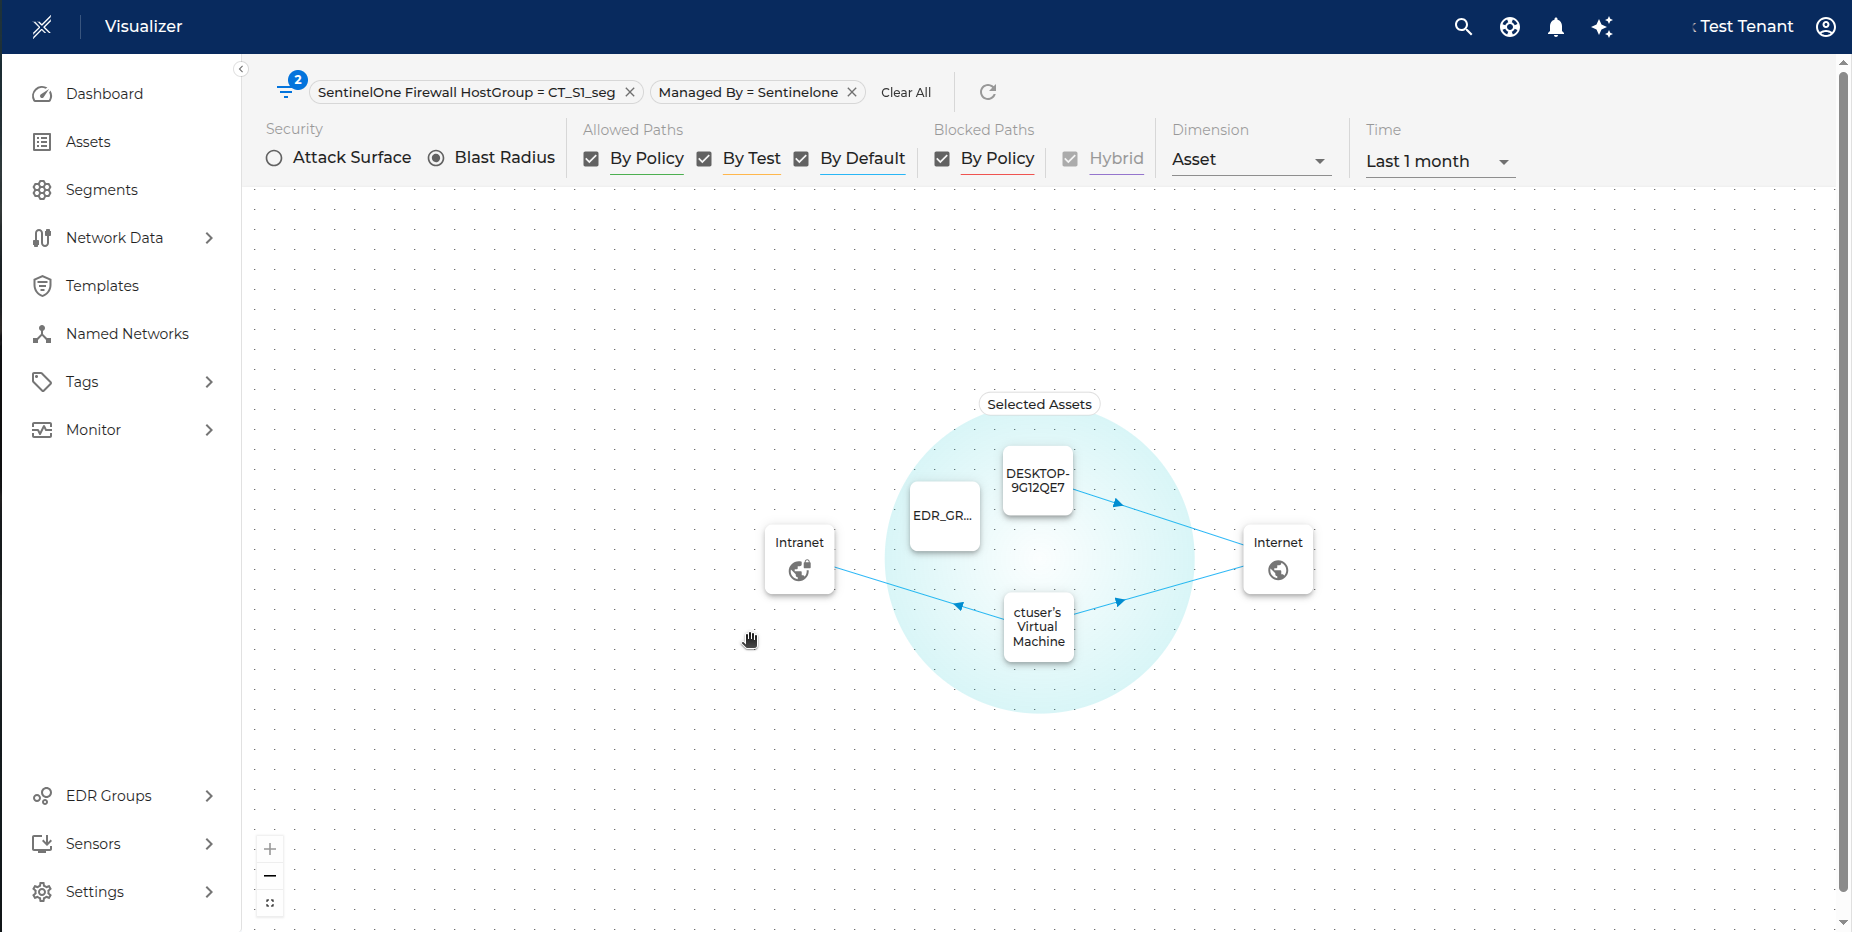
To Visualize the traffic flows between the imported endpoints, click on Visualize icon next to the segment.
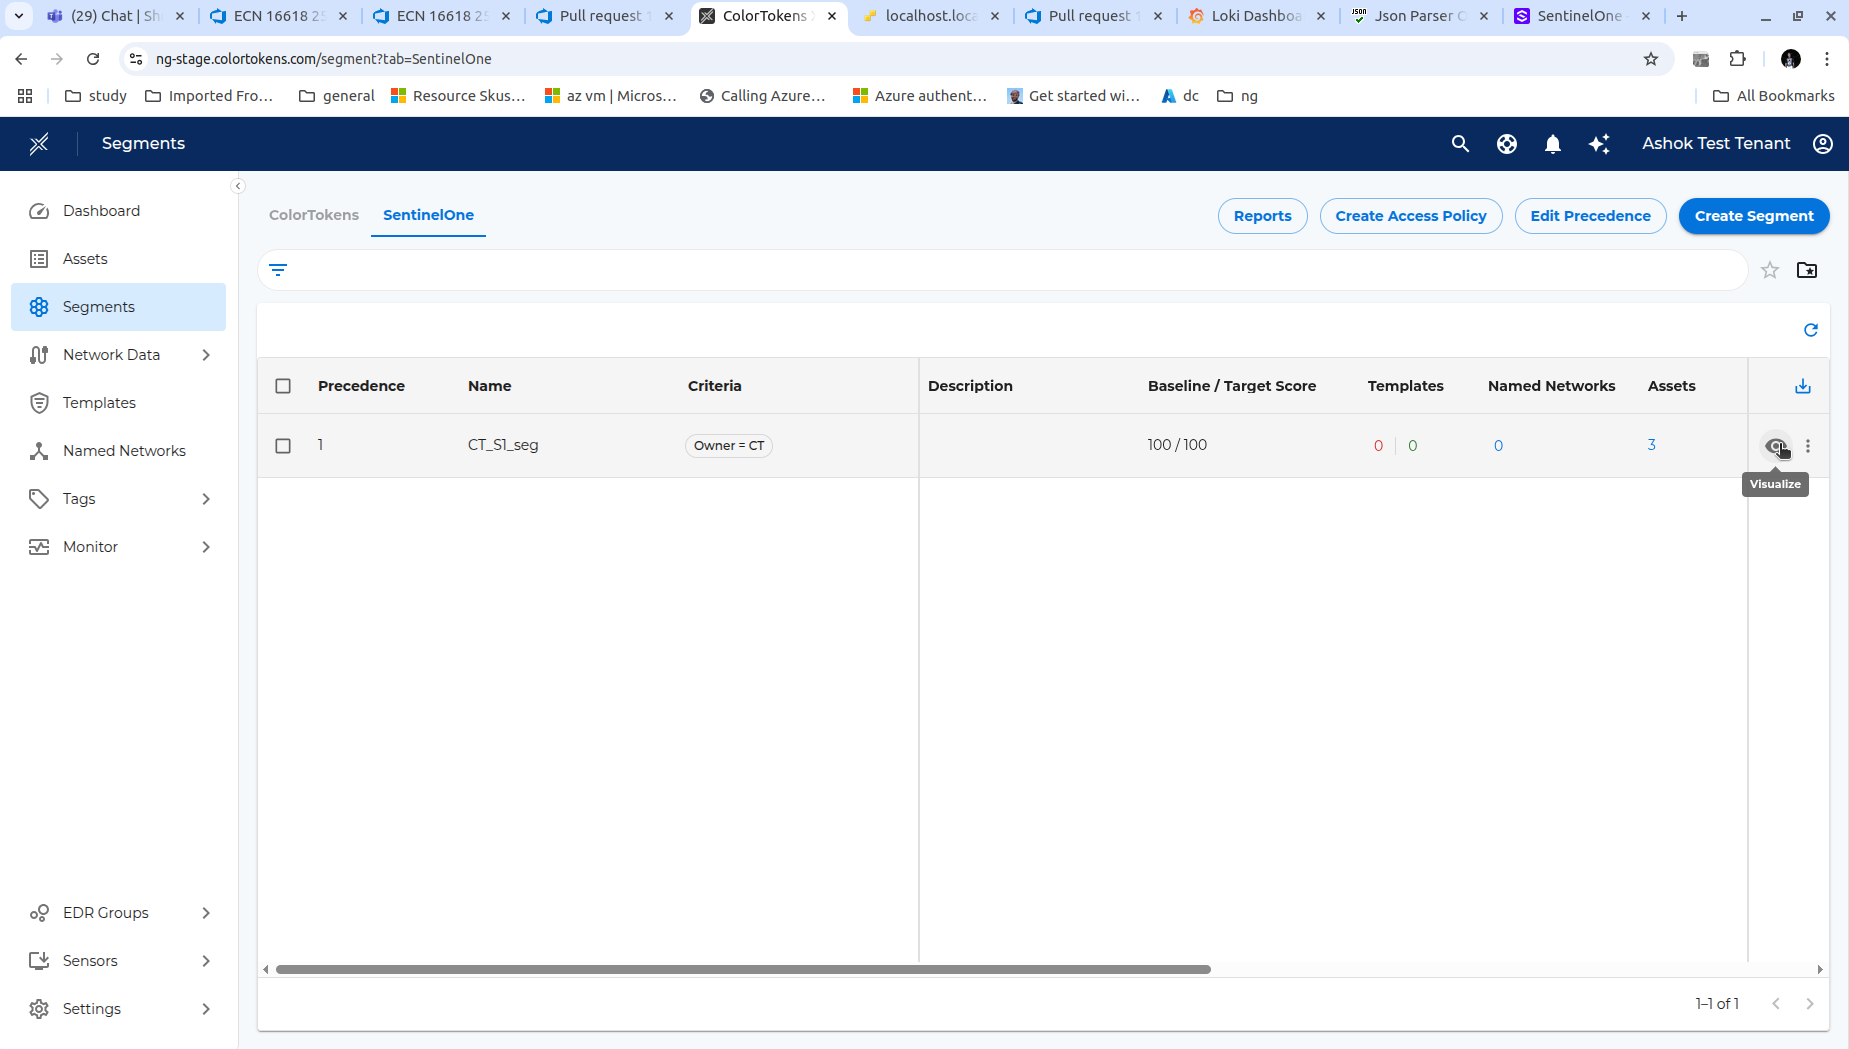
You will be redirected to the Visualize page where you can now Visualize all the traffic flows between the imported endpoints.
Policy Enforcement
Once visibility is established through telemetry ingestion, the next step is to enforce firewall policies on SentinelOne-managed endpoints. This is achieved by deploying XShield Spark to endpoint devices using SentinelOne's RemoteOps feature.
Spark is a lightweight binary that runs on endpoints to enforce network security policies without requiring a full Xshield agent installation. The deployment process uses SentinelOne APIs to automatically upload Spark packages and schedule execution tasks across Windows, Linux, and macOS platforms.
Prerequisites
Before deploying Spark, ensure the following requirements are met:
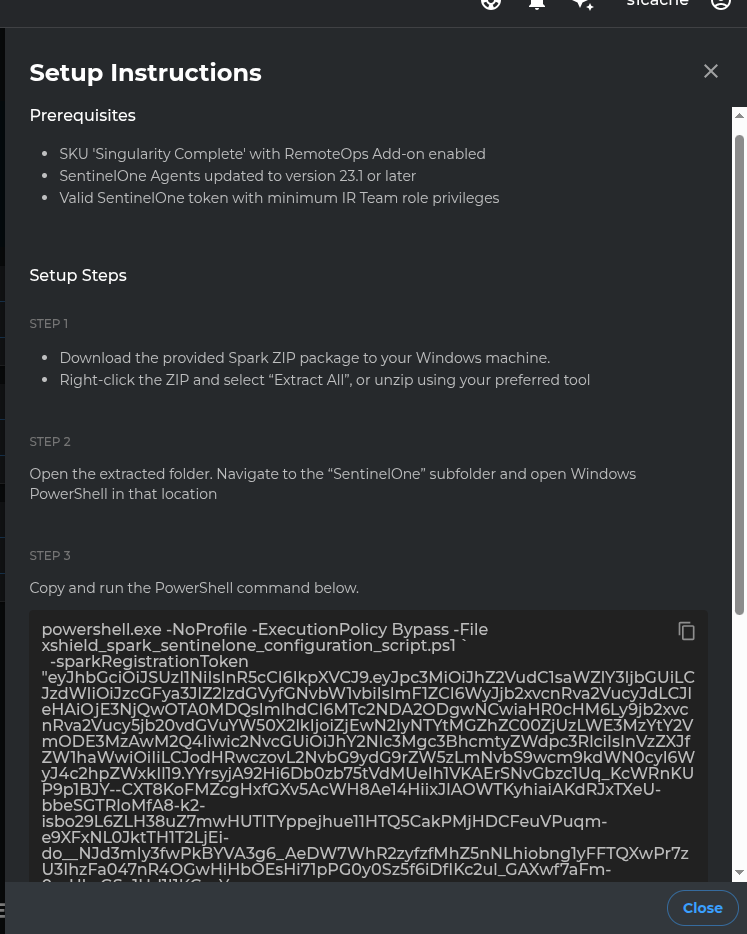
- SKU: "Singularity Complete" with RemoteOps Add-on enabled
- Agent Version: SentinelOne Agents updated to version 23.1 or later
- API Token: Valid SentinelOne token with minimum IR Team role privileges
- System: Windows machine with PowerShell 5.1 or later
- Network Access: Connectivity to SentinelOne Console URL
Deployment Steps
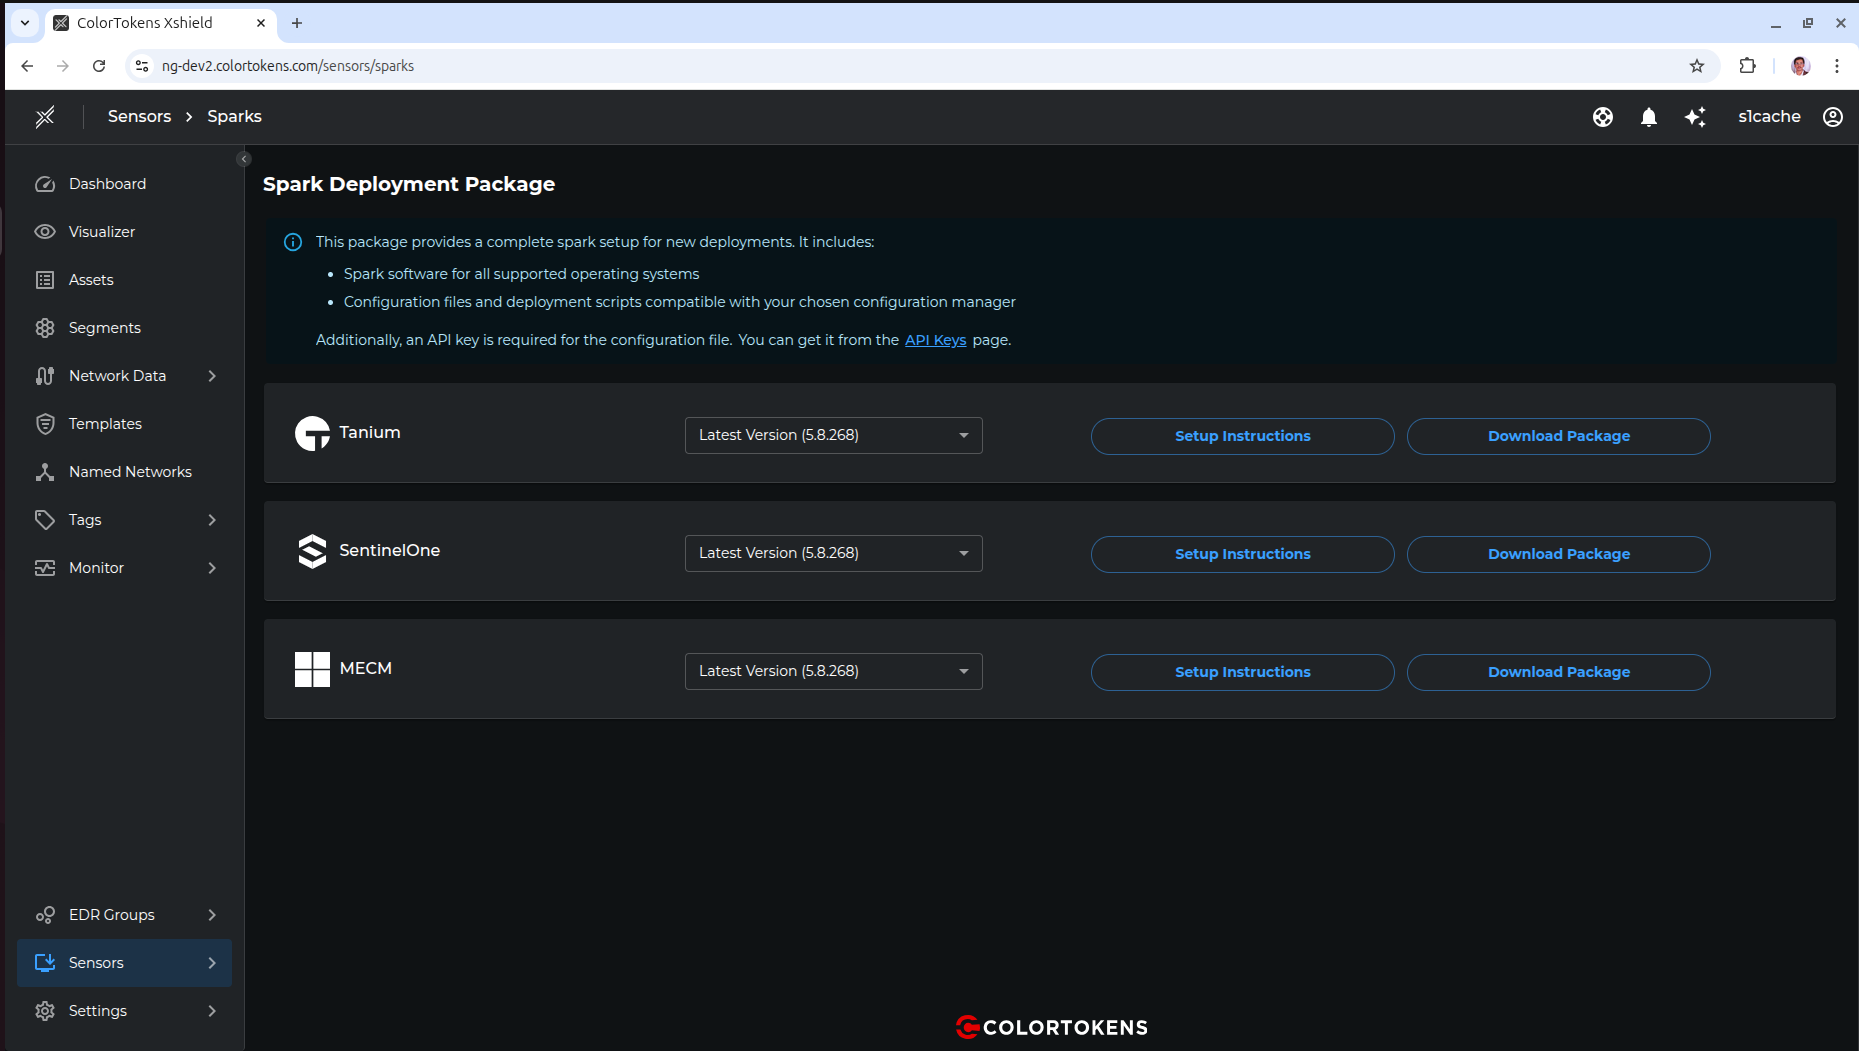
1. Access Spark Deployment Page
Navigate to Sensors > Sparks in the Xshield console. Select SentinelOne from the available deployment packages and click Download Package.
2. Extract and Navigate to Package
Download the ZIP file and extract it to a local directory.

Open the extracted folder and navigate to the sentinelone subfolder.

3. Review Setup Instructions
Click Setup Instructions on the Spark deployment page to view the prerequisites and obtain the pre-configured PowerShell command with all required parameters.
4. Execute Deployment Script
Open PowerShell inside the sentinelone folder. Copy the complete PowerShell command from the Setup Instructions page and paste it into the PowerShell window. Press Enter to execute.
When prompted, enter your SentinelOne API token. The script will validate the token and proceed with deployment.
What the Script Does
The automated deployment script performs the following actions:
- Validates all input parameters (URLs, token, interval, group IDs)
- Prompts for optional proxy configuration if endpoints require proxy access
- Generates platform-specific configuration files for Windows, Linux, and macOS
- Creates payload ZIP packages containing Spark binaries and configuration
- Cleans up existing scripts and tasks to prevent duplicates
- Uploads remote script objects to SentinelOne for each OS type
- Schedules automated execution tasks at specified intervals throughout the day
- Logs all operations to
C:\Windows\Temp\SparkSentinelOneScriptLogs.log
Verification
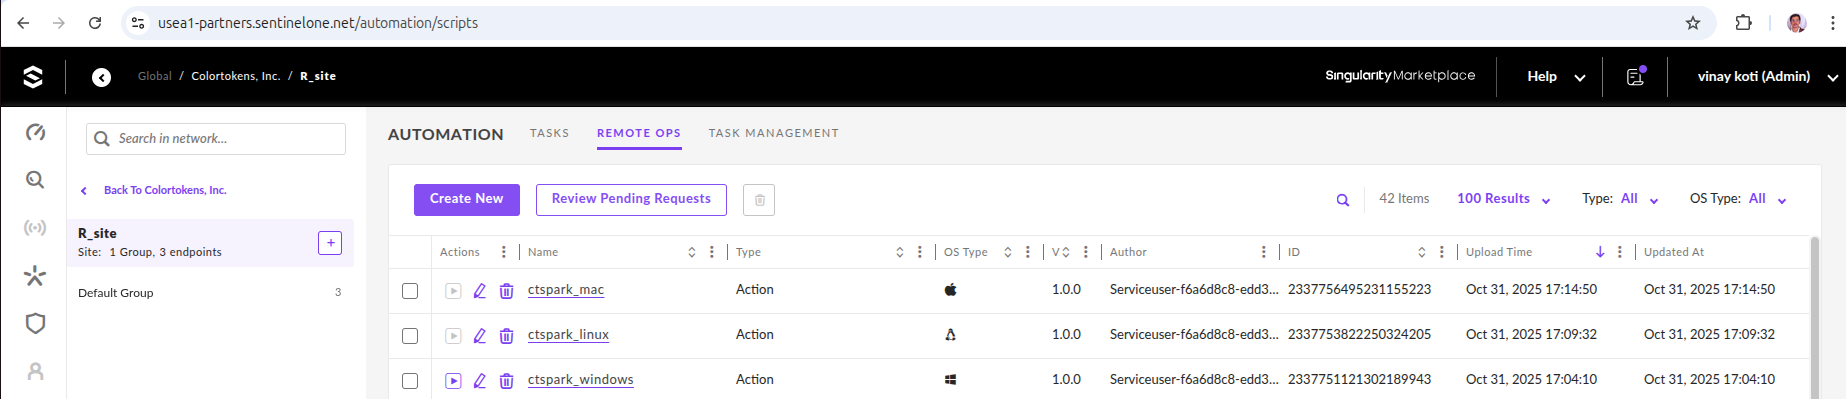
After successful deployment, verify in the SentinelOne console:
- Remote Scripts: Navigate to Automation > REMOTE OPS > Script Library and confirm
ctspark_windows,ctspark_linux,ctspark_macosscripts are present
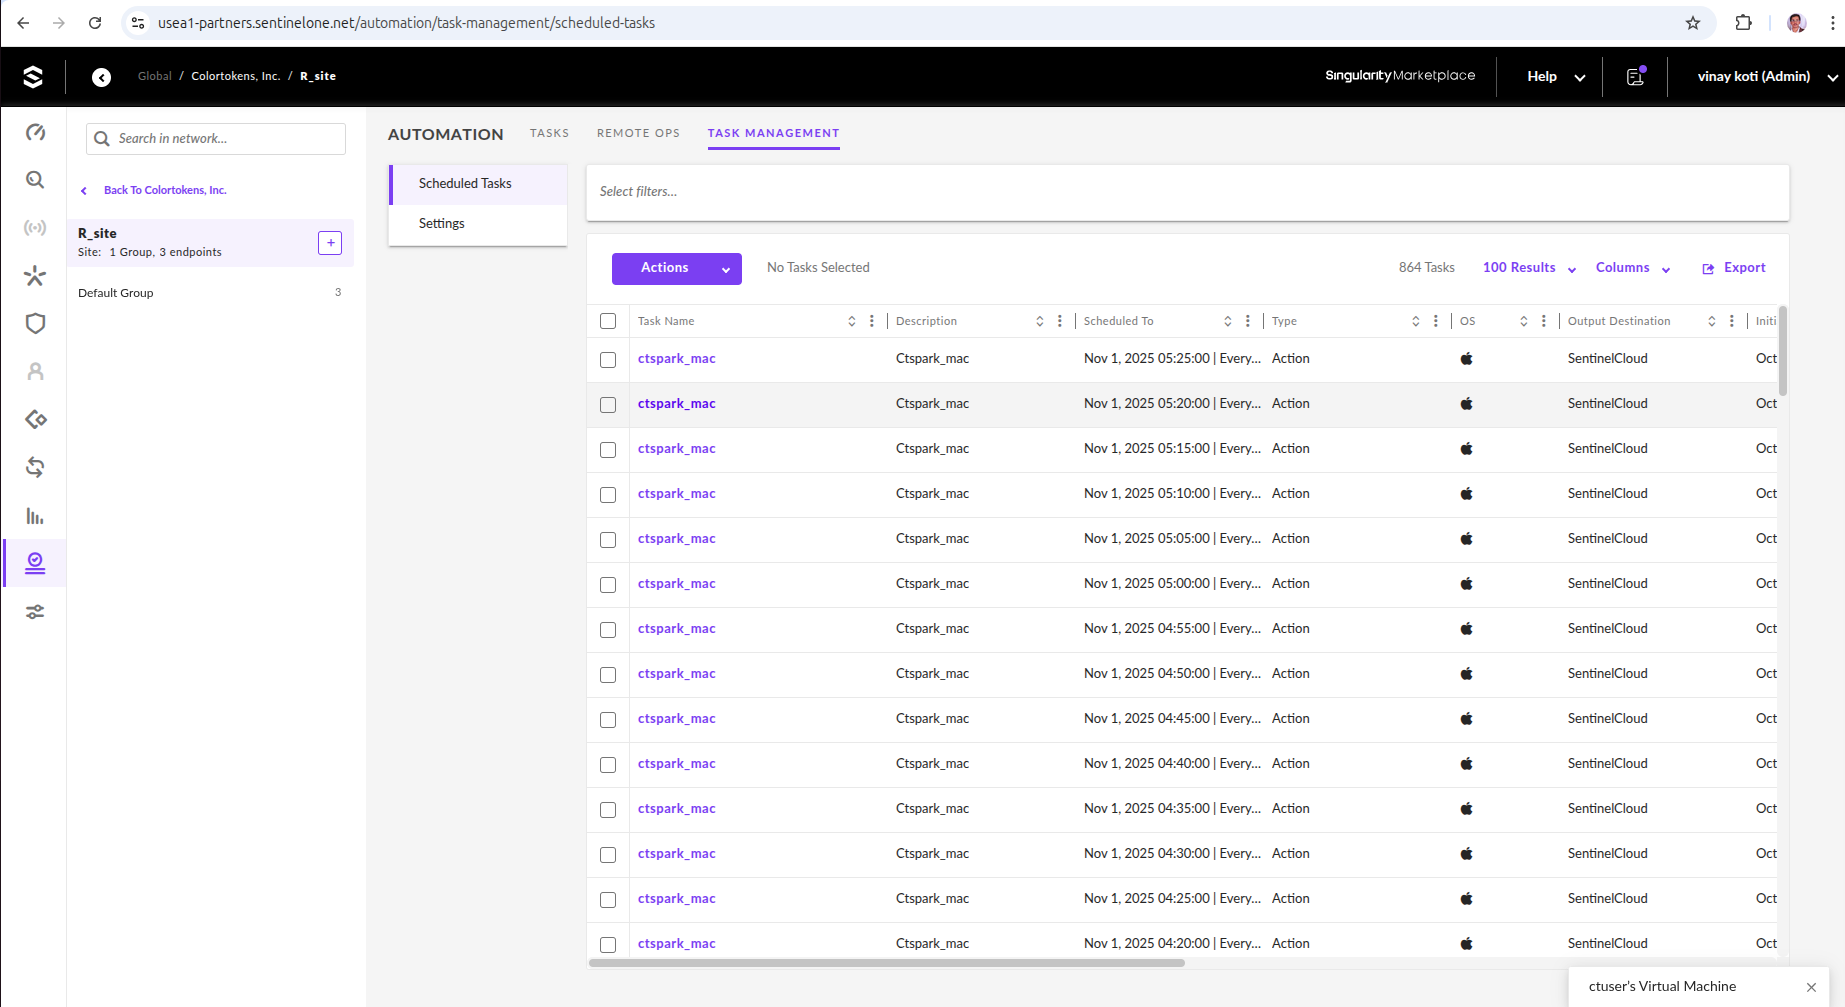
- Scheduled Tasks: Navigate to Automation > Task Management > Scheduled Tasks and verify tasks are created with correct intervals and group assignments
Once deployed, Spark will automatically enforce firewall policies on the selected endpoint groups at the configured interval.
If you enable or disable SentinelOne groups in EDR Groups > SentinelOne page, you will need to execute the deployment command again with updated group IDs. Click Setup Instructions on the Spark deployment page to get a fresh command with the correct group configuration.
Summary
This integration helps enhance your organization's security posture by enabling visibility and threat analysis across your network without the need for any additional agents or footprint. With Policy Enforcement through Spark deployment, you can extend microsegmentation capabilities to SentinelOne-managed endpoints seamlessly.