Manual (Portal-based)
Introduction
This guide walks you through onboarding the XShield Cloud Connector and Xcloud to your Azure environment by performing all setup steps manually in the Azure Portal. No script is used: you enable the Colortokens app in your tenant (once), then per subscription create a custom role, assign it to the Colortokens app, and connect in the Xshield platform.
Use this method when:
- Your change-management or compliance process requires manual, auditable steps in the Azure Portal
- You need to align with existing Azure RBAC and governance practices
- You prefer to perform setup in the Azure Portal instead of running the setup script
For a faster, script-based alternative that achieves the same result, see Script-based.
Note: This guide covers onboarding both the XShield Cloud Connector and Xcloud compliance scans, using a single Azure app registration.
Terminology: In this guide, Microsoft Entra ID (formerly Azure AD) refers to your identity and tenant directory. The Azure Portal may still show "Azure AD" in some places; they are the same service.
Who Does What: Tenant vs Subscription
Portal-based onboarding involves two levels of access:
| Who | What | When |
|---|---|---|
| Tenant-level admin (someone with admin rights in Microsoft Entra ID for your organization) | Enable the Colortokens Enterprise App for the entire tenant | Once per tenant: required before any subscription can use the Cloud Connector |
| Subscription Owner (or team with Owner/Contributor on a subscription) | Create the custom role, assign it to the Colortokens app and connect the subscription in Xshield | Per subscription: after the Enterprise App is enabled in the tenant |
Until the Colortokens Enterprise App is enabled at the tenant level, subscription owners cannot use the Cloud Connector for their subscriptions, even if they have Owner role on those subscriptions. If your organization has many teams, each with their own subscriptions, a central identity or IT admin must complete the tenant-level step first; then each team can onboard their subscriptions.
Note: Why there are two levels (tenant vs subscription) Azure separates identity (who can use an app in your organization) from resource access (what that app can do in a subscription). The Colortokens app must exist in your tenant’s identity directory (Entra ID) before any subscription can grant it access. That’s why Step 0 is done once by a tenant admin, and Steps 1–3 are done per subscription by subscription owners. Otherwise, subscription owners won’t see the Colortokens app in the role-assignment picker. :::
Prerequisites
Before you begin, ensure you have what you need for your role:
If you are doing Step 0 (Entra ID admin):
- Application Administrator (or Global Administrator / Cloud Application Administrator) in Microsoft Entra ID. You need this to grant admin consent for the tenant.
- Tenant ID. Find it in Microsoft Entra ID → Overview in the Azure Portal (you will use it in the admin consent URL).
If you are doing Steps 1–3 (subscription owner):
- Confirmation that Step 0 is done. The Colortokens Enterprise App must be enabled for your tenant before you can assign the custom role. If you don't see "Colortokens" when assigning the role in Step 2, ask your Entra ID team to complete Step 0.
- Owner or User Access Administrator on the subscription(s) you want to onboard. You need this to create the custom role and assign it.
- Tenant ID. Find it in the Azure Portal under Subscriptions → select your subscription → Overview. It appears in Essentials as Parent management group. Alternatively, ask your Entra ID admin. This is required for Step 3.
- Subscription ID(s). Find it in Subscriptions → select your subscription → Overview in the Azure Portal. You will need it when creating the role (Step 1) and when connecting in Xshield (Step 3).
- Active Xshield account with access to the management portal. You need this to complete the connection in Step 3.
Overview of Steps
Step 0 (tenant-level, once per tenant): Enable the Colortokens Enterprise App in Microsoft Entra ID so the app is available to the entire tenant.
Steps 1–3 (per subscription): Create the custom role (including storage scopes if needed), assign it to the Colortokens app, optionally confirm or narrow storage scope, and connect in Xshield. These can be done by subscription owners after Step 0 is complete.
- Step 0: Enable the Colortokens Enterprise App for the tenant (Entra ID).
- Step 1: Create a custom role in your subscription with the required permissions; add storage accounts to
assignableScopeswhere VNet flow logs are sent (recommended). - Step 2: Assign the custom role to the Colortokens service principal at the subscription scope.
- Step 3: Connect in Xshield by entering your Tenant ID and Subscription ID(s) and completing the onboarding flow.
Tip: If you are a subscription owner (and a different team handles Entra ID): confirm with your Entra ID team that the Colortokens Enterprise App has been enabled for your tenant (Step 0). Once that is done, you can go directly to Step 1: Create the custom role.
Step 0: Enable the Colortokens Enterprise App (Tenant-level)
Complete this step once per tenant so the Colortokens Enterprise app appears in your tenant and subscription owners can assign role to it.
What this app is for: Colortokens Enterprise is ColorTokens' micro-segmentation and risk readiness platform; the Cloud Connector discovers and monitors Azure resources in subscriptions where customers assign the custom role (Steps 1–2). Xcloud is ColorTokens' compliance scanning platform. Enabling the app in your tenant only makes it available for role assignment. It does not grant access to any subscription until a subscription owner assigns the custom role.
This step must be completed once per tenant by someone with at least Application Administrator in Microsoft Entra ID (Global Administrator or Cloud Application Administrator also work). Until this is done, no subscription in the tenant can use the XShield Cloud Connector, and subscription owners will not see the app when assigning role.
Info: Entra ID only shows an app in the "Assign access to" list when that app exists in your tenant. The admin consent URL creates the Enterprise Application (service principal) in your tenant so that, in later steps, subscription owners can assign the custom role to it. Without this, the app simply don't appear for role assignment in any subscription.
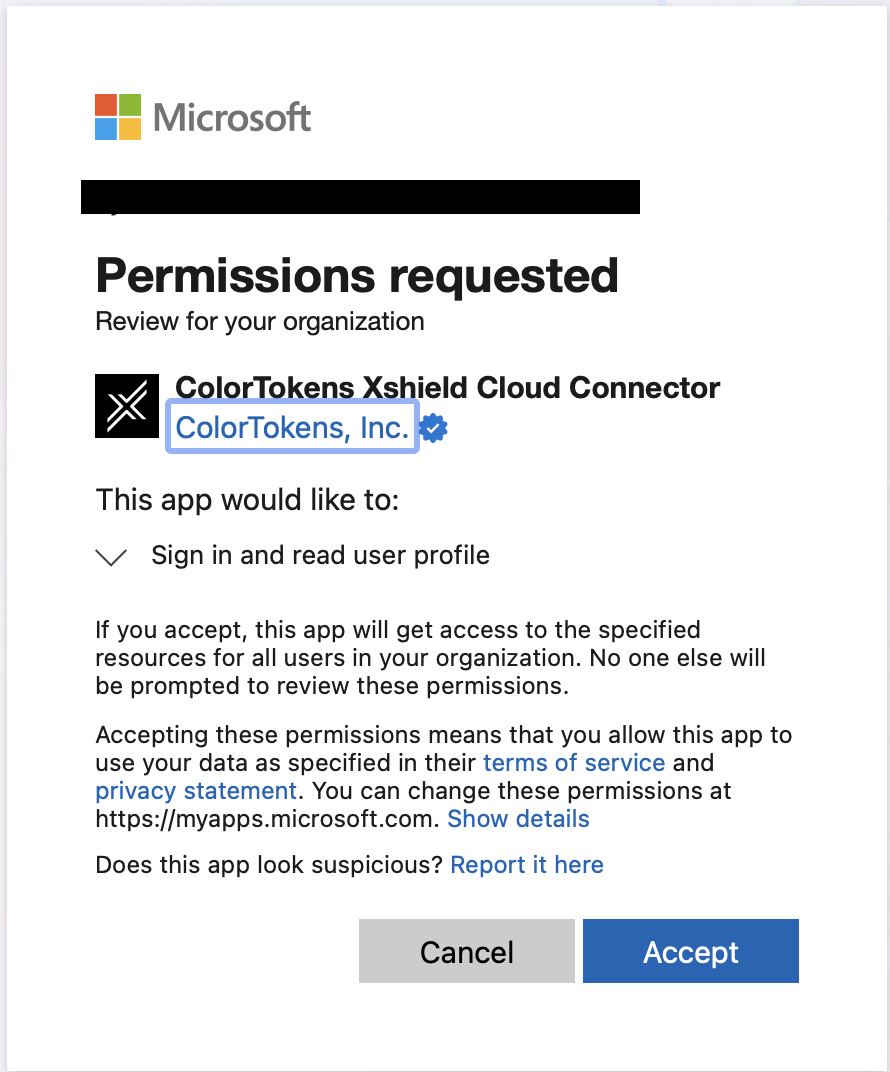
Open the consent URL in your browser to authorize the app, Azure will show the permission the app requests: Sign in and read user profile. This is the least-privilege permission Azure allows for admin consent and is required so Azure can verify that the user granting consent has the correct privileges (e.g. Application Administrator) for the tenant. The app does not get access to directory data or other resources; subscription-level access is granted separately by subscription owners in Step 1 and Step 2.
0.1 Enable the XShield Cloud Connector App
-
Build the admin consent URL using this format:
https://login.microsoftonline.com/<YOUR_TENANT_ID>/adminconsent?client_id=cdeea8f1-4774-4c32-a14e-e365099d83ce&redirect_uri=https://portal.azure.comReplace
<YOUR_TENANT_ID>with your Azure tenant ID. -
tenant admin should open this URL in a browser and signs in when prompted.
-
Azure verifies the user’s permissions and displays the app name and the permissions (Sign in and read user profile). Review and accept the consent.
- After consent, the Colortokens Enterprise Application appears in Microsoft Entra ID → Enterprise applications in your tenant. Subscription owners can then assign role to it.
If your organization uses approval workflows for adding enterprise apps, complete those as required before or after using the consent URL.
Info: After consenting to the app, the Colortokens Enterprise Application appears in Microsoft Entra ID → Enterprise applications in your tenant. Subscription owners can then assign role to it.
Tell subscription owners they can follow this guide from Step 1. They will need the Tenant ID for Step 3 (connecting in XShield and Xcloud). They can find it in Microsoft Entra ID → Overview in the Azure Portal, or you can share it with them.
Step 1: Create the Custom Role in Azure Portal
Why custom role: Azure’s built-in roles (e.g. Reader, Contributor) are broader than what XShield and Xcloud need. Custom roles let you grant only what’s required: for XShield, read access to Azure Resource Graph (to discover resources in the subscription) and read access to storage accounts (to read VNet flow logs for traffic visualization); for Xcloud, broad read access to run compliance scans. This follows least-privilege and makes audits clearer.
1.1 Open the subscription and IAM
- In the Azure Portal, go to Subscriptions and select the subscription where you want to onboard the Cloud Connector.
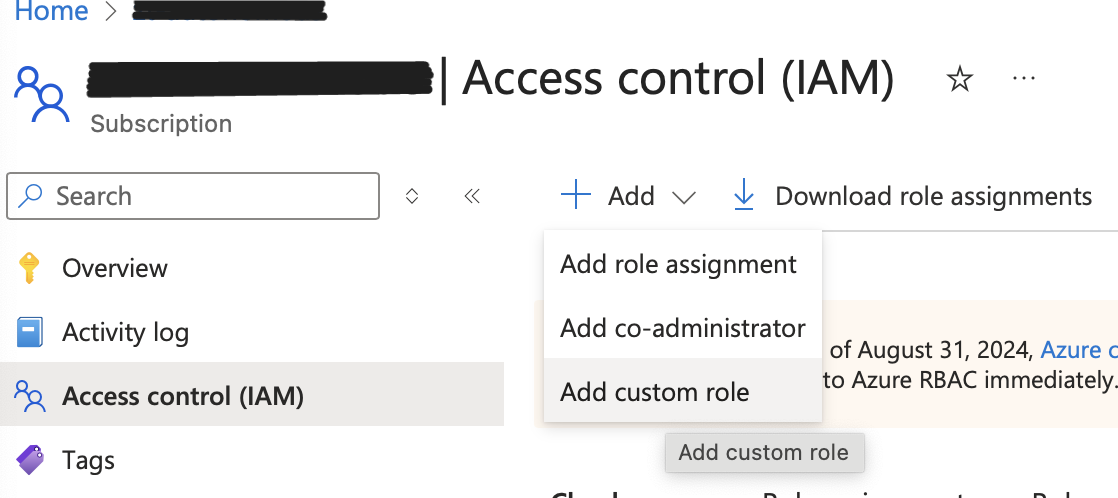
- In the left menu, select Access control (IAM).
- Select the Roles tab to see the list of roles.
- Click + Add → Add custom role.
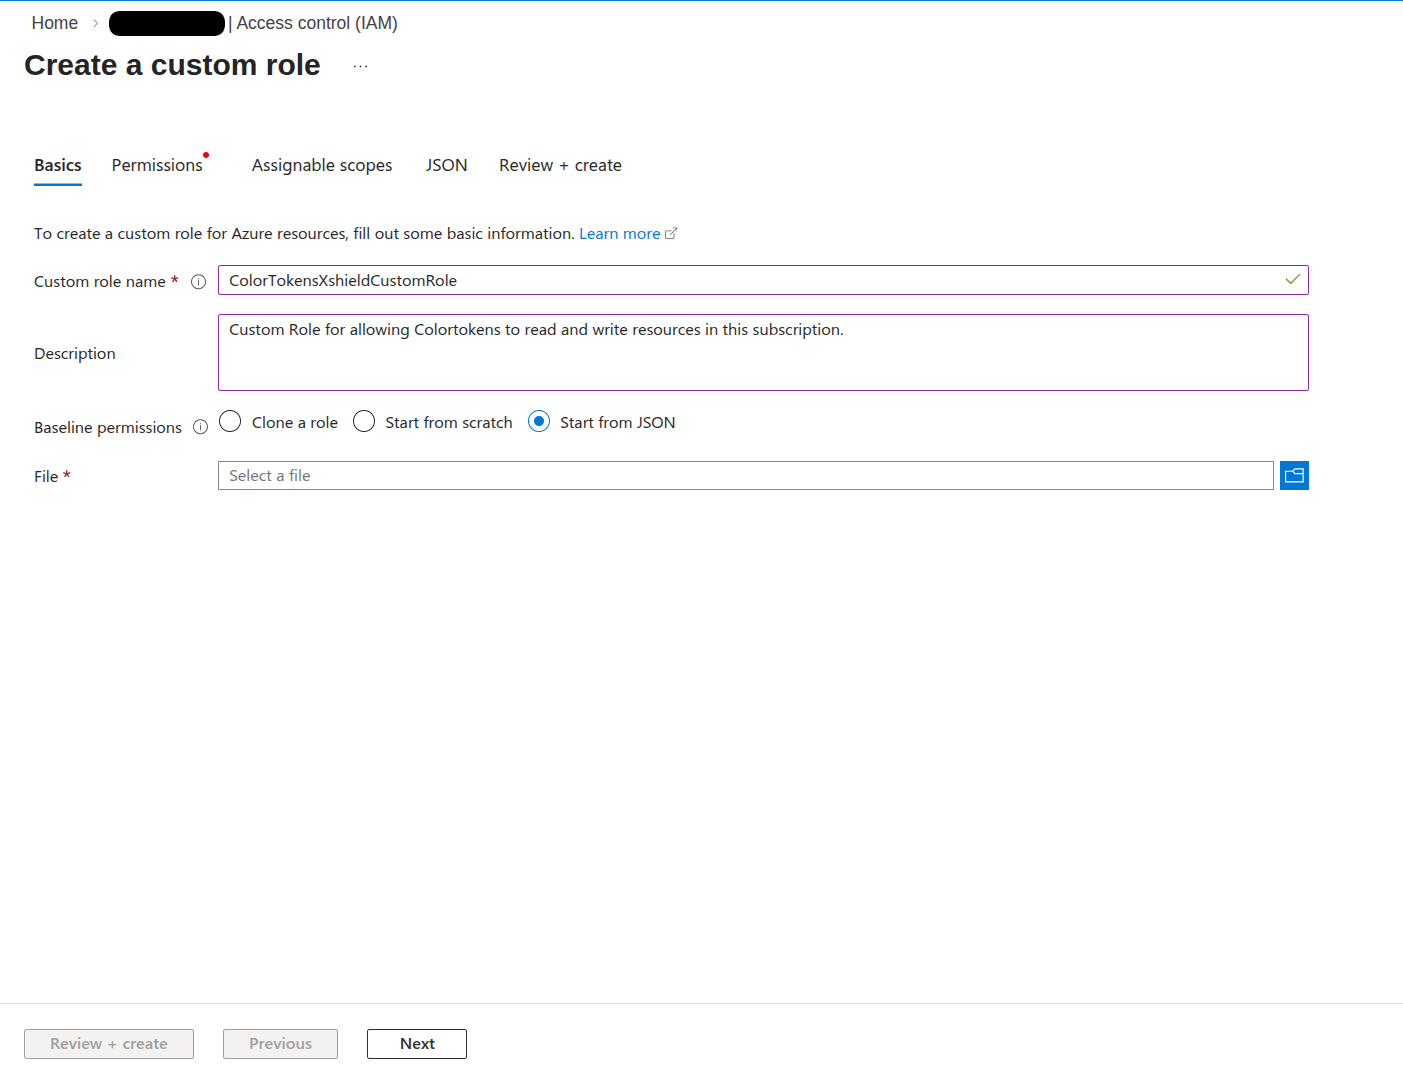
1.2 Create the Role from JSON
- In the Create a custom role experience, select Start from JSON.
-
Replace the default JSON with the XShield Role definition JSON by copying the JSON below, then replace the placeholders in
assignableScopeswith your subscription ID and, for storage where VNet flow logs are sent, your resource group and storage account name(s).{
"properties": {
"roleName": "ColorTokensXshieldCustomRole",
"description": "Custom role permission to allow ColorTokens to protect your system",
"assignableScopes": [
"/subscriptions/<YOUR_SUBSCRIPTION_ID>",
"/subscriptions/<YOUR_SUBSCRIPTION_ID>/resourceGroups/<RESOURCE_GROUP_NAME>/providers/Microsoft.Storage/storageAccounts/<STORAGE_ACCOUNT_NAME_1>",
"/subscriptions/<YOUR_SUBSCRIPTION_ID>/resourceGroups/<RESOURCE_GROUP_NAME>/providers/Microsoft.Storage/storageAccounts/<STORAGE_ACCOUNT_NAME_2>"
],
"permissions": [
{
"actions": [
"Microsoft.Resources/subscriptions/resourcegroups/read",
"Microsoft.Compute/virtualMachines/read",
"Microsoft.Compute/disks/read",
"Microsoft.Authorization/roleAssignments/read",
"Microsoft.Authorization/roleDefinitions/read",
"Microsoft.Compute/virtualMachineScaleSets/read",
"Microsoft.Compute/virtualMachineScaleSets/virtualMachines/read",
"Microsoft.Compute/virtualMachineScaleSets/virtualMachines/instanceView/read",
"Microsoft.Compute/virtualMachineScaleSets/virtualMachines/networkInterfaces/read",
"Microsoft.Compute/virtualMachineScaleSets/networkInterfaces/read",
"Microsoft.Compute/virtualMachineScaleSets/virtualMachines/networkInterfaces/ipConfigurations/read",
"Microsoft.Compute/virtualMachineScaleSets/virtualMachines/networkInterfaces/ipConfigurations/publicIPAddresses/read",
"Microsoft.Compute/virtualMachineScaleSets/publicIPAddresses/read",
"Microsoft.Network/virtualNetworks/read",
"Microsoft.Network/networkSecurityGroups/read",
"Microsoft.Network/networkSecurityGroups/securityRules/read",
"Microsoft.Network/publicIPAddresses/read",
"Microsoft.Network/networkInterfaces/read",
"Microsoft.Network/networkWatchers/read",
"Microsoft.Network/networkWatchers/flowLogs/read",
"Microsoft.Network/loadBalancers/read",
"Microsoft.Network/azureFirewalls/read",
"Microsoft.Network/natGateways/read",
"Microsoft.Network/applicationSecurityGroups/read",
"Microsoft.Network/virtualNetworks/subnets/read",
"Microsoft.Network/privateEndpoints/read",
"Microsoft.ContainerService/managedClusters/read",
"Microsoft.ContainerService/managedClusters/listClusterUserCredential/action",
"Microsoft.Network/privateDnsZones/read",
"Microsoft.Network/privateDnsZones/A/read",
"Microsoft.Web/sites/privateAccess/read",
"Microsoft.Web/sites/privateEndpointConnections/read",
"Microsoft.Web/sites/read",
"Microsoft.Web/sites/config/read",
"Microsoft.Web/sites/functions/read",
"Microsoft.Web/sites/config/list/action",
"Microsoft.Sql/servers/read",
"Microsoft.Sql/servers/databases/read",
"Microsoft.DBforPostgreSQL/flexibleServers/read",
"Microsoft.DBforMySQL/flexibleServers/read",
"Microsoft.DBforMySQL/servers/read",
"Microsoft.DocumentDB/databaseAccounts/read",
"Microsoft.Cache/redis/read",
"Microsoft.Synapse/workspaces/read",
"Microsoft.Batch/batchAccounts/read",
"Microsoft.Storage/storageAccounts/read",
"Microsoft.Storage/storageAccounts/blobServices/generateUserDelegationKey/action",
"Microsoft.Storage/storageAccounts/listKeys/action",
"Microsoft.Storage/storageAccounts/blobServices/containers/read",
"Microsoft.Resources/subscriptions/resourcegroups/write",
"Microsoft.Compute/virtualMachines/write",
"Microsoft.Compute/virtualMachineScaleSets/write",
"Microsoft.Compute/virtualMachineScaleSets/manualupgrade/action",
"Microsoft.Network/loadBalancers/backendAddressPools/join/action",
"Microsoft.Network/networkSecurityGroups/write",
"Microsoft.Network/networkSecurityGroups/securityRules/write",
"Microsoft.Network/applicationSecurityGroups/write",
"Microsoft.Network/virtualNetworks/subnets/write",
"Microsoft.Network/virtualNetworks/write",
"Microsoft.Network/networkInterfaces/write",
"Microsoft.Network/networkSecurityGroups/join/action",
"Microsoft.Network/virtualNetworks/subnets/join/action",
"Microsoft.Network/publicIPAddresses/join/action",
"Microsoft.Network/applicationSecurityGroups/joinIpConfiguration/action",
"Microsoft.Network/natGateways/join/action",
"Microsoft.Network/networkSecurityGroups/securityRules/delete",
"Microsoft.Sql/servers/auditingSettings/read",
"Microsoft.Sql/servers/firewallRules/read",
"Microsoft.Sql/servers/databases/transparentDataEncryption/read",
"Microsoft.Sql/servers/securityAlertPolicies/read",
"Microsoft.Sql/servers/vulnerabilityAssessments/read",
"Microsoft.Sql/servers/encryptionProtector/read",
"Microsoft.Sql/servers/administrators/read",
"Microsoft.Compute/virtualMachines/extensions/read",
"Microsoft.DBforPostgreSQL/servers/read",
"Microsoft.DBforPostgreSQL/servers/configurations/read",
"Microsoft.DBforMySQL/flexibleServers/configurations/read",
"Microsoft.Insights/diagnosticSettings/read",
"Microsoft.Insights/logprofiles/read",
"Microsoft.Insights/activityLogAlerts/read",
"Microsoft.Storage/storageAccounts/blobServices/read",
"Microsoft.Storage/storageAccounts/tableServices/read",
"Microsoft.KeyVault/vaults/read",
"Microsoft.KeyVault/vaults/keys/read",
"Microsoft.KeyVault/vaults/secrets/read",
"Microsoft.Resources/subscriptions/resources/read"
],
"notActions": [],
"dataActions": [
"Microsoft.Storage/storageAccounts/blobServices/containers/blobs/read"
],
"notDataActions": []
}
]
}
} -
In the JSON, update
assignableScopeswith the correct IDs:- Replace
<YOUR_SUBSCRIPTION_ID>with the Subscription ID of the subscription you selected (from Subscriptions → your subscription → Overview). - Recommended: Add one scope per storage account where VNet flow logs are sent. Replace
<RESOURCE_GROUP_NAME>,<STORAGE_ACCOUNT_NAME_1>,<STORAGE_ACCOUNT_NAME_2>(and add or remove lines as needed) with the actual resource group and storage account names. This lets you scope the role to those storage accounts and follows least privilege. If you use only the subscription scope, you can remove the storage-account lines fromassignableScopes.
- Replace
-
Click Review + create, then Create.
Info: VNet flow logs in Azure are stored in storage accounts. Adding those storage accounts to assignableScopes (with the correct subscription ID, resource group name, and storage account name) ensures the role is valid at those scopes. You can then assign the role at the subscription level for resource discovery and, if your policy requires it, at specific storage account scopes for flow log read access. Doing this when you create the role avoids having to edit the role definition later.
1.3 Confirm the role
After creation, the custom role ColorTokensXshieldCustomRole appear under Access control (IAM) → Roles for that subscription. You will assign this role to the service principal in Step 2.
Step 2: Assign the Custom Role to the Service Principal
Assign the role you created in Step 1 to the Colortokens app so it can access resources in this subscription for XShield and Xcloud.
Why assign at the subscription scope: The role you created in Step 1 define what permissions exist; the role assignments link that role to the Colortokens app for a specific subscription. The Cloud Connector and Xcloud can only access resources in subscriptions where you make this assignment. Other subscriptions in the same tenant stay out of scope until you assign the role there too.
2.1 Open the subscription and add a role assignment
- In the Azure Portal, go to Subscriptions and select the same subscription where you created the custom role in Step 1.
- In the left menu, select Access control (IAM).
- Click + Add → Add role assignment.

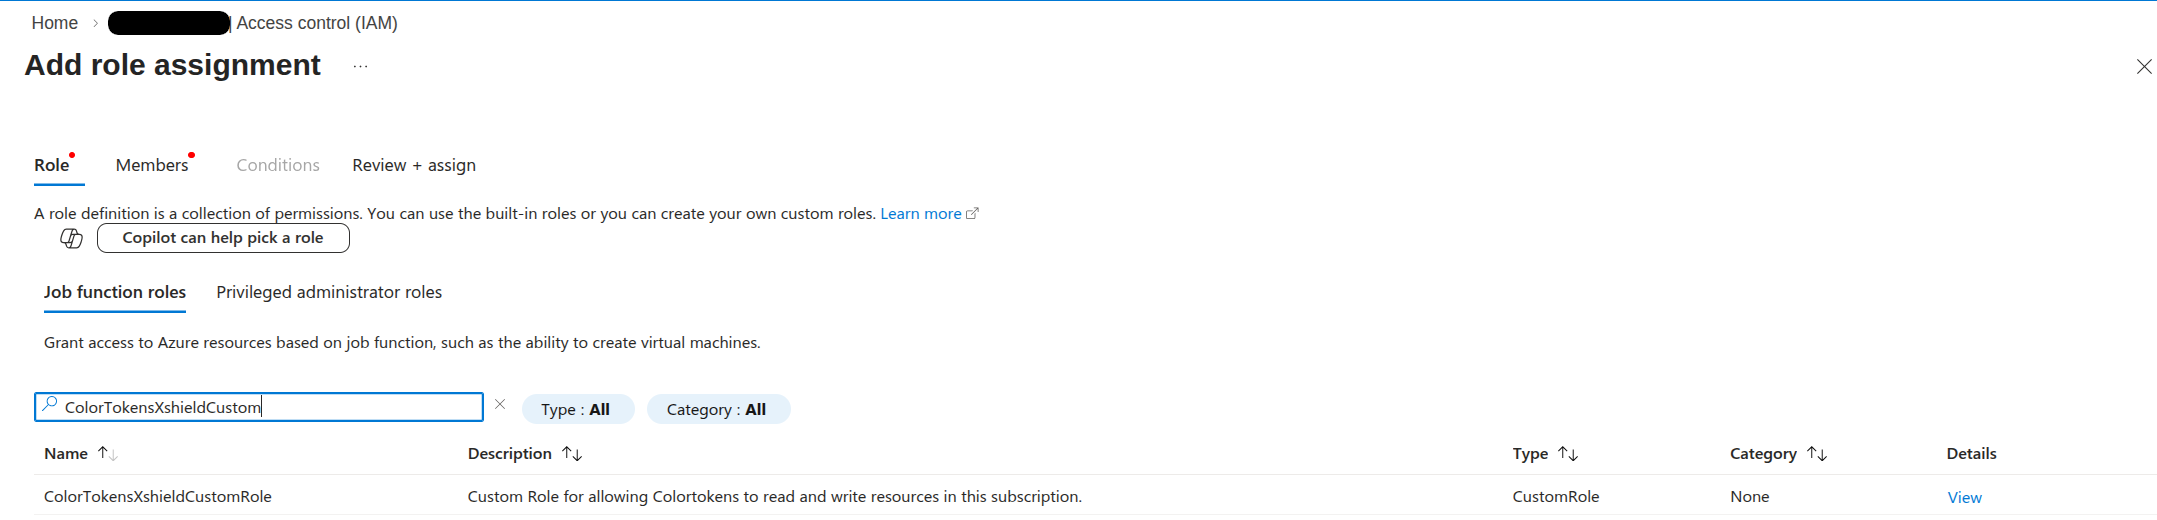
2.2 Select the role
- On the Role tab, search for ColorTokensXshieldCustomRole (or the exact name you used when creating the custom role in Step 1).
- Select the ColorTokensXshieldCustomRole role from the list.
- Click Next.
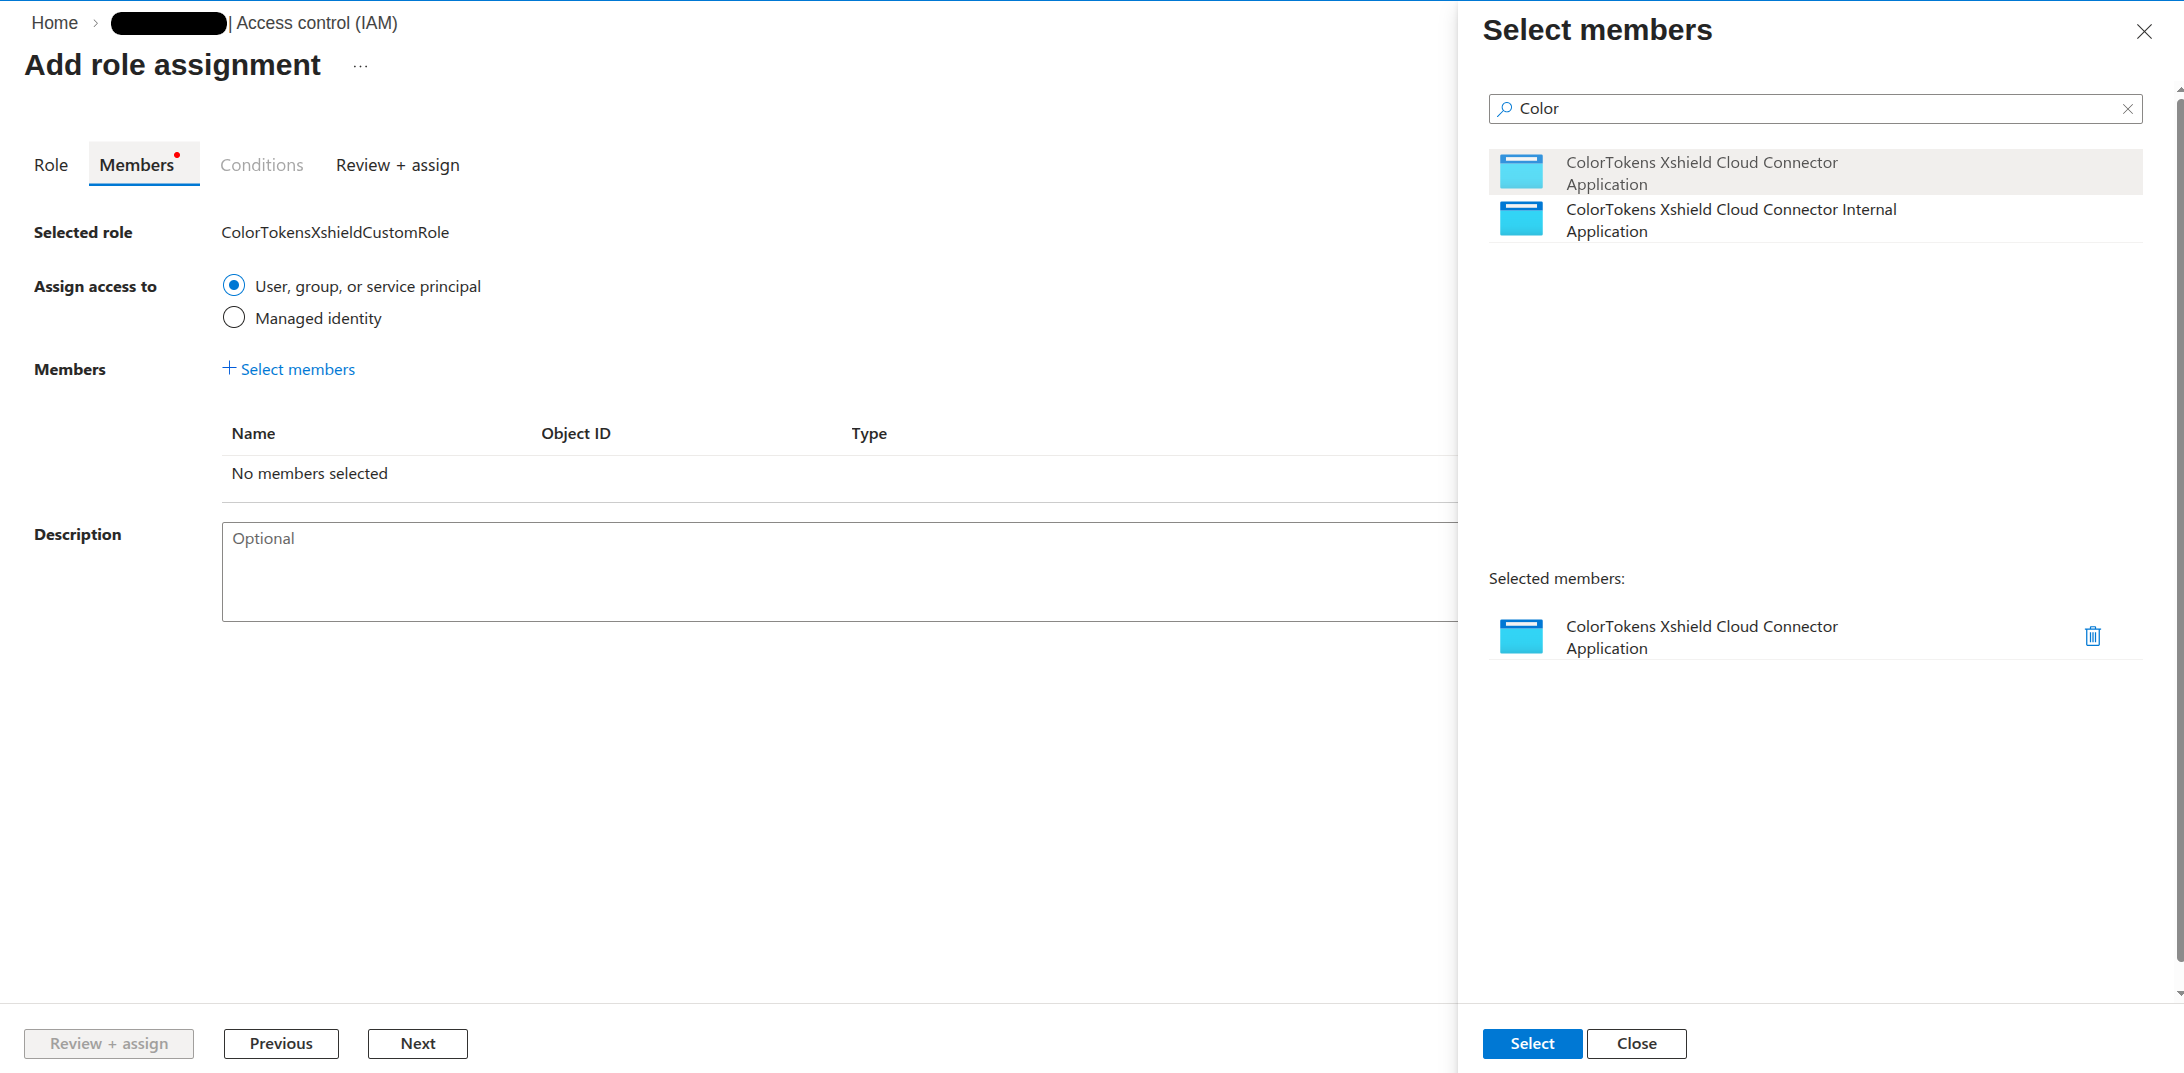
2.3 Select the member (Colortokens app)
- On the Members tab, click + Select members.
- In the Select pane, choose User, group, or service principal.
- Search for Colortokens (or the Colortokens XShield Cloud Connector Enterprise Application name as it appears in your tenant).
- Select the Colortokens (XShield Cloud Connector) application. If you don’t see it, ensure Step 0 (admin consent for XShield) was completed in your tenant.
- Click Select, then Next.
2.4 Review and assign
- On the Review + assign tab, confirm the Role and Members are correct.
- Click Review + assign.

2.5 Confirm the assignment
- After the assignment is created, you’ll see a confirmation. The Colortokens apps now have the custom role on this subscription.
- Repeat Step 2 for any other subscriptions you want to onboard (each subscription needs its own role assignment).
After this step, proceed to Step 3 to connect the subscription(s) in Xshield.
Step 3: Connect in XShield and Xcloud
With the roles created and assigned (Steps 1–2), connect your subscription(s) in XShield Cloud Connector page.
Why we ask for Tenant ID and Subscription ID(s): XShield and Xcloud use the Tenant ID to authenticate to your Azure tenant and the Subscription ID(s) to know which subscriptions to sync. You only enter subscriptions where you've already created and assigned the custom roles (Steps 1–2); the platforms will then use the app's assigned access to discover resources for those subscriptions.
Where to get the IDs: Tenant ID is in Microsoft Entra ID → Overview in the Azure Portal (or ask your Entra ID admin). Subscription ID is in Subscriptions → select your subscription → Overview. The overview page has Tenant ID also under Essentials as Parent management group.
- Log in to the XShield management portal and go to Sensors → Cloud Connector.
- Start the Azure onboarding flow and select the Manual (Portal-based) option.
- You can skip step 1 as you have already created the custom role and assigned it to the Colortokens app.
- In Step 2, Enter your Tenant ID in the field provided.
- Enter one or more Subscription IDs (the subscriptions where you created and assigned the custom role in Steps 1–2). Add multiple IDs if you are onboarding more than one subscription.
- Review the summary, then click Connect to complete onboarding. XShield will verify access to the subscription(s) and start syncing resources.
- When onboarding completes, your subscription name(s) appear on the Cloud Connector dashboard. Resources from the subscription(s) will begin appearing in the platform.
Next Steps
After completing the XShield Cloud Connector onboarding:
- Your Azure resources will begin appearing in the XShield platform.
- Network traffic analysis will be available if storage access was enabled.
- Compliance scans will be available in Xcloud.
- You can configure security policies.
Reference: Permissions for the custom role
Use the table below when building the roles via Terraform, Bicep, or other IaC. The custom roles you create in Step 1 must have the following permissions: grant these actions and dataActions on the role definition. Set assignableScopes to the subscription (required) and, for scoped storage access (e.g. VNet flow logs), optionally add the resource ID of each storage account: /subscriptions/<SUBSCRIPTION_ID>/resourceGroups/<RG_NAME>/providers/Microsoft.Storage/storageAccounts/<ACCOUNT_NAME>. For Xcloud, set assignableScopes to only the subscription.
| Resource provider | Actions | Data actions | Scope |
|---|---|---|---|
| Microsoft.Resources | Microsoft.Resources/subscriptions/resourcegroups/read, Microsoft.Resources/subscriptions/resourcegroups/write, Microsoft.Resources/subscriptions/resources/read | - | Subscription (or as needed) |
| Microsoft.Compute | Microsoft.Compute/virtualMachines/read, Microsoft.Compute/disks/read, Microsoft.Compute/virtualMachines/write, Microsoft.Compute/virtualMachines/extensions/read, Microsoft.Compute/virtualMachineScaleSets/read, Microsoft.Compute/virtualMachineScaleSets/virtualMachines/read, Microsoft.Compute/virtualMachineScaleSets/virtualMachines/instanceView/read, Microsoft.Compute/virtualMachineScaleSets/virtualMachines/networkInterfaces/read, Microsoft.Compute/virtualMachineScaleSets/networkInterfaces/read, Microsoft.Compute/virtualMachineScaleSets/virtualMachines/networkInterfaces/ipConfigurations/read, Microsoft.Compute/virtualMachineScaleSets/virtualMachines/networkInterfaces/ipConfigurations/publicIPAddresses/read, Microsoft.Compute/virtualMachineScaleSets/publicIPAddresses/read, Microsoft.Compute/virtualMachineScaleSets/write, Microsoft.Compute/virtualMachineScaleSets/manualupgrade/action | - | Subscription (or as needed) |
| Microsoft.Authorization | Microsoft.Authorization/roleAssignments/read, Microsoft.Authorization/roleDefinitions/read | - | Subscription (or as needed) |
| Microsoft.Network (read) | Microsoft.Network/virtualNetworks/read, Microsoft.Network/networkSecurityGroups/read, Microsoft.Network/networkSecurityGroups/securityRules/read, Microsoft.Network/publicIPAddresses/read, Microsoft.Network/networkInterfaces/read, Microsoft.Network/networkWatchers/read, Microsoft.Network/networkWatchers/flowLogs/read, Microsoft.Network/loadBalancers/read, Microsoft.Network/azureFirewalls/read, Microsoft.Network/natGateways/read, Microsoft.Network/applicationSecurityGroups/read, Microsoft.Network/virtualNetworks/subnets/read, Microsoft.Network/privateEndpoints/read, Microsoft.Network/privateDnsZones/read, Microsoft.Network/privateDnsZones/A/read | - | Subscription (or as needed) |
| Microsoft.Network (write/join/delete) | Microsoft.Network/loadBalancers/backendAddressPools/join/action, Microsoft.Network/networkSecurityGroups/write, Microsoft.Network/networkSecurityGroups/securityRules/write, Microsoft.Network/networkSecurityGroups/securityRules/delete, Microsoft.Network/networkSecurityGroups/join/action, Microsoft.Network/applicationSecurityGroups/write, Microsoft.Network/virtualNetworks/subnets/write, Microsoft.Network/virtualNetworks/write, Microsoft.Network/networkInterfaces/write, Microsoft.Network/virtualNetworks/subnets/join/action, Microsoft.Network/publicIPAddresses/join/action, Microsoft.Network/applicationSecurityGroups/joinIpConfiguration/action, Microsoft.Network/natGateways/join/action | - | Subscription (or as needed) |
| Microsoft.ContainerService | Microsoft.ContainerService/managedClusters/read, Microsoft.ContainerService/managedClusters/listClusterUserCredential/action | - | Subscription (or as needed) |
| Microsoft.Web | Microsoft.Web/sites/privateAccess/read, Microsoft.Web/sites/privateEndpointConnections/read, Microsoft.Web/sites/read, Microsoft.Web/sites/config/read, Microsoft.Web/sites/functions/read, Microsoft.Web/sites/config/list/action | - | Subscription (or as needed) |
| Microsoft.Sql | Microsoft.Sql/servers/read, Microsoft.Sql/servers/databases/read, Microsoft.Sql/servers/auditingSettings/read, Microsoft.Sql/servers/firewallRules/read, Microsoft.Sql/servers/databases/transparentDataEncryption/read, Microsoft.Sql/servers/securityAlertPolicies/read, Microsoft.Sql/servers/vulnerabilityAssessments/read, Microsoft.Sql/servers/encryptionProtector/read, Microsoft.Sql/servers/administrators/read | - | Subscription (or as needed) |
| Microsoft.DBforPostgreSQL | Microsoft.DBforPostgreSQL/flexibleServers/read, Microsoft.DBforPostgreSQL/servers/read, Microsoft.DBforPostgreSQL/servers/configurations/read | - | Subscription (or as needed) |
| Microsoft.DBforMySQL | Microsoft.DBforMySQL/flexibleServers/read, Microsoft.DBforMySQL/flexibleServers/configurations/read, Microsoft.DBforMySQL/servers/read | - | Subscription (or as needed) |
| Microsoft.DocumentDB | Microsoft.DocumentDB/databaseAccounts/read | - | Subscription (or as needed) |
| Microsoft.Cache | Microsoft.Cache/redis/read | - | Subscription (or as needed) |
| Microsoft.Synapse | Microsoft.Synapse/workspaces/read | - | Subscription (or as needed) |
| Microsoft.Batch | Microsoft.Batch/batchAccounts/read | - | Subscription (or as needed) |
| Microsoft.Storage | Microsoft.Storage/storageAccounts/read, Microsoft.Storage/storageAccounts/blobServices/generateUserDelegationKey/action, Microsoft.Storage/storageAccounts/listKeys/action, Microsoft.Storage/storageAccounts/blobServices/containers/read, Microsoft.Storage/storageAccounts/blobServices/read, Microsoft.Storage/storageAccounts/tableServices/read | Microsoft.Storage/storageAccounts/blobServices/containers/blobs/read | Subscription (or as needed) |
| Microsoft.Insights | Microsoft.Insights/diagnosticSettings/read, Microsoft.Insights/logprofiles/read, Microsoft.Insights/activityLogAlerts/read | - | Subscription (or as needed) |
| Microsoft.KeyVault | Microsoft.KeyVault/vaults/read, Microsoft.KeyVault/vaults/keys/read, Microsoft.KeyVault/vaults/secrets/read | - | Subscription (or as needed) |
Info: The role definition must have
assignableScopesincluding at least the subscription. For subscription-level access: use only the subscription scope (e.g."/subscriptions/<YOUR_SUBSCRIPTION_ID>"); assign the role at the subscription in Step 2. For scoped storage access (e.g. VNet flow logs): add the resource ID of each storage account toassignableScopes(see intro above); you can then assign the role at the subscription (Step 2) or at each storage account scope for least privilege. SetassignableScopesin the JSON when creating the role; see Step 1.2 and Step 3.
Removing Access (Decommissioning)
To remove Cloud Connector access when using manual (portal-based) setup, remove the role assignment and optionally the custom role in the Azure Portal. For full steps, see Cloud Connector decommissioning.
After removing the role assignment and custom role, you can remove the subscription from the Xcloud page as well by going to the Xcloud portal and deleting the app from the cloud accounts page.