On-Premise PoC Deployment Guide – Xshield
⚠️ Important: This guide is intended only for Proof-of-Concept (PoC) deployments of Xshield on a single VM. It is not suitable for production use.
Important Notices
- This is a single-VM Xshield deployment with no redundancy.
- Customer is responsible for any data backup requirements.
- The PoC supports securing up to 15 assets only.
- Intended strictly for evaluation of the Xshield platform in on-prem environments.
- Authentication is not provided out of the box as part of the platform deployment. Customers are required to integrate their own Identity Provider (IdP) (SAML2.0 or OAuth2.0) after the platform is deployed in order to enable user authentication.
Pre-requisites
- Virtual Machine Requirements:
- 8 vCPU
- 32 GB RAM
- 256 GB Disk
Deployment Steps
1. Create the VM
Deploy the OVA (provided by ColorTokens) with the minimum specs listed above
2. (Optional) Configure Network
🛑 Skip this step if your VM already has an IP address configured
Manually configure static IP, DNS, and gateway:
cd $HOME/onprem-infrastructure/single-node
bash setup-static-ip.sh
3. SSH Into the VM
Default credentials:
Username: ctuser
Password: colors321
4. (Optional) Alert notifications SMTP config
If alert notifications feature is to be demonstrated, please follow the instructions
- Get the SMTP details from the customer
- SMTP server
- SMTP sender email
- SMTP port
- SMTP sender password
- Open the platforms.env file
vi ~/onprem-infrastructure/single-node/platform-variables.env - Press "i" to edit the file. Fill in the SMTP details in the SMTP credentials section present in the file
# SNMP credentials
SENDER_SERVER=""
SENDER_PORT=""
SENDER_EMAIL=""
SENDER_PASSWORD="" - Save the file. Press escape >> type ":wq" >> press enter
5. (Optional) Enable AI Navigator
⚠️ OVA with AI Navigator must be used for this feature
⚠️ To enable AI navigator in single-node POC cluster a valid paid OpenAI API key is required. The free API key would be insufficient as it would be rate-limited.
Run the commands to set the AI Navigator parameters. Replace "THE_API_KEY" with a valid OpenAI API Key.
cd $HOME/onprem-infrastructure/single-node
sed -i 's/NAVIGATOR=false/NAVIGATOR=true/g' platform-variables.env
sed -i 's/OPENAI_API_KEY=""/OPENAI_API_KEY="THE_API_KEY"/g' platform-variables.env
6. Deployment Options
6.1 IP-Based Deployment (HTTP) – Default
⚠️ Please follow Gatekeeper on-prem POC guide if Gatekeeper is involved in the PoC
The platform is accessible via the VM's IP over HTTP.
cd $HOME/onprem-infrastructure/single-node

# Platform setup
./deploy.sh --poc
6.2 Domain-Based Deployment (HTTP or HTTPS)
You may deploy Xshield on:
6.2.1 Using default colortokenspoc domain (HTTPS):
cd $HOME/onprem-infrastructure/single-node

# Domain setup
./deploy.sh --domain
- Leave the the field blank to use the default domain
colortokenspoc.com
- Enter a subdomain (optional) or leave blank to generate a random subdomain

- Check with customer whether the VM has internet access
- If yes, enter Yes, the script will configure the DNS automatically in Cloudflare DNS server
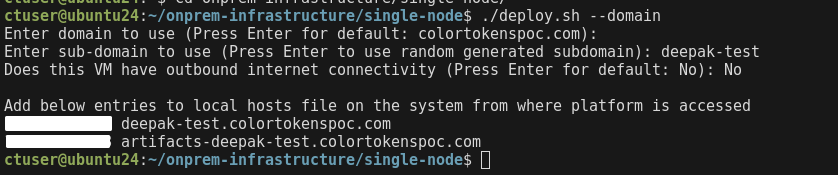
- If no, enter No. Please follow the instructions on the CLI to configure local DNS on the machines
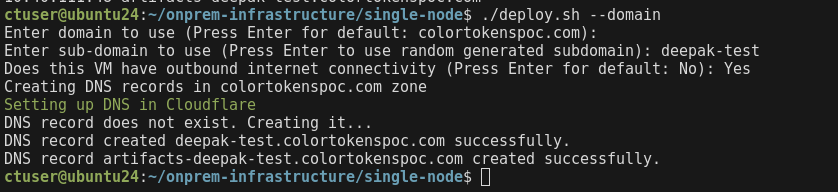
- If yes, enter Yes, the script will configure the DNS automatically in Cloudflare DNS server
- Deploy the platform
# Platform setup
./deploy.sh --poc
6.2.2 Using custom domain
Refer section 6.2.2.1 HTTP (if TLS certs are unavailable) to deploy over HTTP
Refer section 6.2.2.2 HTTPS (requires TLS certs) to deploy over HTTPS
6.2.2.1 HTTP (if TLS certs are unavailable)
cd $HOME/onprem-infrastructure/single-node

# Domain setup
./deploy.sh --domain
- Enter the domain to be used for the platform. Add the domains displayed on the CLI to a DNS server or local DNS on the machines that require access to the platform.

- Enter HTTP to deploy the cluster on HTTP

- Deploy the platform
# Platform setup
./deploy.sh --poc
6.2.2.2 HTTPS (requires TLS certs)
Prerequisite
To deploy the platform using a custom domain over HTTPS, the customer should provide a valid TLS certificate and corresponding private key
-
A full certificate chain which covers the following domains. Name it as
tls.crtand place it in/home/ctuser/on the Xshield VM- colortokens.custom-domain
- artifacts-colortokens.custom-domain
-
The private key corresponding to the certificate. Name it as
tls.keyand place it in/home/ctuser/on the Xshield VM
cd $HOME/onprem-infrastructure/single-node

# Domain setup
./deploy.sh --domain
- Enter the domain to be used for the platform. Add the domains displayed on the CLI to a DNS server or local DNS on the machines that require access to the platform.
- Enter HTTPS to deploy the platform on HTTPS

- Provide the path where the
tls.crtandtls.keyare stored
- Deploy the platform
# Platform setup
./deploy.sh --poc
7. Access the Platform
After deployment completes, an invite link is printed and also saved at:
/home/ctuser/tenant_invite_link.txt
Use this link in a browser to access the Xshield platform. No authentication password is required by default.
8. Enable feature flags
⚠️ This step MUST be done only after accepting the invite link and logging into the platform. This is a pre-requisite before enabling feature flags
cd $HOME/onprem-infrastructure/single-node

./deploy.sh --feature-flags
⚠️ AI Navigator: (applicable only when NAVIGATOR is set to true in platform-variables.env as part of step 5. One of the feature flags is for AI Navigator and the above step must be completed for navigator to show up on the platform UI. (Navigator is available only in the OVA with AI Navigator)
Reload the UI, in browser, for features to show up in platform
Notes:
-
Xshield agent installation
If platform is configured with custom TLS certificates signed by an internal CA, make sure to import the root CA into every VM where the agent will be installed. Failure to do so will result in TLS verification errors.
-
Container security agent installation
If PoC involves deploying container segmentation please follow the instructions in below section
Container security agent installation (expand)
Non-airgapped environments
If the target environment has internet access we can follow the instructions in the portal to install container agents.
Air-gapped environments
The images required for container security are preloaded in the single node OVA. Follow the steps to install the container agents on the target cluster
Prerequisites
- There should be port 22 access from the single node VM to the bastion VM that has access to the target Kubernetes cluster
- An OCI registry to upload the container security images
Steps
- Copy the contsec helm chart package, located at
/home/ctuser/contsec-images/helm-charts/ct-contsec-<chart version>.tgz, to the bastion that has access to the target Kubernetes cluster. For eg. 10.40.111.126 is the system that has access to the target kubernetes cluster
scp /home/ctuser/contsec-images/helm-charts/ct-contsec-24.9.2.tgz ctuser@10.40.111.126:/home/user/
- Upload the contsec container images to the OCI registry
- Tag the images to target registry. In the sample below "registry.colortokens.com/container-agent/" is the target OCI registry
docker tag colortokenspublic.azurecr.io/ct-policy:24.9.2 registry.colortokens.com/container-agent/ct-policy:24.9.2
docker tag colortokenspublic.azurecr.io/ct-collector:24.9.2 registry.colortokens.com/container-agent/ct-collector:24.9.2
docker tag colortokenspublic.azurecr.io/openpolicyagent/opa:0.63.0-istio-4-rootless registry.colortokens.com/container-agent/openpolicyagent/opa:0.63.0-istio-4-rootless
- Push images to the OCI registry
docker push registry.colortokens.com/container-agent/openpolicyagent/opa:0.63.0-istio-4-rootless
docker push registry.colortokens.com/container-agent/ct-collector:24.9.2
docker push registry.colortokens.com/container-agent/ct-policy:24.9.2
- Deploy container security on target cluster
- Install istio as prerequisite following the instructions from the install page in portal
- You may choose to download install istio via internet or any other means. If istio images are required it is present in
/home/ctuser/contsec-images/istio-imagesand the istio helm chart is present in/home/ctuser/contsec-images/helm-charts/(Colortokens does not recommend any istio version, the version packages are the latest at the time of creation of the OVA) - Follow the instructions in the install page to install ct-contsec helm chart on to the target cluster. While installing enable "User Local registry" and provide the path to respository where ct-policy and ct-collector are hosted. Also change the installation path to local tgz file
Example:
helm -n ct-system install ct-contsec ct-contsec-24.9.2.tgz --version 24.9.2 --set global.colortokensDomainSuffix=https://<platform_domain> --set global.clusterIdentifier=<cluster_id> --set global.colortokensAuthKey=<auth_key> --set global.service.classicMode="false" --set global.registryAccount=registry.colortokens.com/container-agent
Troubleshooting
Run the below script to check the cluster/services health if experiencing any issues
cd $HOME/onprem-infrastructure/single-node
bash status.sh
Known Issues
Cluster Issues
During deployment, ./deploy.sh --poc script, a failure with the following error indicates a faulty cluster:
ctuser@localhost:~/onprem-infrastructure/single-node$ ./deploy.sh --poc

Setting up..
waiting for cluster configuration..
Job for k3s.service failed because the control process exited with error code.
See "systemctl status k3s.service" and "journalctl -xeu k3s.service" for details.
ERROR: Cluster is inaccessible. Please verify k3s service.
See 'systemctl status k3s.service' and 'journalctl -xeu k3s.service' for details.
- Inspect the K3s or RKE2 service status using:
- Ubuntu VM:
sudo systemctl status k3s - RHEL VM:
sudo systemctl status rke2-server
- Ubuntu VM:
- Review service logs for detailed errors using:
- Ubuntu VM:
sudo journalctl -xeu k3s - RHEL VM:
sudo journalctl -xeu rke2-server
- Ubuntu VM:
These logs provide insights into the root cause of the cluster failure. Address the issue based on the specific errors reported.
If the logs shows the below error:
localhost k3s[741306]: level=fatal msg="no default routes found in \"/proc/net/route\" or \"/proc/net/ipv6_route\""
Run ip route show to check the routing table. If there is NO default route configured then cluster will not work as expected. Rerun bash setup-static-ip.sh with the valid gateway IP address.
Invite link not generated
If the invite link did not get generated during ./deploy.sh --poc step, run the below command to re-generate the link
./deploy.sh --invite
SSL validation errors
When an SSL certificate validation fails, the following issues will occur:
- The platform URL displays the site as "Not Secure" on the browser
- Agent registration fails with an SSL certificate validation error.
This issue is often caused by a missing root certificate on the system.
If you are using *.colortokenspoc.com, note that SSL.com is the Certificate Authority (CA) for the certificate. If using a custom domain, please contact the customer for the respective root certificate.
💡 In the full certificate chain the last certificate would be the root certificate
Steps to add certificate to system trust store
Debian/Ubuntu Linux
- (For *.colortokenspoc.com domain only) Download the certificate in .pem format
cd ~
curl https://ssl.com/repo/certs/SSLcomRootCertificationAuthorityRSA.pem -o SSLcomRootCertificationAuthorityRSA.pem
- Copy the root certificate to /usr/local/share/ca-certificates/
sudo cp ~/SSLcomRootCertificationAuthorityRSA.pem /usr/local/share/ca-certificates/
- Update the system trust store
sudo update-ca-certificates
Fedora/RHEL Linux
- (For *.colortokenspoc.com domain only) Download the certificate in .pem format
cd ~
curl https://ssl.com/repo/certs/SSLcomRootCertificationAuthorityRSA.pem -o SSLcomRootCertificationAuthorityRSA.pem
- Copy the root certificate to /etc/pki/ca-trust/source/anchors/
sudo cp ~/SSLcomRootCertificationAuthorityRSA.pem /etc/pki/ca-trust/source/anchors/
- Update the system trust store
sudo update-ca-trust
Windows
- (For *.colortokenspoc.com domain only) Open powershell and run the commands to download the certificate in .cer format
cd ~
curl https://ssl.com/repo/certs/SSLcomRootCertificationAuthorityRSA.pem -o SSLcomRootCertificationAuthorityRSA.cer
- Open File explorer and navigate to the location where the
SSLcomRootCertificationAuthorityRSA.cerfile was saved - Double click the
SSLcomRootCertificationAuthorityRSA.cerfile - Click on
Install Certificate - Select
Local Machineand click on Next - Select
Automatically select the certificate store based on the type of certificateand click on Next - Click on Finish
MAC
- (For *.colortokenspoc.com domain only) Open powershell and run the commands to download the certificate in .pem format
cd ~
curl https://ssl.com/repo/certs/SSLcomRootCertificationAuthorityRSA.pem -o SSLcomRootCertificationAuthorityRSA.pem
- Open the Keychain Access App
- Navigate to the System Keychains > System view in the left-hand pane.
- From the Menu Bar, select File > Unlock Keychain “System” - enter your password. You can also right-click on the Keychain to unlock.
- From the Menu Bar, select File > Import Item..
- Select the PEM file
- Enter your password
From this point, it will be imported into the System Keychain, but not trusted yet - you’ll see a Red “X” on its icon. If you see a Red "X" on the certificate
- Right click on the newly imported Root CA select Get Info…
- Expand the Trust section in the popup modal.
- Select the “Always Trust” option from the When using this certificate: dropdown.
- Close the modal - enter your password again.