Lab Setup
The XShield Lab is a comprehensive Python-based tool designed to set up assets and generate real-time traffic on a single Linux machine. It simplifies asset configuration, automatically registers assets with the tenant, and generates traffic flows for testing or demonstration purposes.
Basic Lab Setup
Please refer to the basic Xshield Lab setup guide for the base setup. Basic Lab Environment Setup
Set SCIM Bearer token
- Create new IDP and get the bearer token. (Settings > Integrations > User Provisioning > SCIM > +IDP. Enter IDP name and Save. Copy the BearerToken)
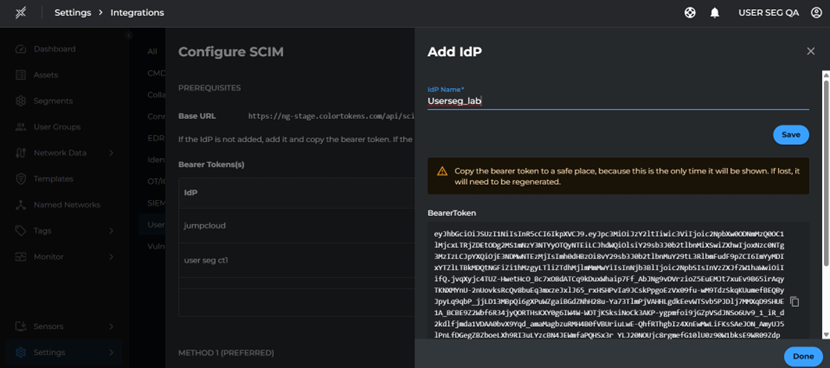
- Edit the config.yaml file with the values obtained in the previous steps.
- Add scim_token under api with the copied bearer token as the value
Deploying the user segmentation lab
In this demonstration, we will begin by building basic security (blocking malicious and risky communications, restricting management and infrastructure ports) followed by whitelisting application traffic for user groups.
The goal is to progressively implement micro segmentation policies, starting with the Location and advancing to the Application layer. This approach gradually reduces the attack surface and lowers the risk of blast radius at each stage.
To deploy the lab environment specific to user segmentation and this use case, follow the steps below:
- Make sure you are in the directory with the
xshield_lab.pyscript (either /etc/colortokens/lab or directory where the xshield lab package is downloaded). - If the python virtual env is already activated during the installation steps then just launch the xshield lab tool.
- Run the following commands to activate the python virtual env
cd /etc/colortokens/lab/
source .venv/bin/activate
- If you are deploying the lab for customized use case, provide the correct paths for lab and traffic config yaml files from your machine along with the xshield lab tool command
- Make sure your lab config file should be named as "<usecase>_lab.yaml" and traffic config file should be named as "<usecase>_lab_traffic_yaml"
python3 xshield_lab.py --lab-config <path/to/lab/config/file>/<usecase>_lab.yaml --traffic-config <path/to/traffic /config/file>/<usecase>_lab_traffic.yaml
- If you want to deploy the default demo lab available for user segmentation use case mentioned above, then just run the command to launch xshield lab tool and Select Option 4: Create Lab Environment for User Segmentation.
python3 xshield_lab.py
You'll see the following menu:
Welcome to the Xshield Lab Environment setup tool.
Please select an option:
- Create Lab Environment for Server Segmentation
- Create Lab Environment for Container Segmentation
- Create Lab Environment for Gatekeeper
- Create Lab Environment for User Segmentation
- Create Lab Environment for CrowdStrike Integration
- Create Lab Environment for Cloud Segmentation (Beta)
- Customize Lab Environment
- Remove Lab Environment
- Remove Docker Images
- Exit
Enter your choice:
Select Option 4: Create Lab Environment for User Segmentation.
Final Result Shows that we have created 30 assets (28 managed and 3 umanaged) that can communicate with the tenant on the Xshield platform
Demo Lab Components & Topology
Key Components:
-
Networks:
- Managed Networks:
- ep_net1: 10.100.0.0/24
- ep_net2: 10.110.0.0/23
- ep_net3: 10.120.0.0/21
- ep_net4: 10.130.0.0/25
- ep_net5: 10.140.0.0/22
- man_net1: 10.220.0.0/24
- Unmanaged Networks:
- unman_net1: 10.230.0.0/24
- Managed Networks:
-
Devices (Nodes):
- Controller: Acts as a gateway between the managed and unmanaged networks.
- Endpoints: Managed nodes connected to the managed network.
- Servers: Unmanaged nodes connected to the unmanaged network.
-
Routing & Gateways:
- The controller device has interfaces in both the managed network and unmanaged network acting as a routing bridge between them.
-
Network Configurations:
- Controller enables IP forwarding and masquerading, allowing communication between the two networks.
Network Topology Diagram:
Here's a textual description of the topology:
-
Managed Network:
- xpct-pc-01 to xpct-pc-03: 10.100.0.2 to 10.100.0.4
- xpct-pc-11 to xpct-pc-13: 10.110.0.2 to 10.110.0.4
- xpct-pc-21 to xpct-pc-23: 10.120.0.2 to 10.120.0.4
- xpct-pc-31 to xpct-pc-33: 10.130.0.2 to 10.130.0.4
- xpct-pc-41 to xpct-pc-43: 10.140.0.2 to 10.140.0.4
- TMS-APP 10.220.0.2
- WMS-APP 10.220.0.3
-
Unmanaged Network:
- Citrix: 10.230.0.2
- EMServer: 10.230.0.3
- Proxy: 10.230.0.4
- XPCT-AD: 10.230.0.5
User Details:
| username | full_name | active | groups |
|---|---|---|---|
| neo | Neo Carter | TRUE | TMS Users, Citrix Desktop Users, XPCT ActiveDirectory Users |
| jin | Jin Park | TRUE | WMS Team, Citrix Desktop Users, XPCT ActiveDirectory Users |
| lia | Lia Chen | TRUE | WMS Team, XPCT ActiveDirectory Users |
| rio | Rio Johnson | TRUE | TMS Users, WMS Team Citrix Desktop Users, XPCT ActiveDirectory Users |
| eli | Eli Brooks | TRUE | |
| rex | Rex Harrison | FALSE | TMS Users, XPCT ActiveDirectory Users |
Policy Modelling
**Allowed traffic: **
Endpoint Inbound
Port 17472 In for local network Outbound Domain ports for AD communication 17472 Endpoint Management Client Peer-to-peer on LAN and to server Port 3128 to Proxy
User group: Outbound
'TMS Users' to TMS-APP on port 443 'WMS Team' to WMS-APP from on port 443 'Citrix Desktop Users' to Citrix port 3389
**Denied traffic: ** Inbound
RDP from any machine Outbound TMS-APP, WMS-APP and Citrix traffic from unintended endpoints and users