Demo Steps
This guide demonstrates Xshield's micro-segmentation capabilities to prevent lateral movement and enhance security by isolating users.
Use Case
Ensure endpoints are invisible to the rest of the network. This means there will be no communication between the endpoints or from other devices to the endpoints except for the applications allowed. We will achieve this by:
- Inbound policies to block all communication except for legitimate application/management traffic
- Outbound policies to access the servers/applications, based on the user login.
Discovery
Asset Discovery
The Xshield security platform collects hardware, operating system, network telemetry data, and other tags from the endpoints in the ecosystem to build visibility into the communications across the network.
The lab setup comes with the Xshield agent software already installed, and the endpoints are onboarded to the tenant. You should be able to see the discovered assets and their agent information on the platform.
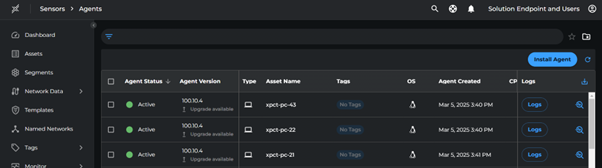
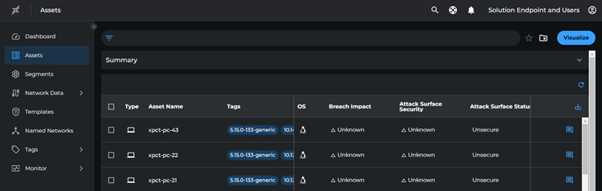
Viewing Assets
Navigate to:
- The Agents page
- The Assets page
These pages display the agent and asset details as part of the discovery process.
Classify Assets
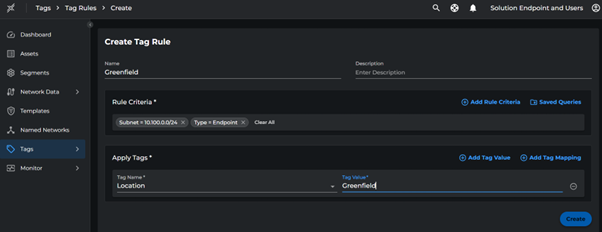
Create Tag rules to auto-assign Location tags based on the asset subnet for easier segmentation and policy enforcement.
Creating Tag Rules
- Go to Tags > Tag Rules > Create Tag Rule
- Configure the rule:
- Name:
Greenfield - Click Add Rule Criteria > Tags > Subnet
- Enter subnet:
10.100.0.0/24 - Click Apply Tags > Location > **Greenfield`
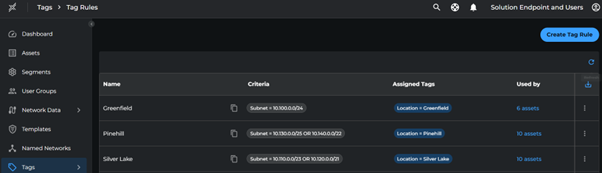
- Name:
Follow similar steps to create tag rules for other subnets using the mapping below.
| Subnet | Location |
|---|---|
| 10.100.0.0/24 | Greenfield |
| 10.110.0.0/23, 10.120.0.0/21 | Silver Lake |
| 10.130.0.0/25, 10.140.0.0/22 | Pinehill |
Segmentation Strategy
Based on the above classification, we can now start building segments. Agree upon the segments with the customer.
Define Core Segments
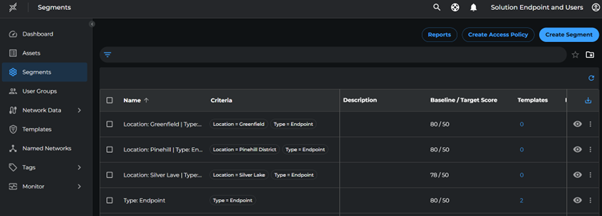
Create a segment for all endpoints and individual segments per location using the following criteria:
| Segment Name | Criteria |
|---|---|
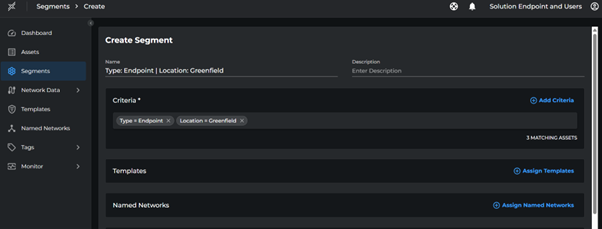
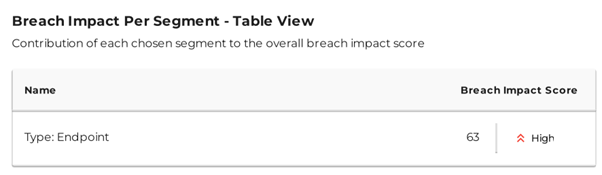
| All Endpoints | Type: Endpoint |
| Greenfield | Location: Greenfield, Type: Endpoint |
| Silver Lake | Location: Silver Lake, Type: Endpoint |
| Pinehill | Location: Pinehill, Type: Endpoint |
Creating Segments
- Go to Segment > Create Segment
- For each segment:
- Enter the name from the table above
- Set the criteria as specified
- Set breach impact metrics target as
50
Enrichment
Now that we have defined Core Segments, we will next start defining Named Networks, policies for management communications and Infrastructure communications.
Network Discovery
Usually customers have an IP Plan of the network where the IP addresses of management and infrastructure services are usually known. Either use the IP Plan or the Xshield recommendation to define core named networks for Management and Infrastructure services.
The named networks created in this step help map IP addresses to known traffic patterns between sources such as:
- Active directories
- DNS servers
- Jump servers
- Bastion hosts
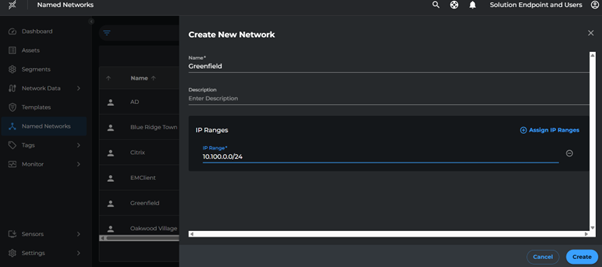
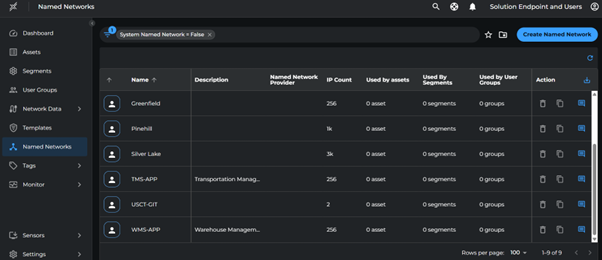
Create Named Networks
- Go to Named Networks > Create Named Network
- Create networks with the following IP ranges:
| Subnet | Named Network |
|---|---|
| 10.100.0.0/24 | Greenfield |
| 10.110.0.0/23, 10.120.0.0/21 | Silver Lake |
| 10.130.0.0/25, 10.140.0.0/22 | Pinehill |
| 10.230.0.2/32 | Citrix Desktops |
| 10.230.0.3/32 | EMClient |
| 10.230.0.4/32 | Proxy |
| 10.230.0.5/32 | AD |
| 10.220.0.2/32 | TMS-APP |
| 10.220.0.3/32 | WMS-APP |
Assign Named Networks
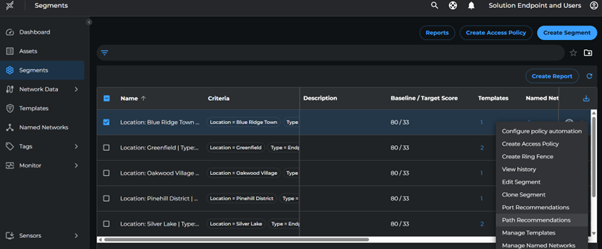
We shall apply these named networks to respective segments using the recommendations available at the segment level.
Assignment Steps
- For each segment:
- Click the three dots (⋮) at the end
- Navigate to Path recommendations > Named Network Assignment
- Select the recommended Named Networks with inbound paths
- Click Assign

Management Policy Templates
Based on the discovered network flows, we will define policies for Management communications such as privileged access between endpoints.
Management communications typically flow from management servers/tools (like Endpoint Management servers) to managed assets, representing inbound communication from the asset's perspective. Let us leverage Path Template recommendation to create Management templates
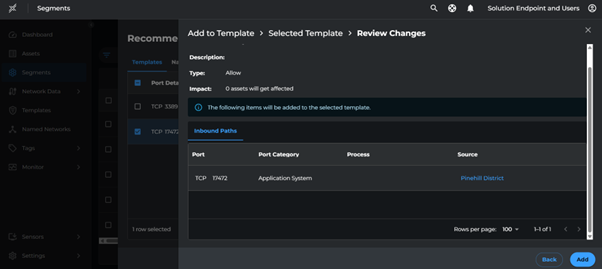
Creating Management Templates
- For each segment:
- Click the three dots (⋮) at the end
- Navigate to Path recommendations > Templates > Inbound
- Select path with port
17472 - Click Add to Template
- Name the template as
Management Access - <Location> - Click Save
We will define specific policies applicable to each location.

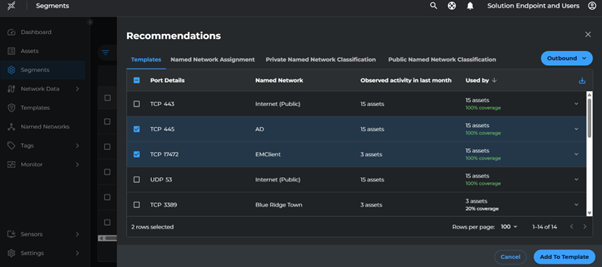
Infrastructure Policy Templates
Infrastructure communications typically flow from many managed assets to a few Infrastructure services/servers, representing outbound communication from the asset's perspective.
We shall define policies for communications between assets and infrastructure services such as:
- DNS servers
- Domain controllers
- Endpoint Management Servers
Creating Infrastructure Template
- Go to endpoint segment
- Click the three dots (⋮) at the end
- Navigate to Path recommendations > Templates > outbound
- Select paths to:
- EMClient
- AD
- Proxy
- Click Add to Template
- Name the template as
Infra - Base - Click Save
Apply Infrastructure and Management Templates to Segments
Now that we have defined the core named networks and templates for management services, we'll attach the templates to their respective segments.
Assign the following templates:
| Template | Target Segment |
|---|---|
| Infra - Base | Type: Endpoint |
| Management Access - Greenfield | Location: Greenfield, Type: Endpoint |
| Management Access - Silver Lake | Location: Silver Lake, Type: Endpoint |
| Management Access - Pinehill | Location: Pinehill, Type: Endpoint |
Visualization and Baseline
Named networks and templates are now linked to their respective segments. The Xshield security platform will identify all discovered ports and paths, marking them as allowed or denied based on defined policies.
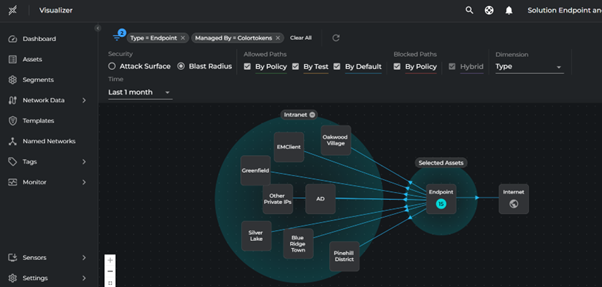
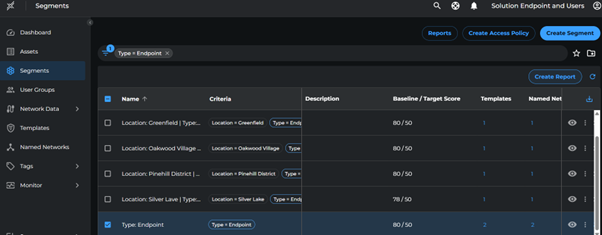
Visualize Core Segments
Visualize Core segments in the panoptic map to see infrastructure and management networks context:
- Go to Segments
- For Endpoint Segment:
- Click Visualize
- Select Dimension Location
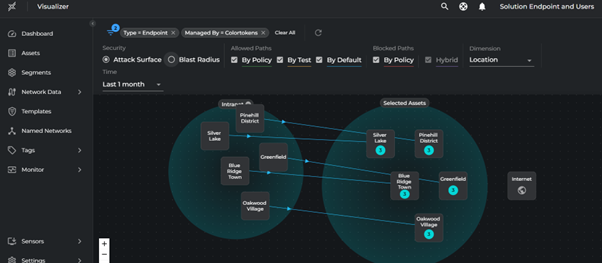
- Click Blast Radius
- Select Dimension Type
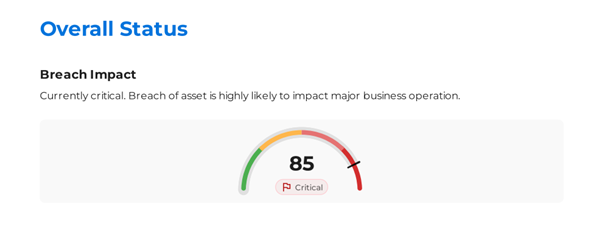
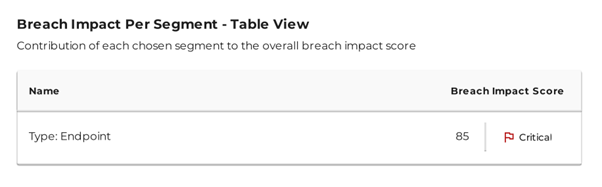
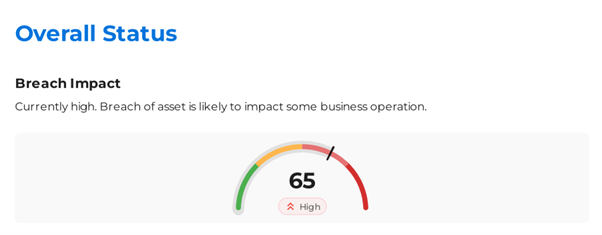
Analyze Breach Impact Score
- Go to Segments
- Select Endpoint segment
- Click Create Report
- Enter a report name
- Click Save
Reports will be available in a few minutes. Download from Segments > Reports page and note the current breach score.
Reduce Attack Surface
Block Malicious and High-Risk Ports
To start eliminating any malicious traffic and ensure assets are protected from unauthorized sources, we will leverage block templates and assign them to the endpoint segment.
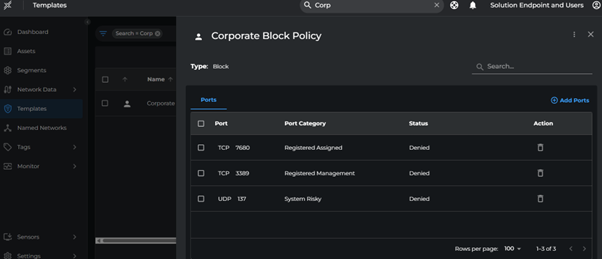
- Go to Templates > Create Template
- Select type as Block
- Add ports that are blocked as per the corporate policy. In our example we are blocking vulnerable ports such as:
- TCP 3389
- TCP 7680
- Name it as Corporate Block Policy and click Create
Now that the Block Template is created, we will assign it to the endpoint segment:
- Go to Segments > click on the three dots (⋮) at the end > Manage Templates
- Click on Assign Templates
- Select the Corporate Block Policy template and click Assign
The policies defined in the Block Templates will be applied and enforced on the matching assets irrespective of the enforcement state of the Asset (i.e., even if the Asset is in Unsecure state).
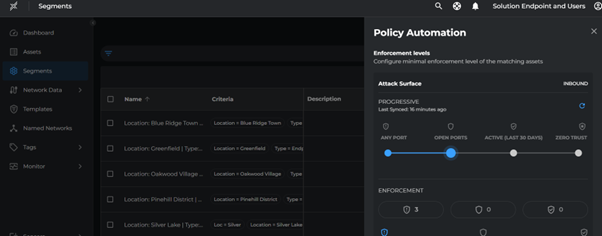
Progressive Zero-Trust
To ensure enforcement is without disruption and currently open ports are not disrupted, use the progressive zero trust slider to move all core segments to open ports.
- Go to each segment > click on the three dots (⋮) at the end > Configure Policy Automation
- Select the policy automation as Inbound Test
- Move the slider on Attack Surface Progressive to Open Ports
- Click Save
Repeat these steps for all segments.
Deploy Inbound Test-Mode
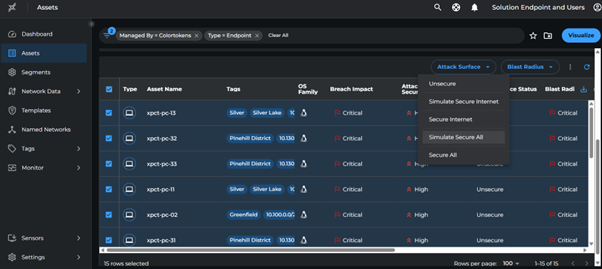
With templates set for blocking malicious ports and allowing inbound essential communications, we will move assets to Inbound Enforcement in Test Mode, applying policies without blocking non-template traffic by-default.
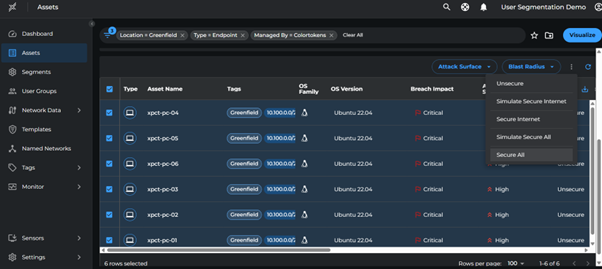
- Go to endpoint segment > click on the assets count
- Select all the assets > Attack Surface > Simulate Secure All
Resolve Violations and Enforce Inbound
Review the paths with Path Candidate Status Allowed Template and Denied. These paths will be Allowed or Denied respectively once the Assets are moved from Inbound Test mode to Inbound Enforce mode.
- Go to Network Data > Paths
- Filter by:
- Type:
Endpoint - Direction:
Inbound - Path Candidate Status:
DeniedandAllowed(template)
- Type:
- Review each path to determine if it represents authorized or unauthorized traffic
- To allow a path:
- Select the path
- Click Add to Template
- Select the appropriate template
- Click Save
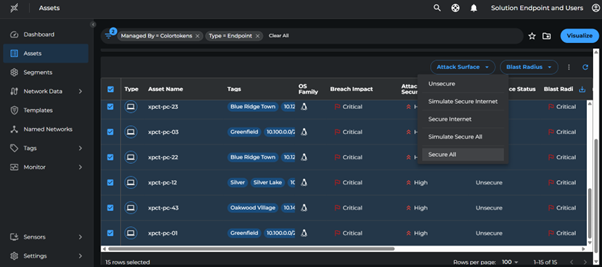
Once all violations are addressed:
- Select all assets with Type:
Endpoint - Click Attack Surface > Secure All
Run Progress Reports
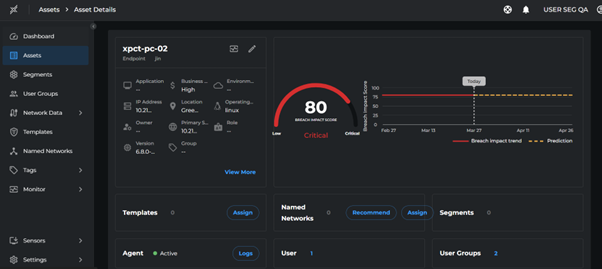
Breach Impact score for endpoint after Attack surface enforcement
- Go to Segments > Select Endpoint segment > Click on Create Report > Enter a report name > Save
- Reports will be available in few minutes. Download it from Segments > Reports page
- Note the current value of breach score.
Configure User Group Segmentation
Users are provisioned through the SCIM API. For more details, refer to the SCIM API documentation.
Activate User Groups
To enable user group segmentation:
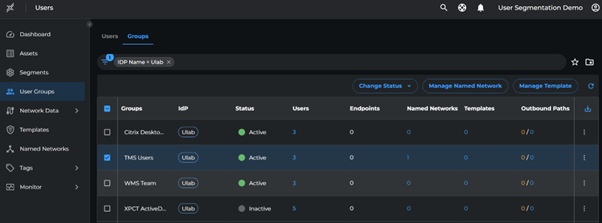
- Go to User Groups > Groups
- Select the following groups:
- "TMS Users"
- "WMS Team"
- "Citrix Desktop Users"
- Click Change Status > Active
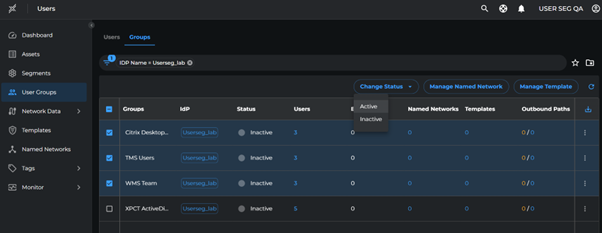
It takes a few minutes for the groups to be activated.
User Login to Endpoints
Use the following script to login to different endpoints:
bash /home/ctuser/xshieldUtil/.labs/userseg_lab/user_login.sh
After login, assets will show the logged-in user and their associated groups:
Assign Named Networks to User Groups
- Go to User Groups
- Assign the following Named Networks:
| User Group | Named Network |
|---|---|
| TMS Users | TMS-APP |
| WMS Team | WMS-APP |
| Citrix Desktop Users | Citrix |
Configure User Group Policies
To configure the policies:
- Go to User Groups
- Open the outbound paths
- Select the paths with named networks
- For each activated group:
- Create a new template
- Add the selected paths to the template
- Assign the template to the corresponding group
Reduce Blast Radii
Deploy Outbound Test-Mode
With templates set for allowing essential outbound communications, we will move assets to Outbound Enforcement in Test Mode, applying policies without blocking non-template traffic by default.
- Go to each segment > click on Assets
- Select all assets > Blast Radius > Simulate Secure All
- Repeat these steps for all segments
Resolve Violations and Enforce Outbound
Review the paths with Path Candidate Status Allowed Template and Denied. These paths will be Allowed or Denied respectively once the Assets are moved from Inbound Test mode to Inbound Enforce mode.
- Go to Network Data > Paths
- Filter by:
- Type:
Endpoint - Direction:
Outbound - Path Candidate Status:
DeniedandAllowed(template)
- Type:
- Review each path to determine if it represents authorized or unauthorized traffic
- To allow an authorized path:
- Select the path
- Click Add to Template
- Select the appropriate template
- Click Save
Enforce Blast Radius
Once all violations are addressed:
- Select all assets with Type:
Endpoint - Click Blast Radius > Secure All
Check Breach Impact Score After Blast Radius Enforcement
- Go to Segments > select Endpoint segment
- Click Create Report
- Enter a report name
- Click Save
Reports will be available in a few minutes. Download from Segments > Reports page and note the current breach score.

Prepare Breach Responses
This section is under development.
Outcome
Before Micro-segmentation
The initial state of the network had several security concerns:
- Endpoint communications were wide open
- Vulnerable ports like RDP were accessible between all endpoints/servers
- Endpoints provided unrestricted lateral movement across the network
- The network had a critical breach impact score
After Micro-segmentation
By progressively segmenting the network based on locations and user groups, we achieved:
-
Controlled Access
- All incoming connections are denied by default
- Only explicitly approved traffic is allowed
- This includes critical application functions and management purposes
-
User-based Segmentation
- Users are provided access only to specific servers and applications
- Access is based on their role and requirements
-
Improved Security Posture
- Network and user group segmentation minimized the potential blast radius
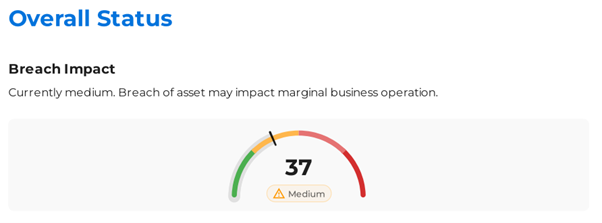
- Breach impact score improved from critical to medium
Enforcement Validation
The Xshield Security Platform offers multiple ways to validate security enforcement:
Monitoring and Validation Tools
-
Paths & Ports Pages
- Shows learned paths and ports as Allowed or Denied
- Ensures only authorized traffic flows
-
Firewall Logs
- Captures dropped traffic due to zero-trust policies
- Helps identify misconfigurations
-
Policy Assessment
- Review paths and ports
- Confirm policies effectively restrict unauthorized access
-
Fine-Tuning
- Use firewall logs to refine policies
- Ensure security without disrupting operations
Conclusion
This demo lab demonstrated how progressive micro-segmentation can enhance network security:
-
Progressive Implementation
- Applied zero-trust policies step by step
- Reduced attack surface and blast radius
- Maintained legitimate traffic flow
-
Continuous Monitoring
- Tracked paths, ports, and firewall logs
- Ensured only authorized traffic was allowed
- Adjusted policies based on logged data
-
Effective Security Enhancement
- Successfully implemented endpoint and user group policies
- Improved network security with minimal operational impact
Lab Teardown
Please refer to the Remove Lab Environment section in the Lab Setup Guide.