Demo Steps
This is a step by step guide to building Zero Trust Micro-segmentation (to prevent lateral movement) solution using the integration with Microsoft Defender (MDE) platform.
Xshield platform imports host and network telemetry data from Microsoft Defender platform for building the visibility that is normally available with a Xshield agent based solution.
Once the visibility is completed, then the same rules of policy management to perform micro-segmentation applies.
Demo Workflow
The workflow for this demo will follow the same steps performed for progressive server segmentation.
As part of server segmentation, we will begin by building basic security (blocking malicious and risky communications, restricting management and infrastructure ports) followed by whitelisting enviroment-specific traffic flows.
The flow of the demo will consist of the following phases:
- Microsoft Defender Integration Activation
- Discovery
- Visualize and Baseline
- Reduce Attack Surface
- Reduce Blast Radii
Microsoft Defender Integration
Generate API credentials forMicrosoft Defender Platform
Follow Generate API Credentials for Integrating Microsoft Defender for Endpoint with Xshield platform using Terraform for instructions to generate API credentials.
The Microsoft Defender API credentials will be used in the next steps to integrate the microsoft defender platform with Xshield platform, please note them down
client_id, tenant_id, client_secret, storage_account_name, and queue_name
Microsoft Defender Integration Activation
This step is needed if the Microsoft Defender Integration is not already activated during lab setup.
To activate the Microsoft Defender Integration in Xshield, the user must import the already generated API credentials into the activation page.
-
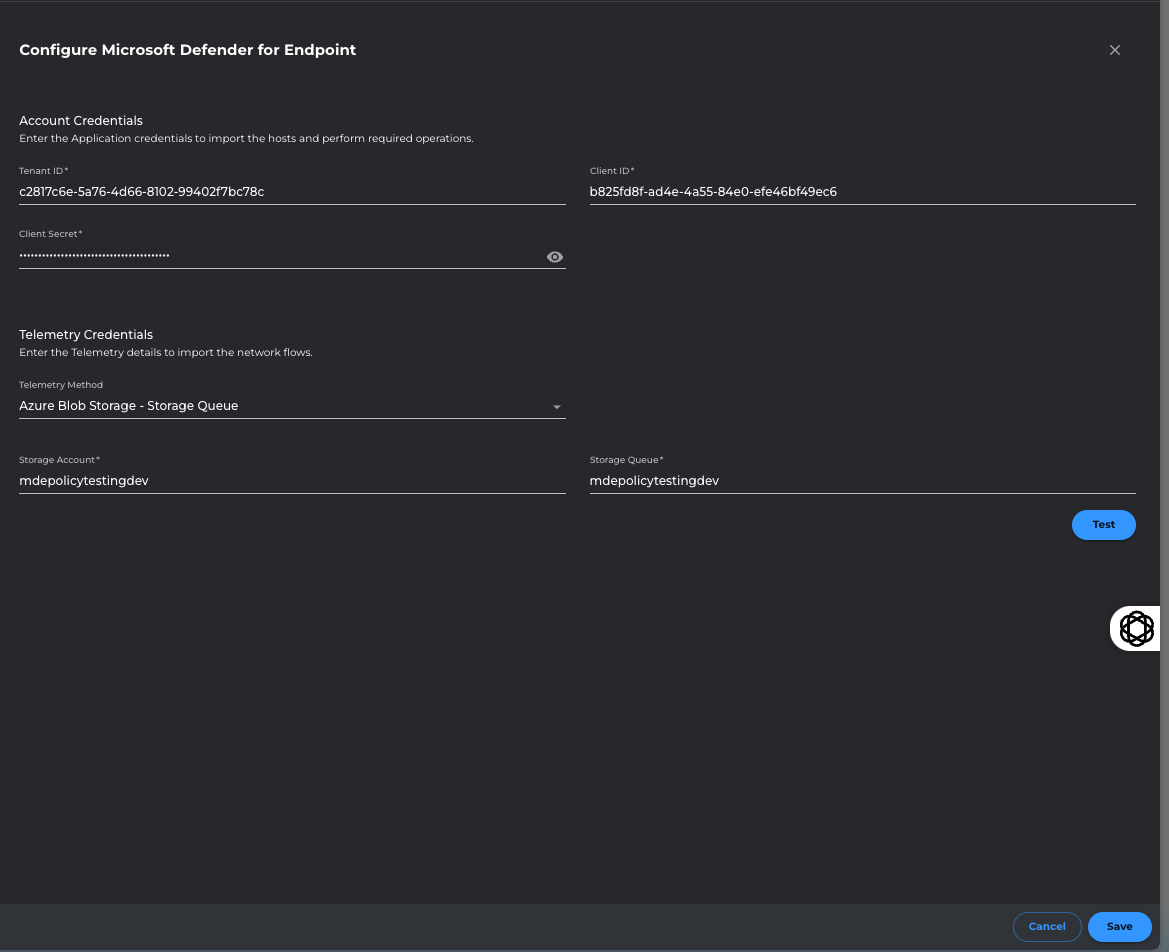
Activate the Microsoft Defender integration by Navigating to Settings -> Integrations -> EDR --> Microsoft Defender for Endpoint Click on ACTIVATE. This will open a Configuration pop-up with provided API credentials.
API Credentials - This is used by the Xshield Platform to make API calls to the Microsoft Defender platform to import the already defined HostGroups and Hosts periodically.
-
Click on Test button to validate the credentials.
-
Once the Test says successful, click on Save button to save the integration. This will save and activate the Microsoft Defender integration.
Discovery
Host Group Discovery
This step is needed if the Microsoft Defender Integration is not already activated during lab setup.
On successful Microsoft Defender Integration activation, we need to wait upto 10 minutes before the imported EDR tags start showing up in Xshield platform.
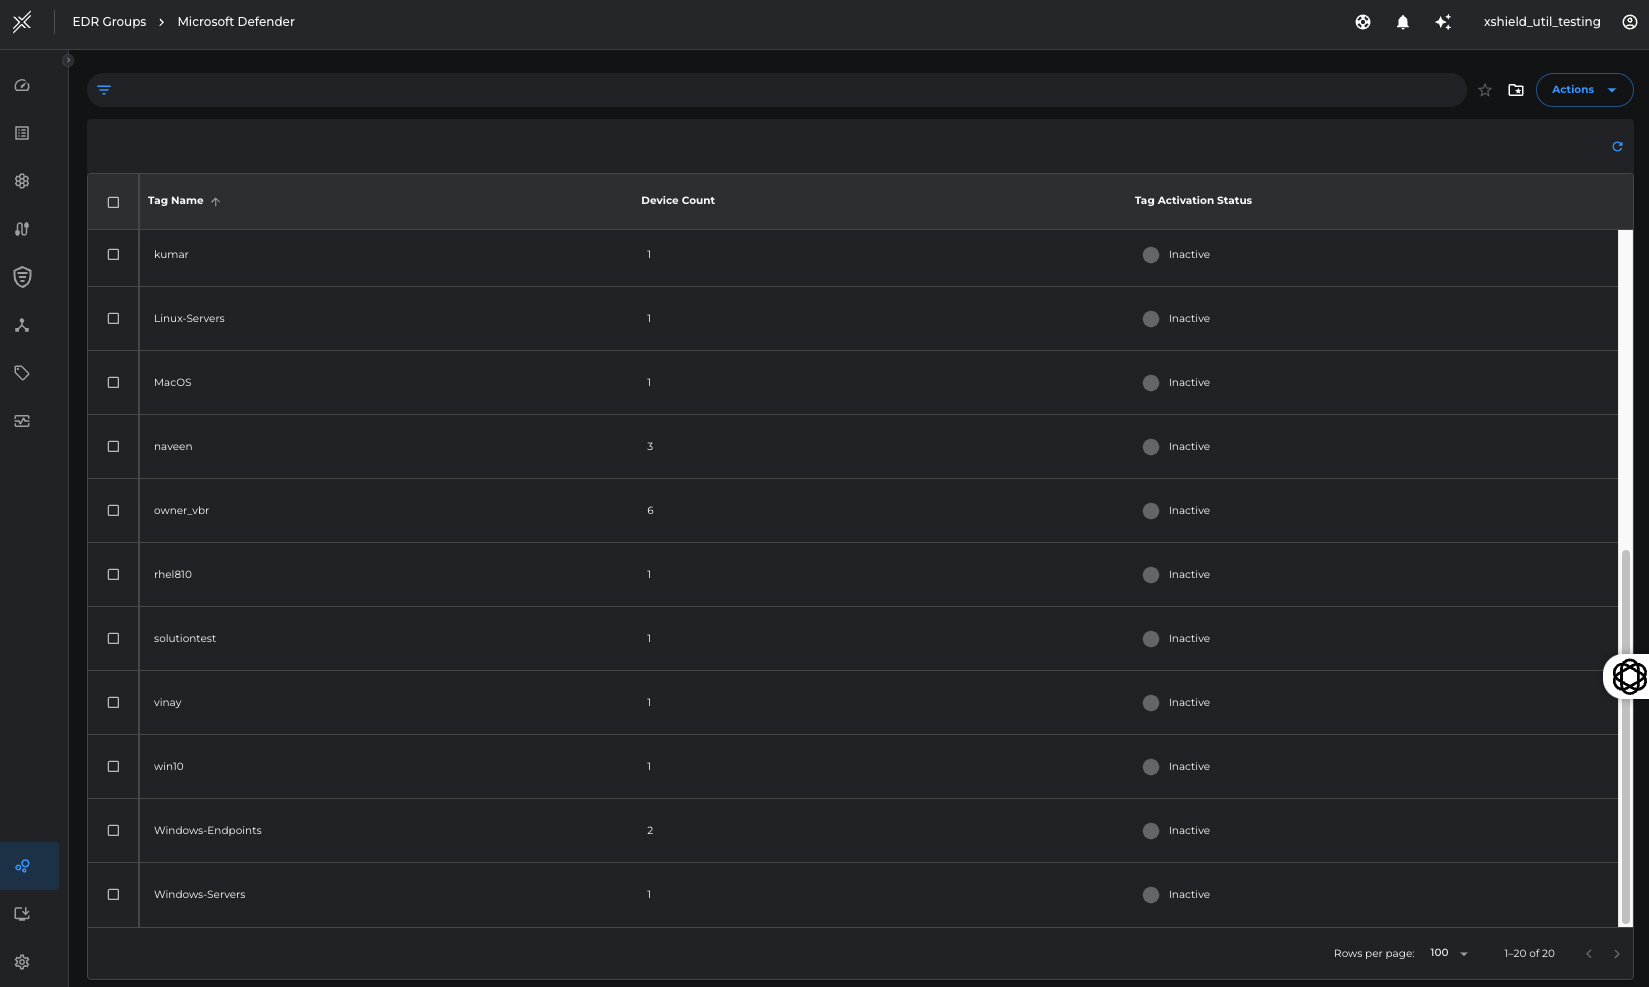
The Xshield Security platform will populate the imported EDR tags in a separate page by Navigating to EDR Groups -> Microsoft Defender.
On this page, the user can select the set of EDR tags (1 or many) to be imported for Micro-segmentation operations.
Tag(s) Activation
This step is needed if the Microsoft Defender Integration is not already activated during lab setup.
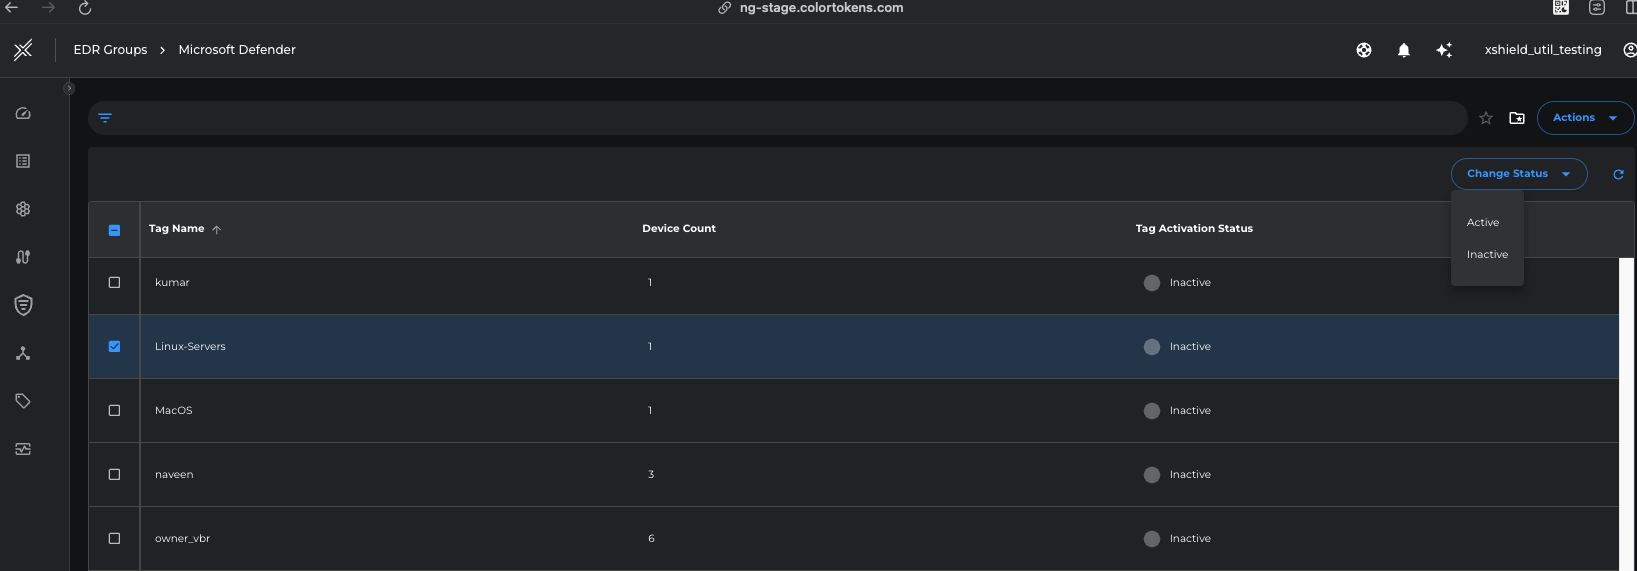
Activate respective EDR tags so that hosts import operation is scheduled for these tags.
From the EDR tags listed, select the required tag(s) (clicking on the checkbox before the name) and ** select Active** under Change Status action button. Click on Confirm button on the popup that follows.
We need to wait upto 10 minutes before the imported hosts start showing up in Xshield platform.
Asset Discovery
XShield security platform will automatically import Microsoft Defender hosts from the activated EDR tags as Xshield Assets.
Xshield security platform collects asset name, operating system, IP address, network telemetry data from the servers in the ecosystem to build visibility into the communications across the network.
Go to the Assets page to view the asset details as part of the discovery process with the filter managedby=Microsoft Defender.

Classify Assets
Tagging of assets is done by writing Tag rules which can be built using arbitrary criterias as defined by the system.
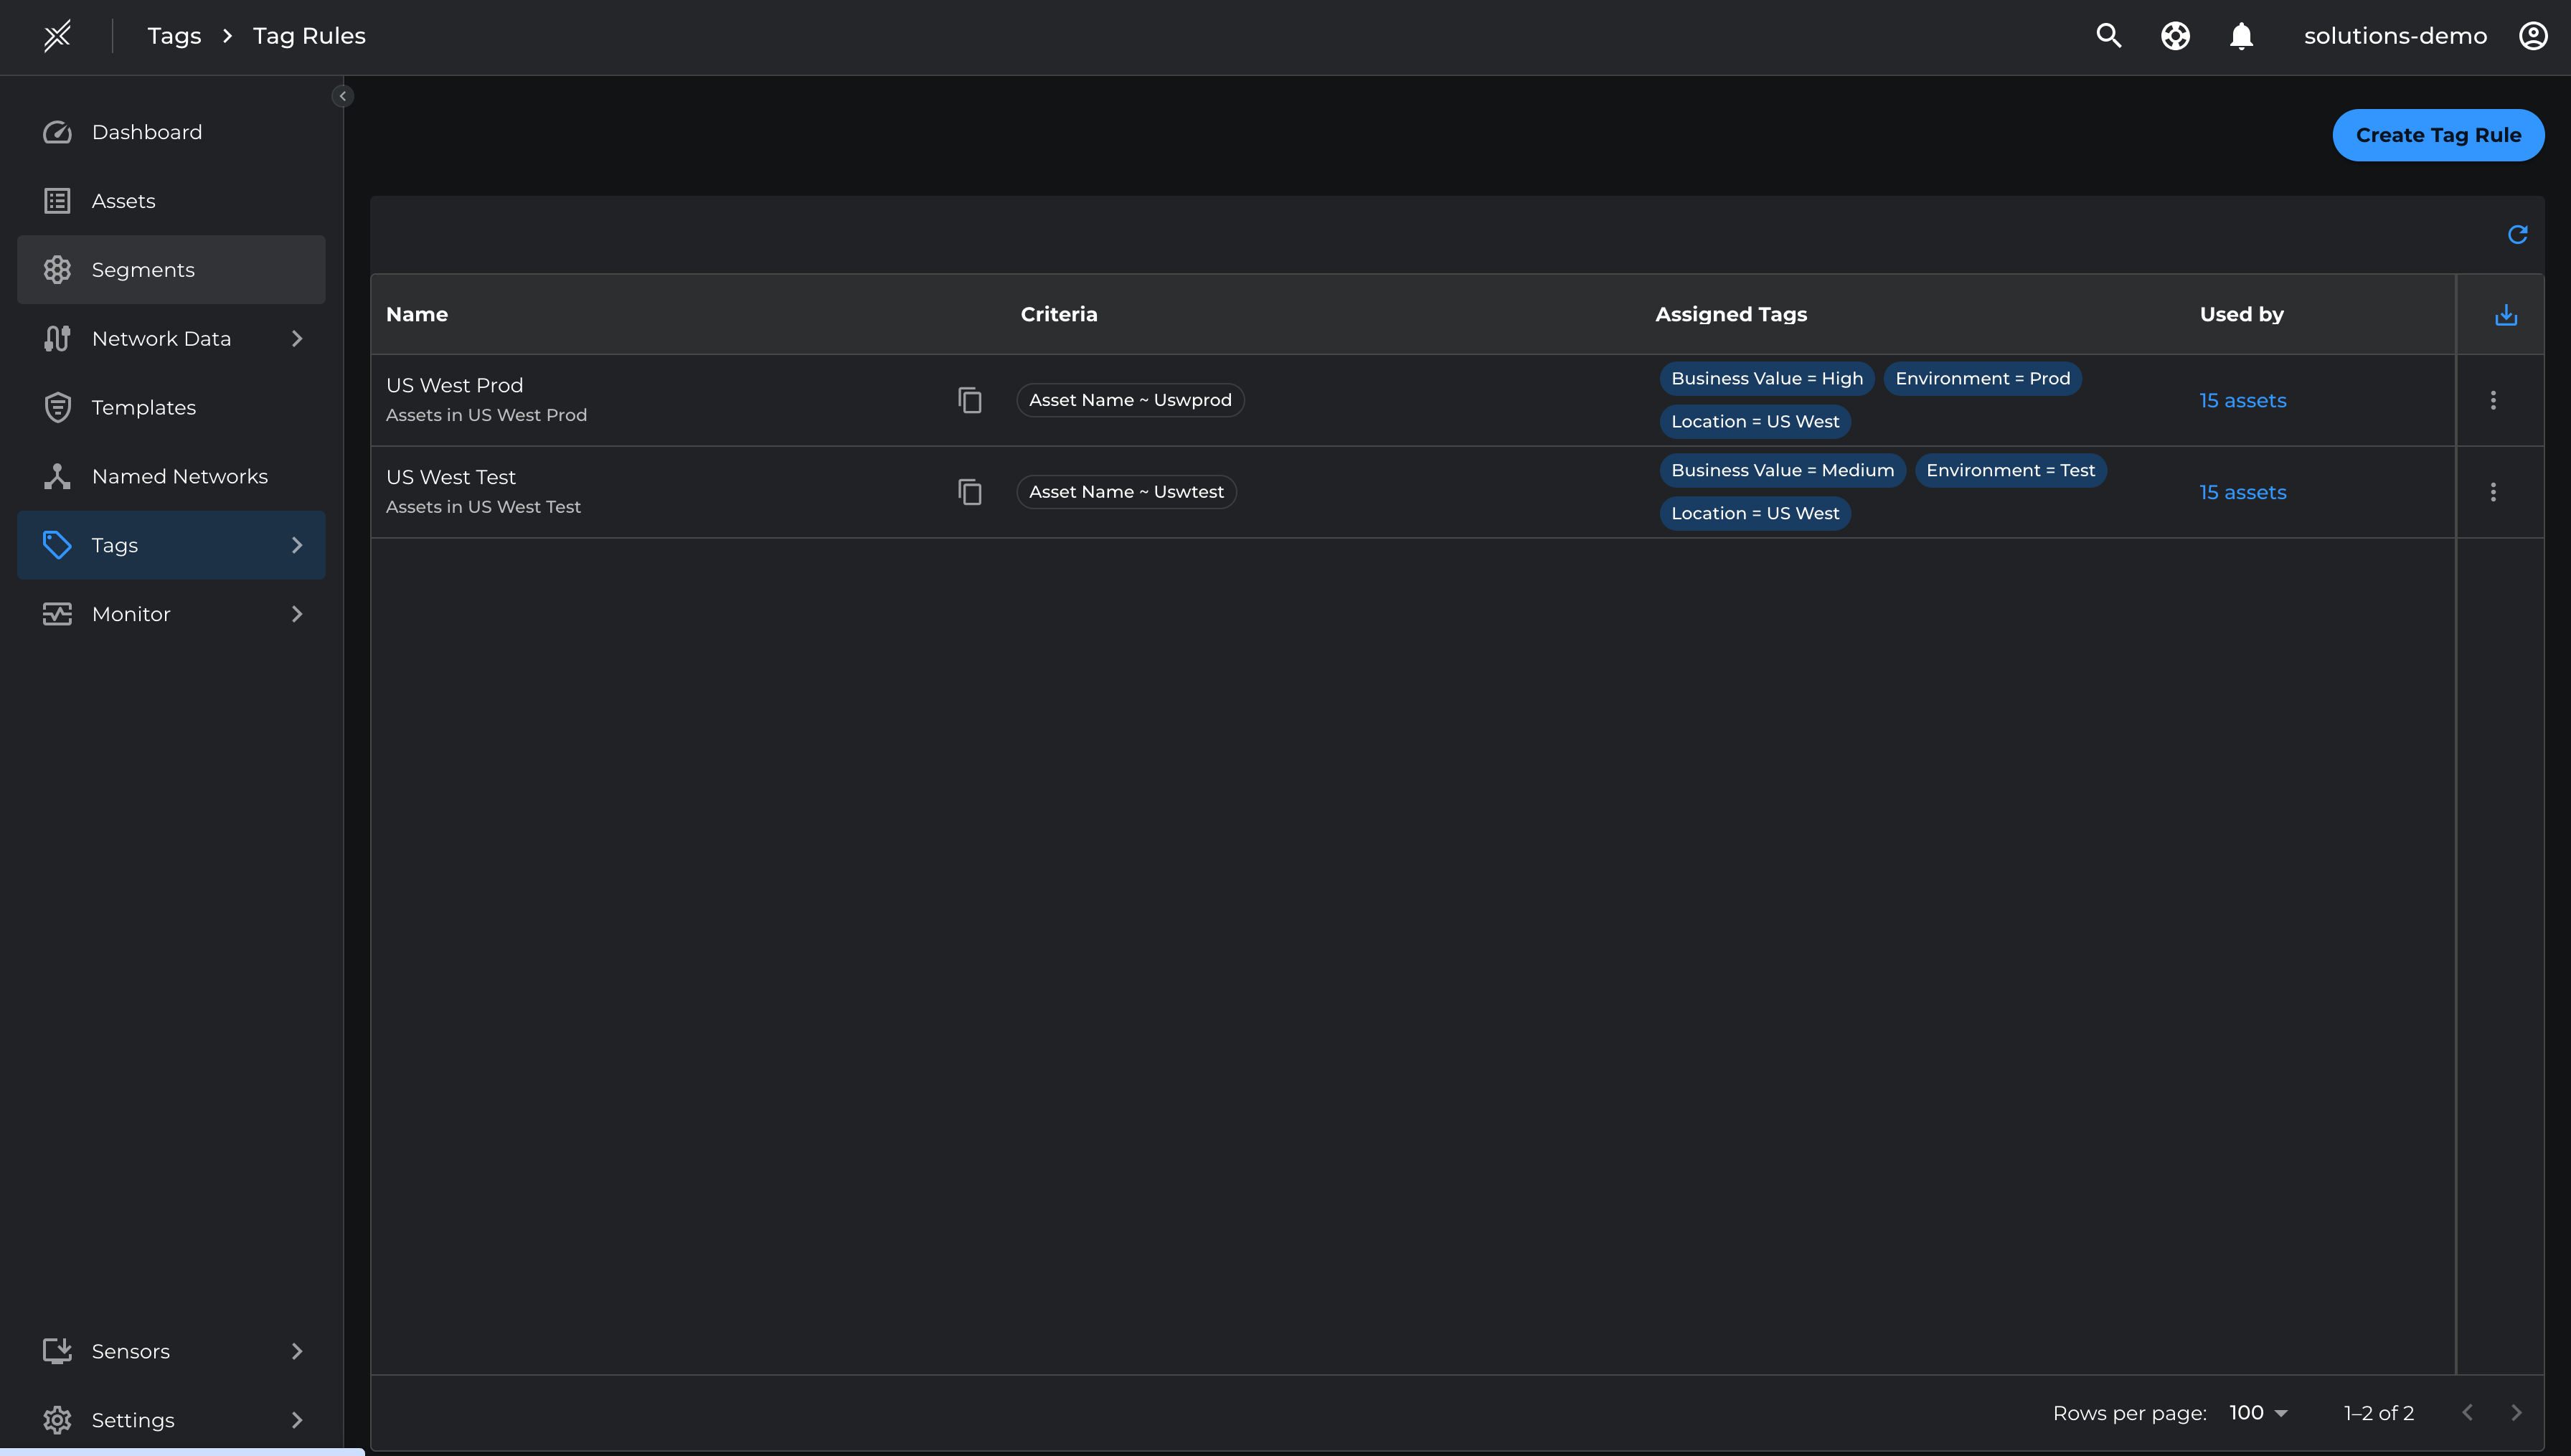
Create Tag rules to auto assign Environment and Location tags based on the asset hostnames for easier segmentation and policy enforcement.
- Go to Tags > Tag Rules > Create Tag Rule
- Enter Name = US West Prod > click Add Rule Criteria > Assets > Asset Name > Advanced
- Enter the criteria as Contains = uswprod > Apply
- Click Add Tag Value > Environment = Prod, Location = US West, Business Value = High > Create
- Follow similar steps to create the second tag rule called 'US West Test' with criteria as Contains = uswtest and Tag Value as Environment = Test, Location = US West, Business Value = Medium
Segmentation Strategy
Based on the above classification, we can now start building segments. Agree upon the segments with the customer.
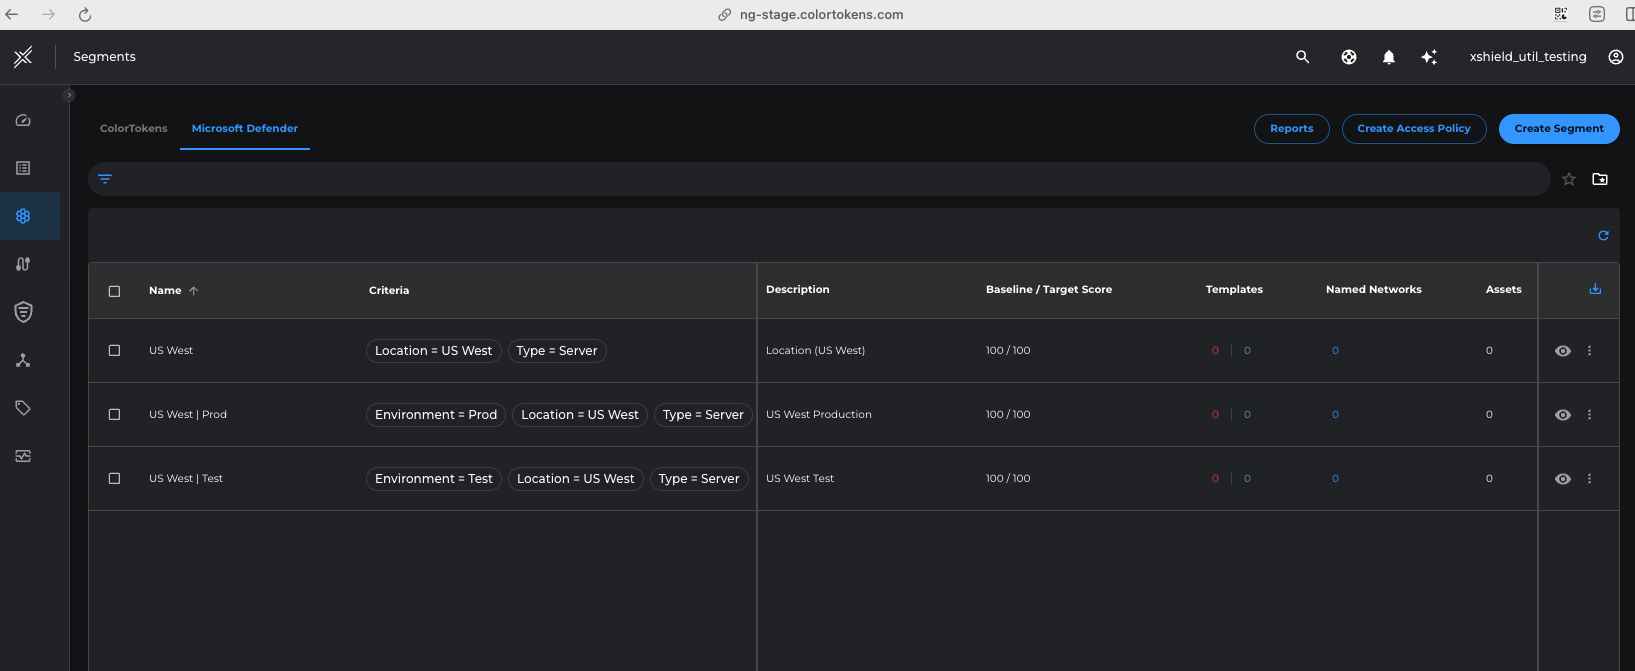
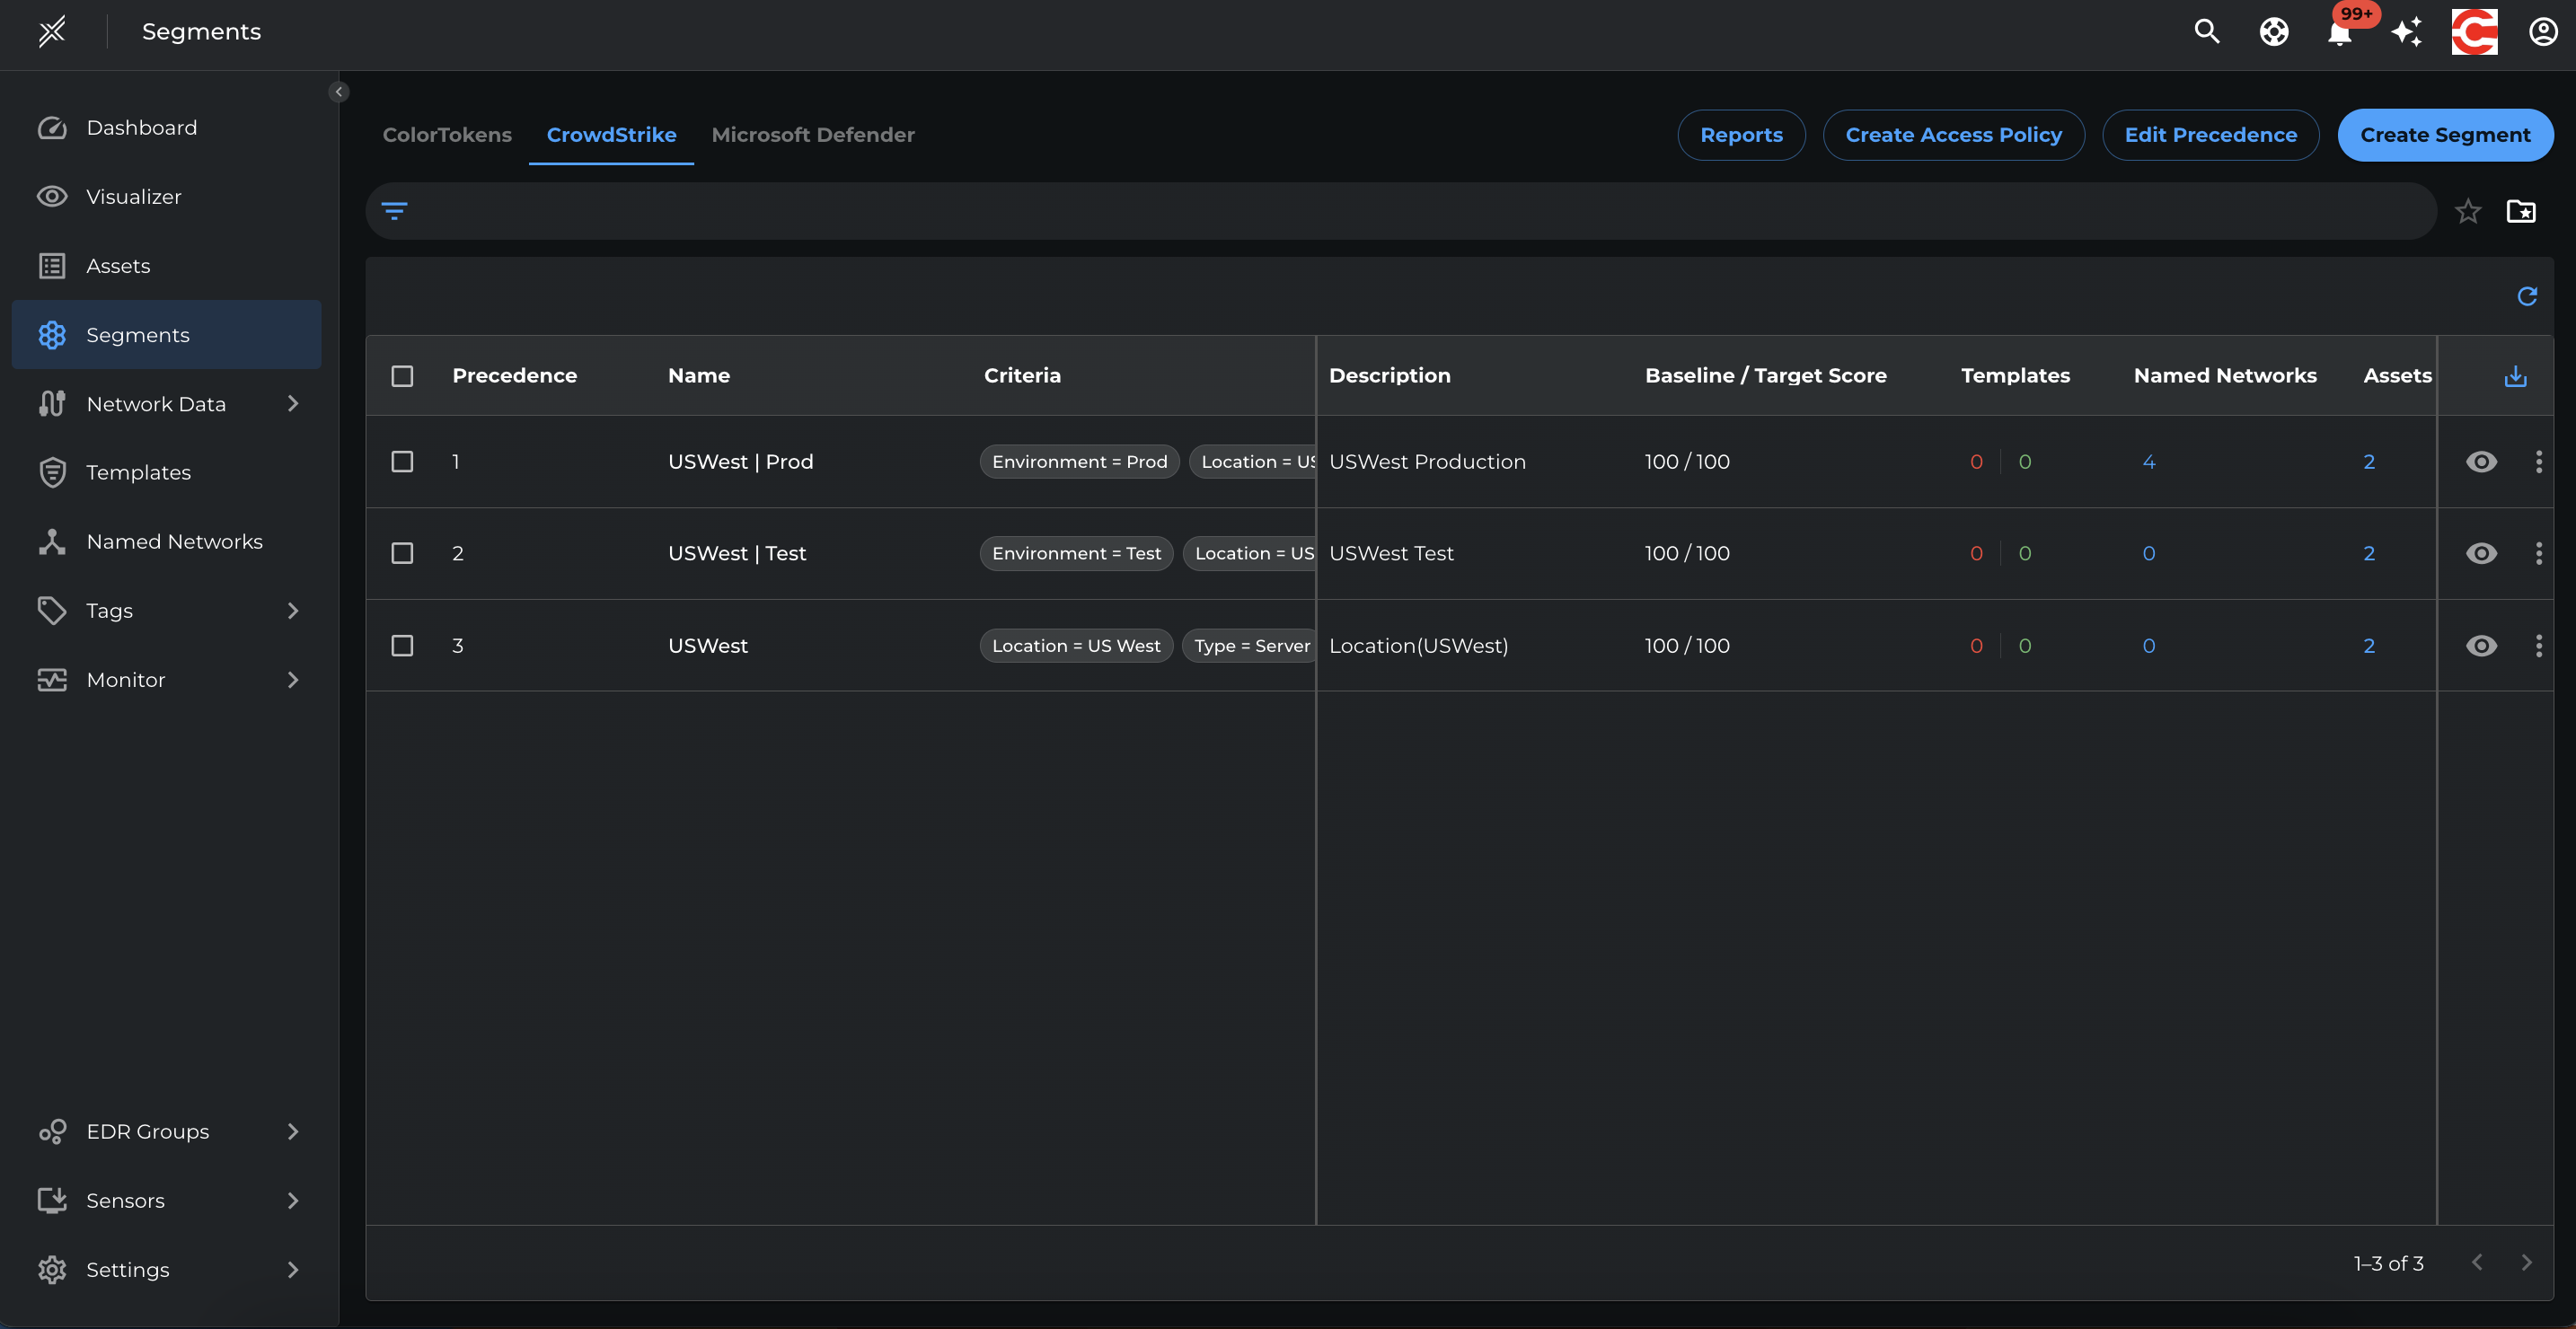
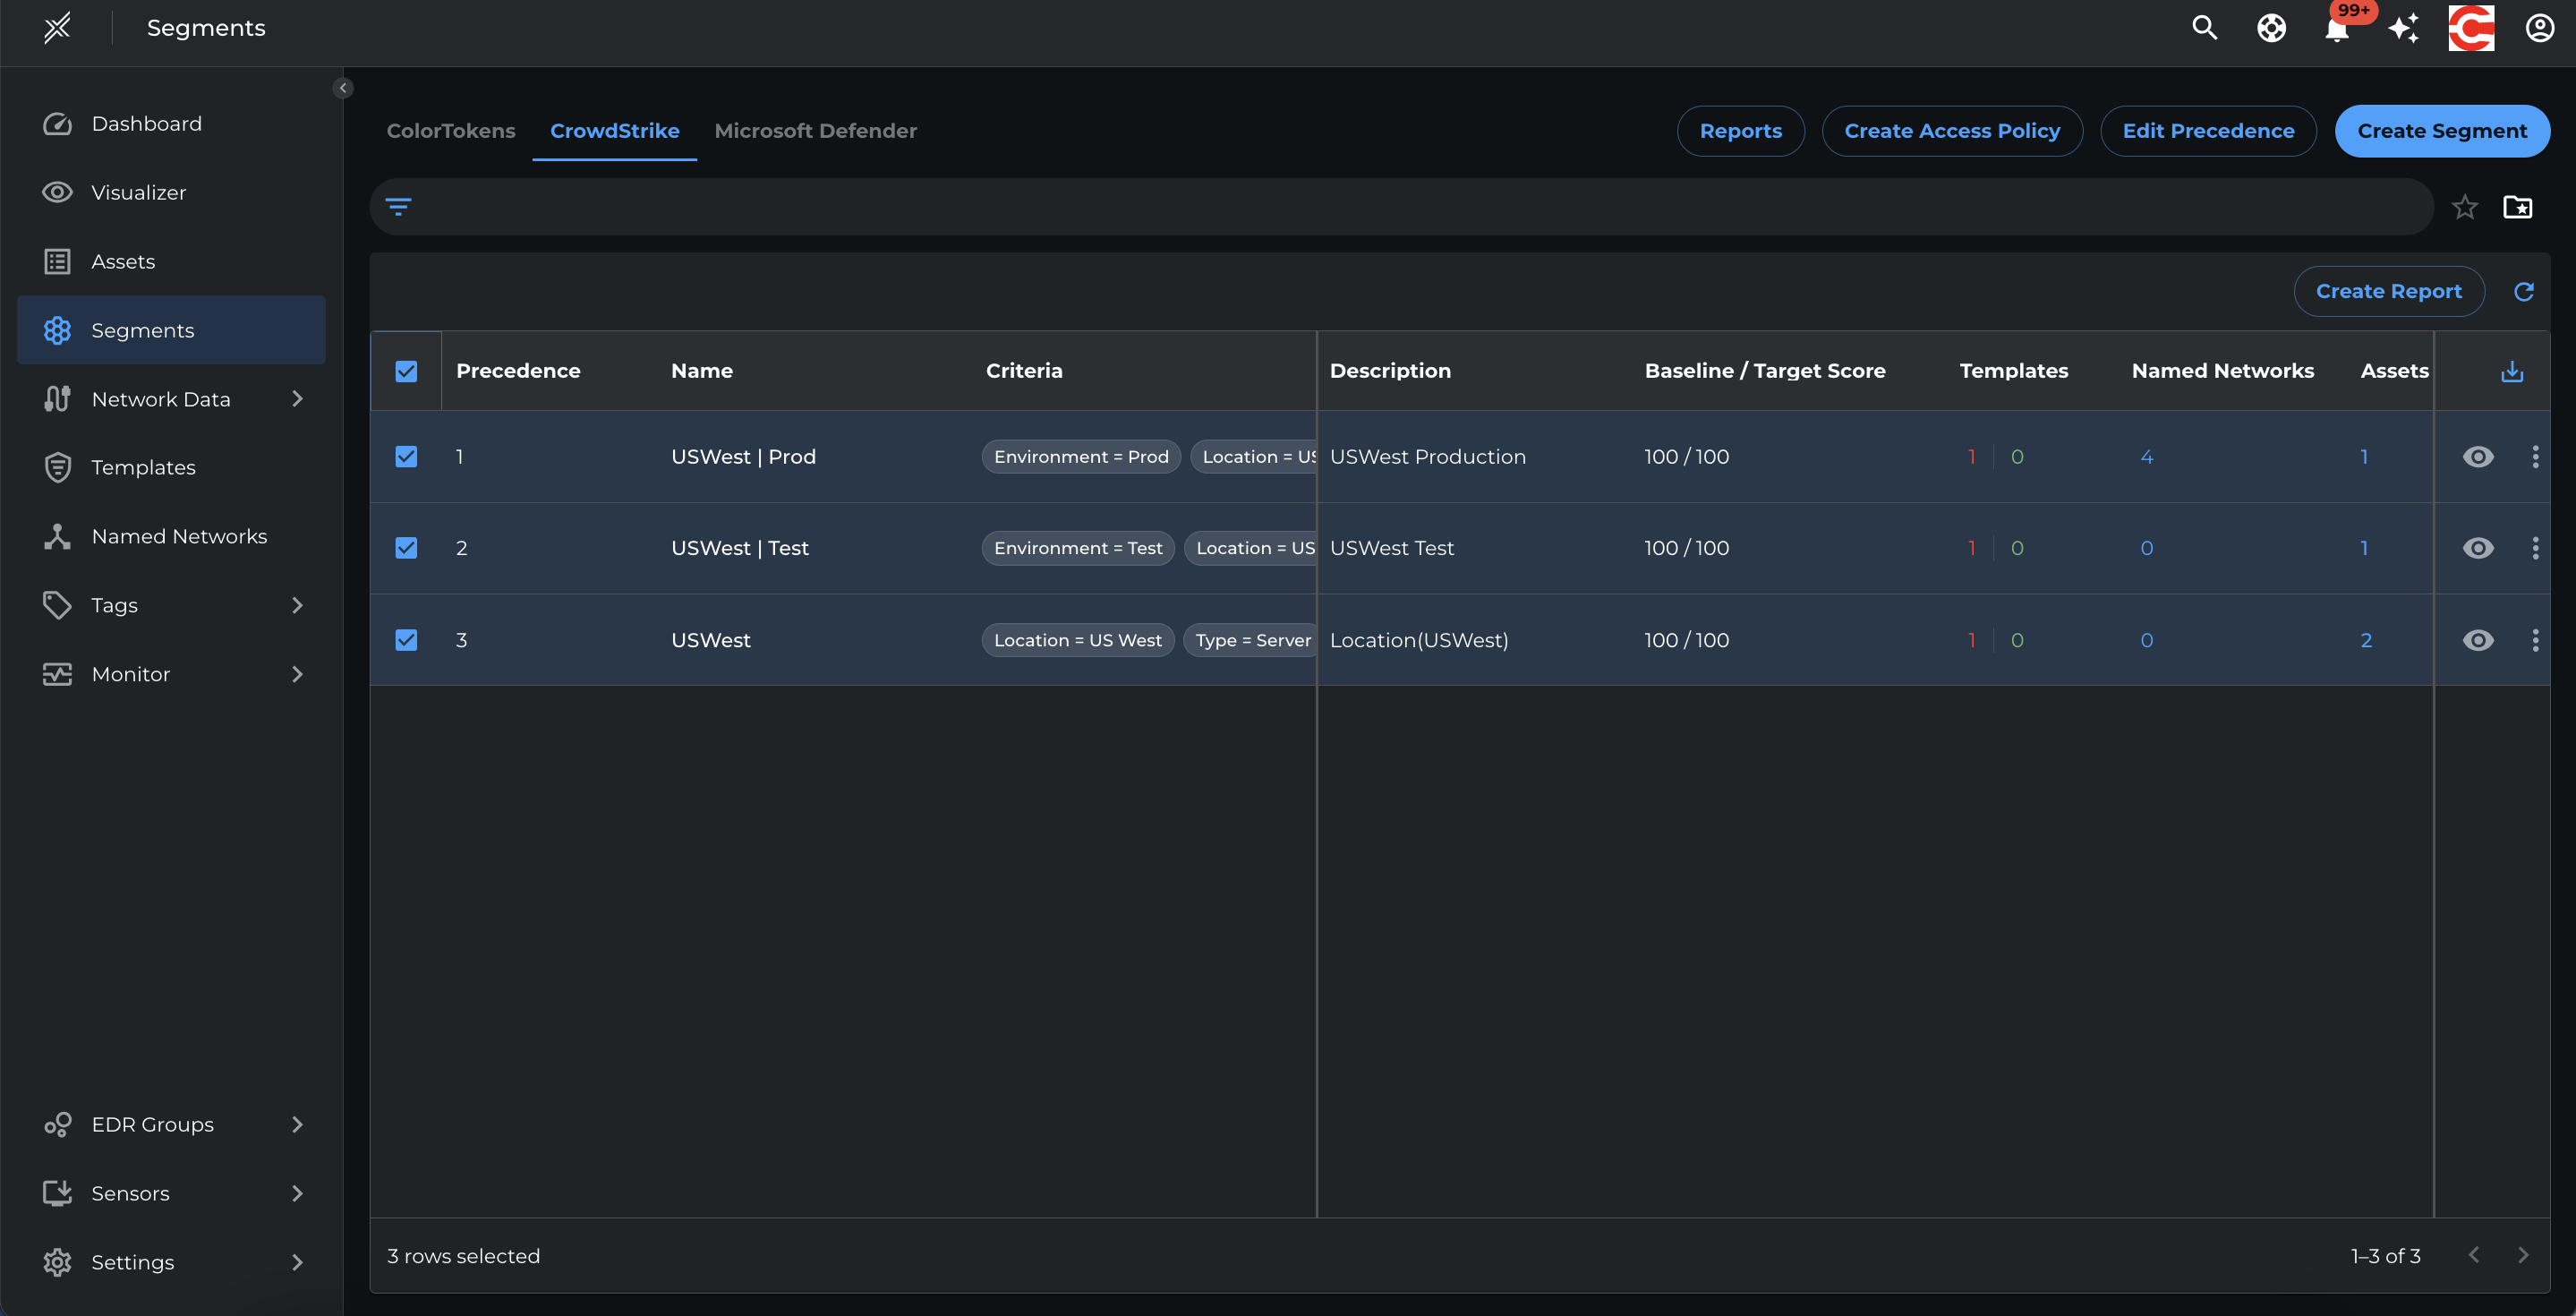
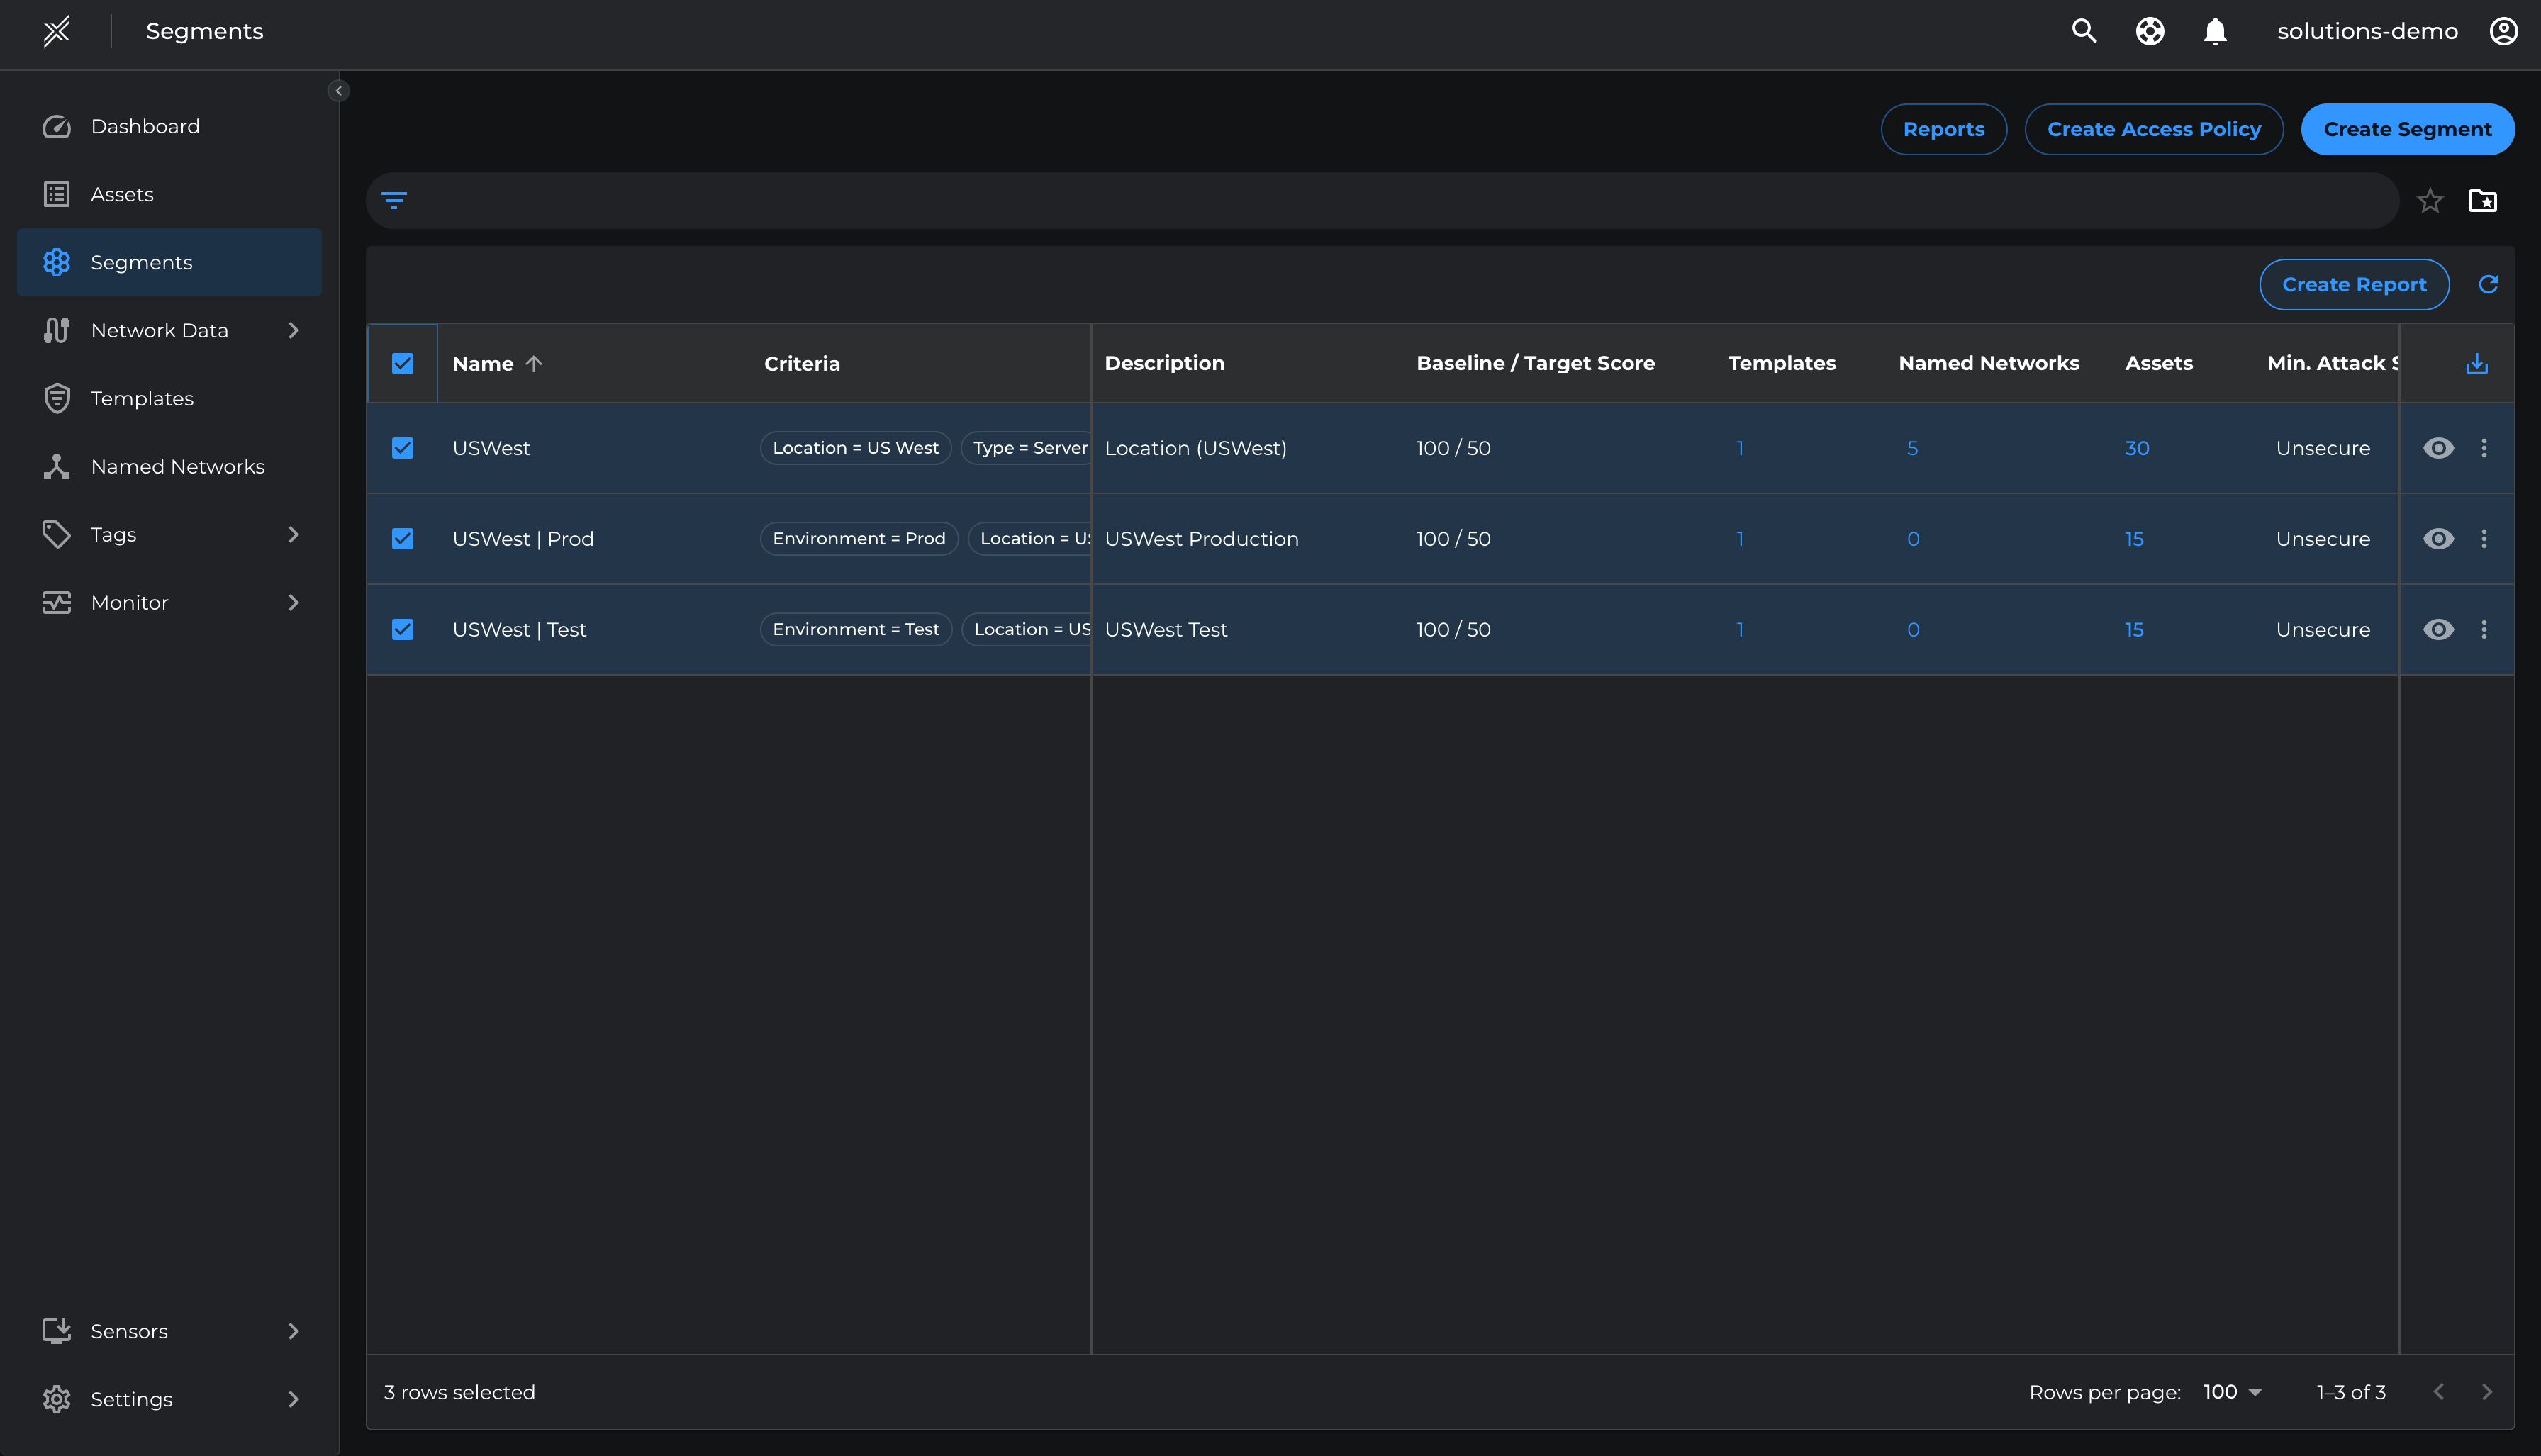
Define Microsoft Defender Segments
Create a Microsoft Defender Segment for all servers in US West Location and individual segments per Environment i.e Test and Production
Go to Segment > Switch to Microsoft Defender tab >Create Segment and enter the name, criteria and breach impact metrics target as 50 for each of the following segments
- USWest > Location=US West, Type=Server
- USWest | Prod > Location=US West, Type=Server, Environment = Prod
- USWest | Test > Location=US West, Type=Server, Environment = Test
Enrichment
Now that we have defined Microsoft Defender Segments, we will next start defining Named Networks, policies for management communications and Infrastructure communications.
Network Discovery
Usually customers have an IP Plan of the network where the IP addresses of management and infrastructure services are usually known. Either use the IP Plan or the Xshield recommendation to define core named networks for Management and Infrastructure services
The named networks created in this step help map IP addresses to known traffic patterns between sources such as DNS servers, jumpservers, bastion hosts etc
Create Named Networks:
Go to Named Networks > Create Named Network and create the following named networks with respective IP ranges.
- IT-Jumpservers: 192.168.11.10/32
- Dev-Ops-Bastion: 192.168.11.11/32
- DNS Servers: 192.168.11.12/32
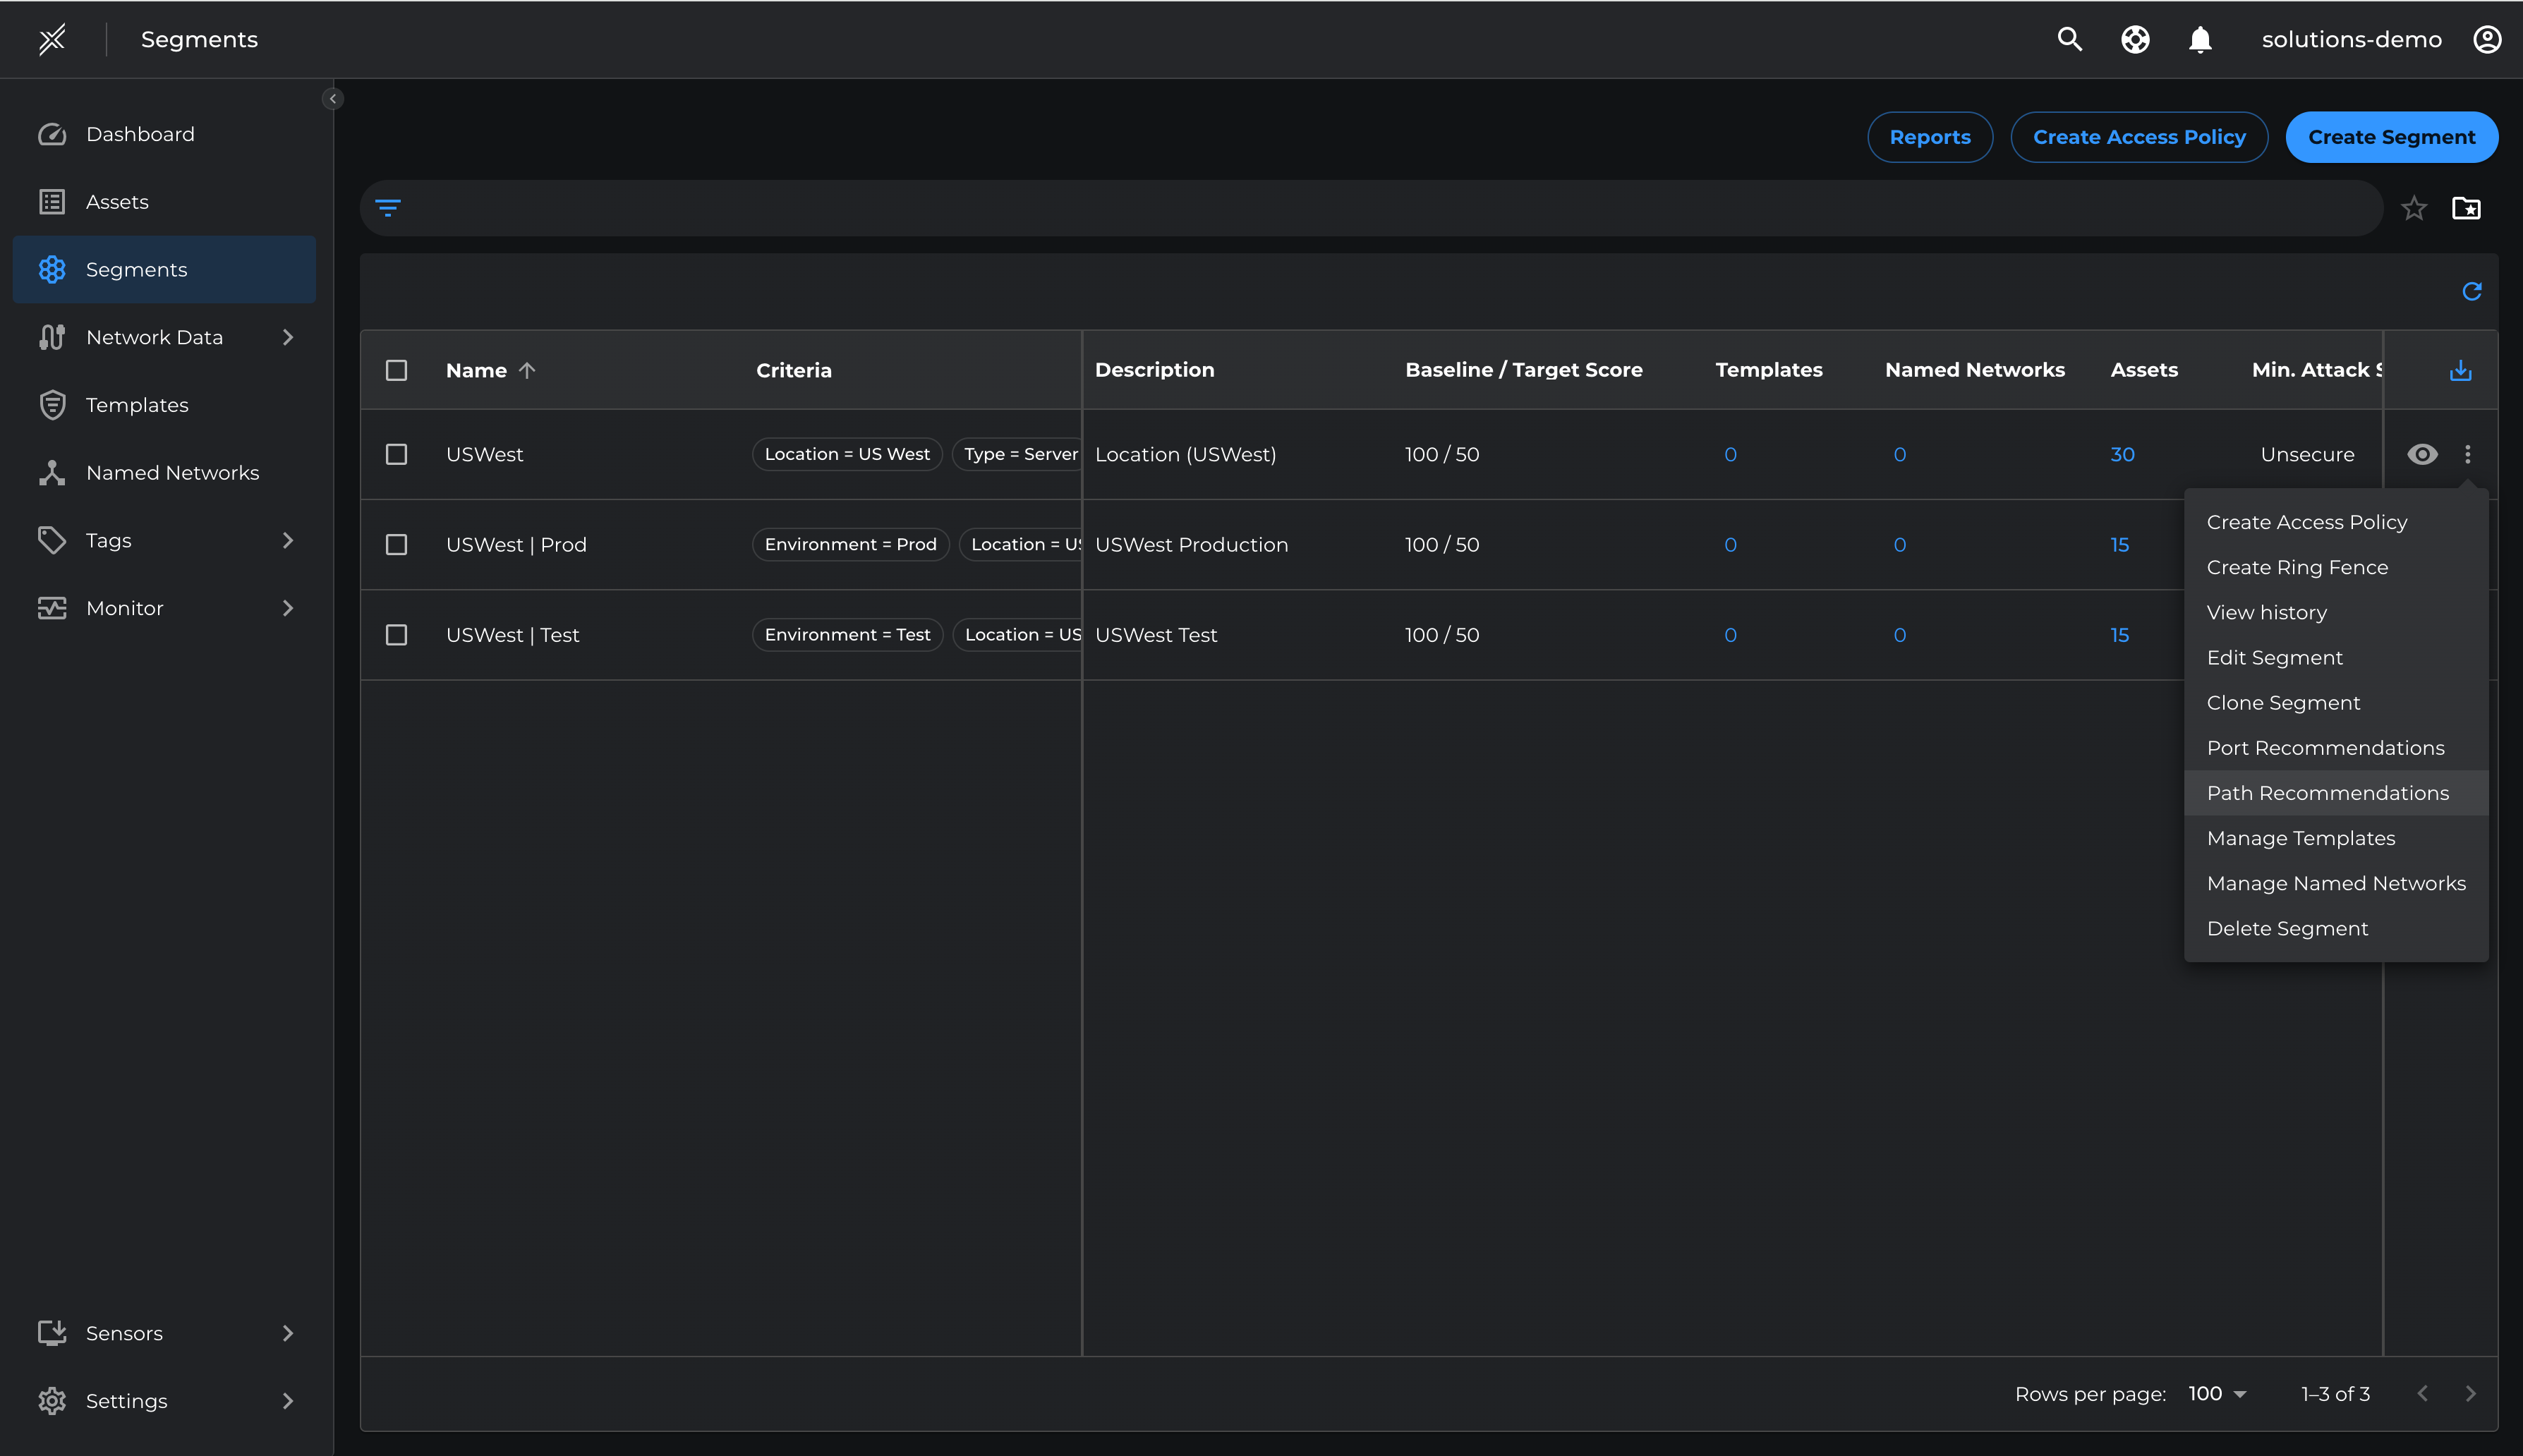
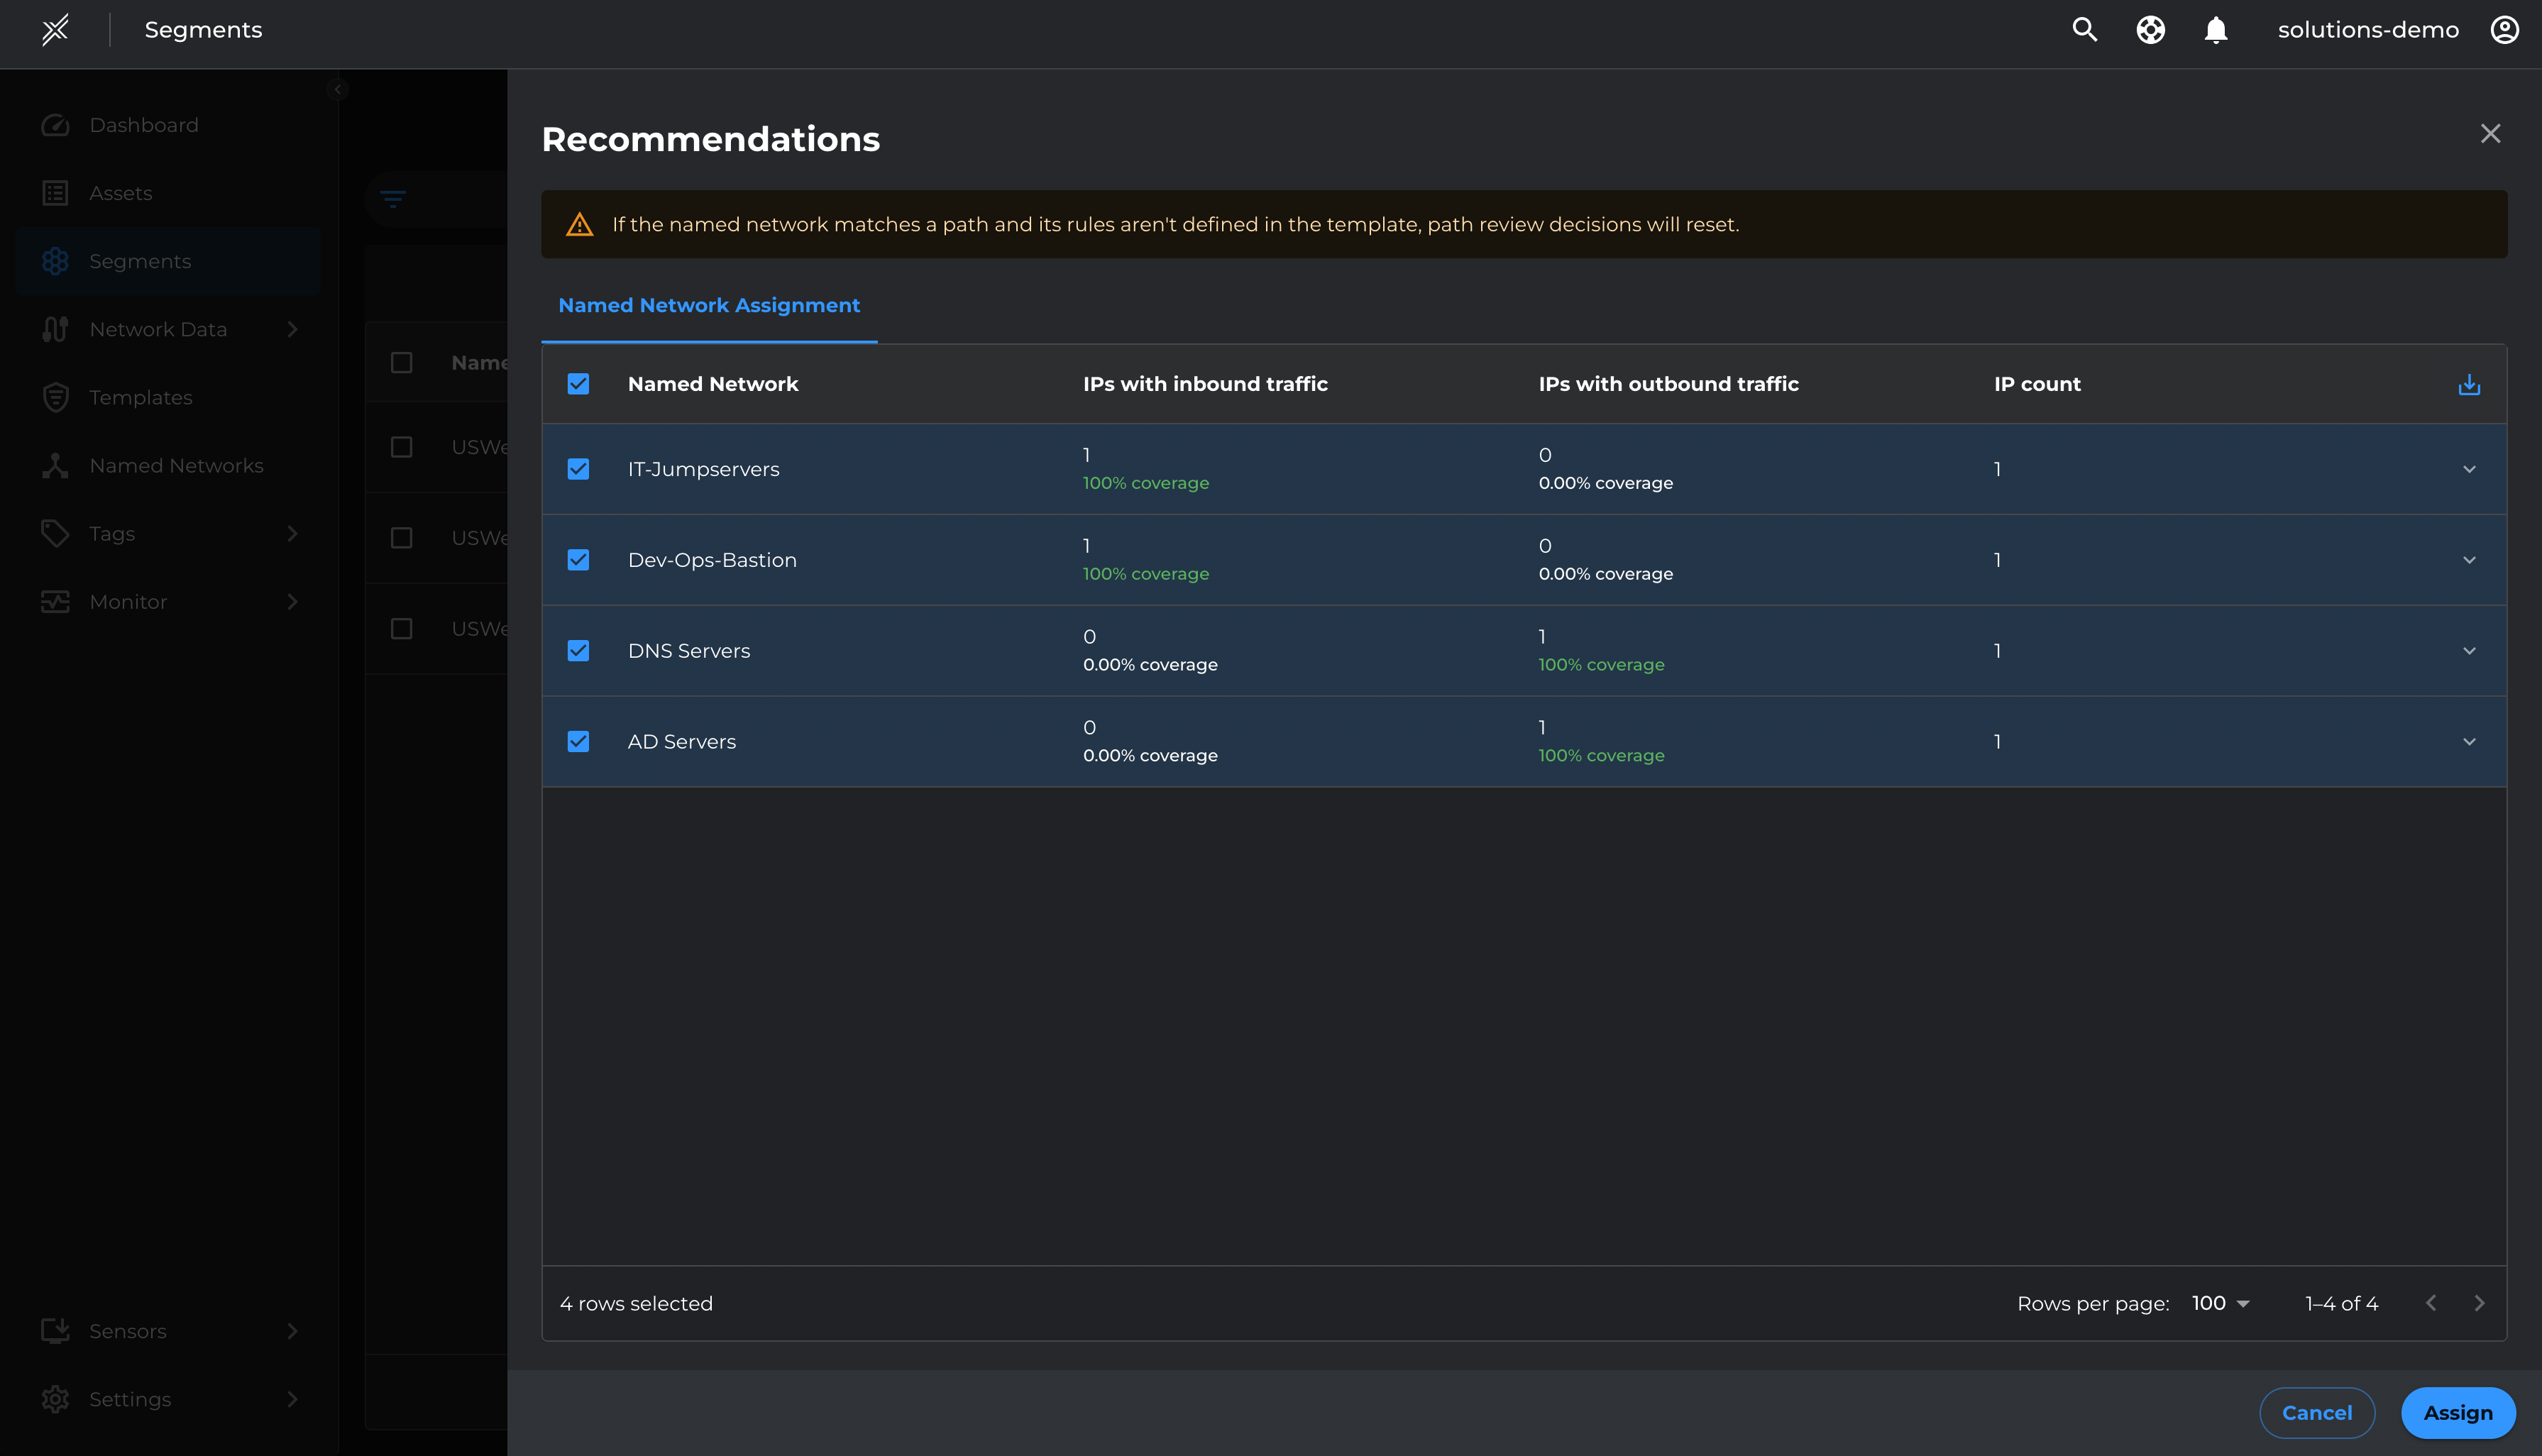
Apply these named networks to respective segments using the recommendation available at the segment level
- Go to each Microsoft Defender segment and click on the 3 dots at the end > Path recommendations > Named Network Assignment
- Select the recommended Named Networks > Assign
Management Policy Templates
Based on the discovered network flows in the previous section, we will define policies for Management communications such as privileged access between Servers and Bastion hosts, IT jumpservers, IT tools etc.
Management communications are usually from a few management servers or tools such as bastion hosts, jumpservers etc to many managed assets. This represents inbound communication from the asset's perspective.
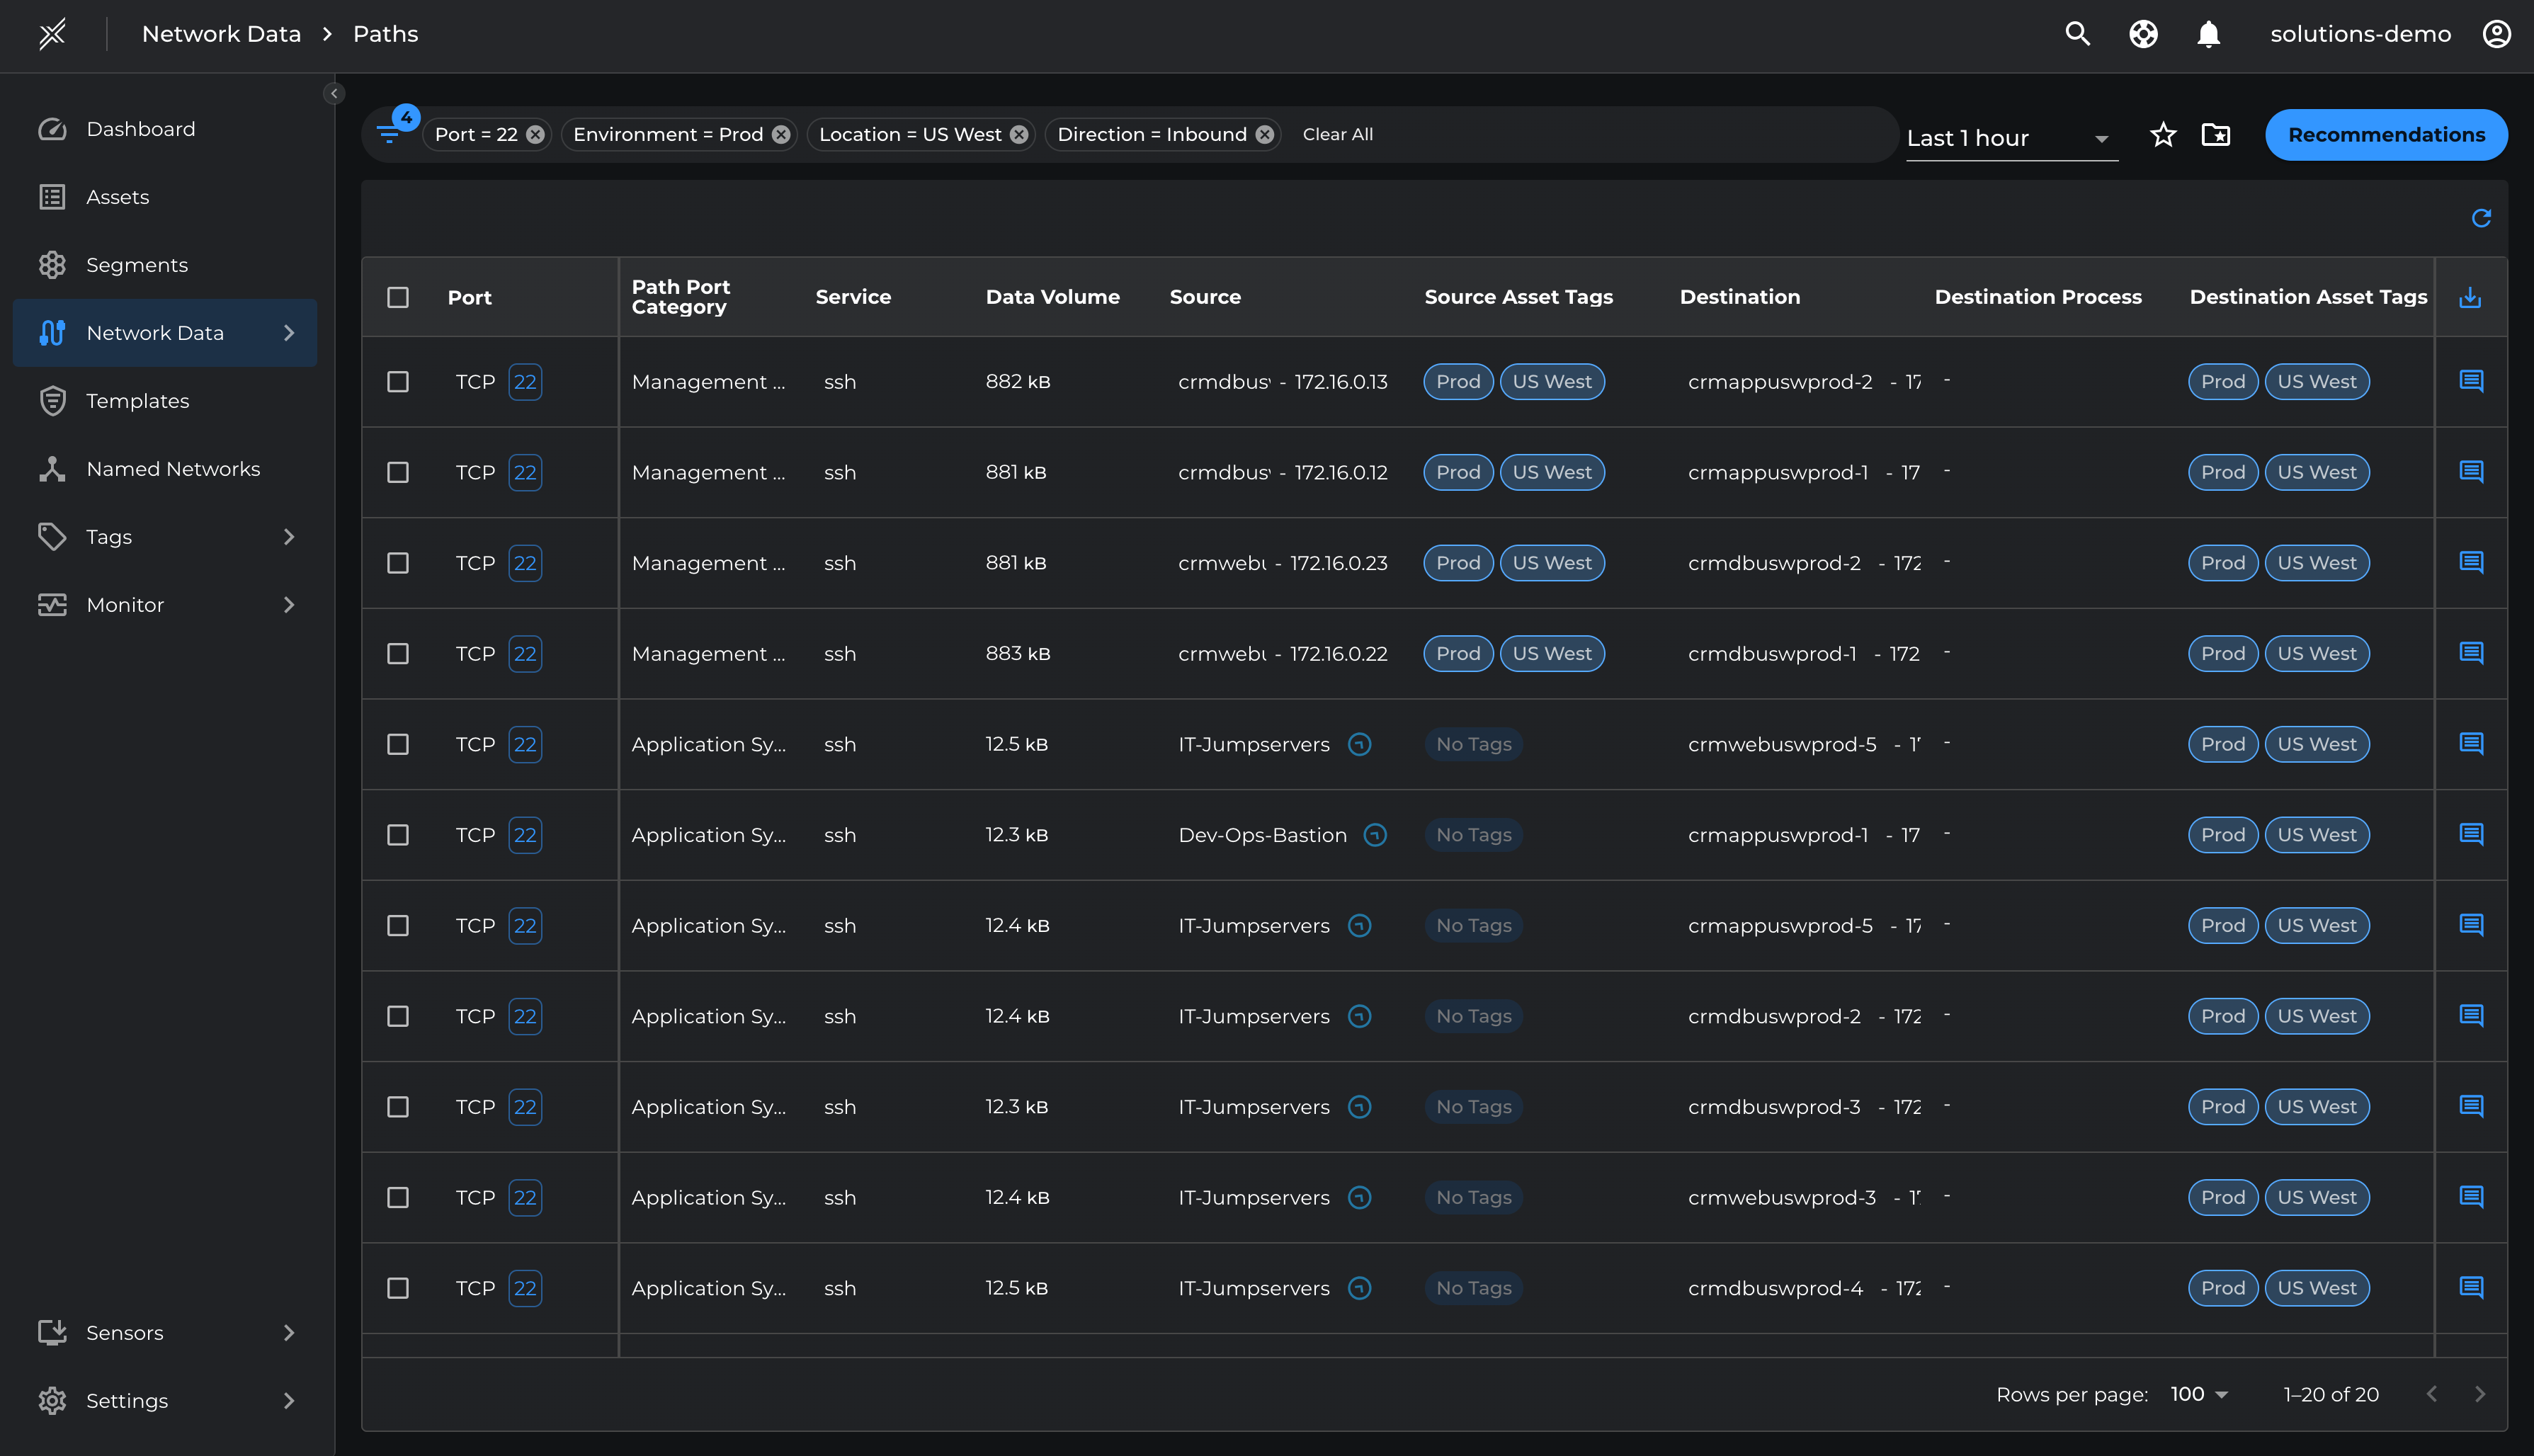
Leverage Path Template recommendation to create Management templates
- Go to Network Data > Paths
- Filter by Environment=Prod, Location=US West
- Click on Recommendation
- Select the relevant management ports (22 and 443 for Prod, 22 and 80 for Test) and Add To Template
- Name the Template with Management Access or Privileged Access and Save
We will define specific policies applicable to US West Location, Prod and Test Environments.

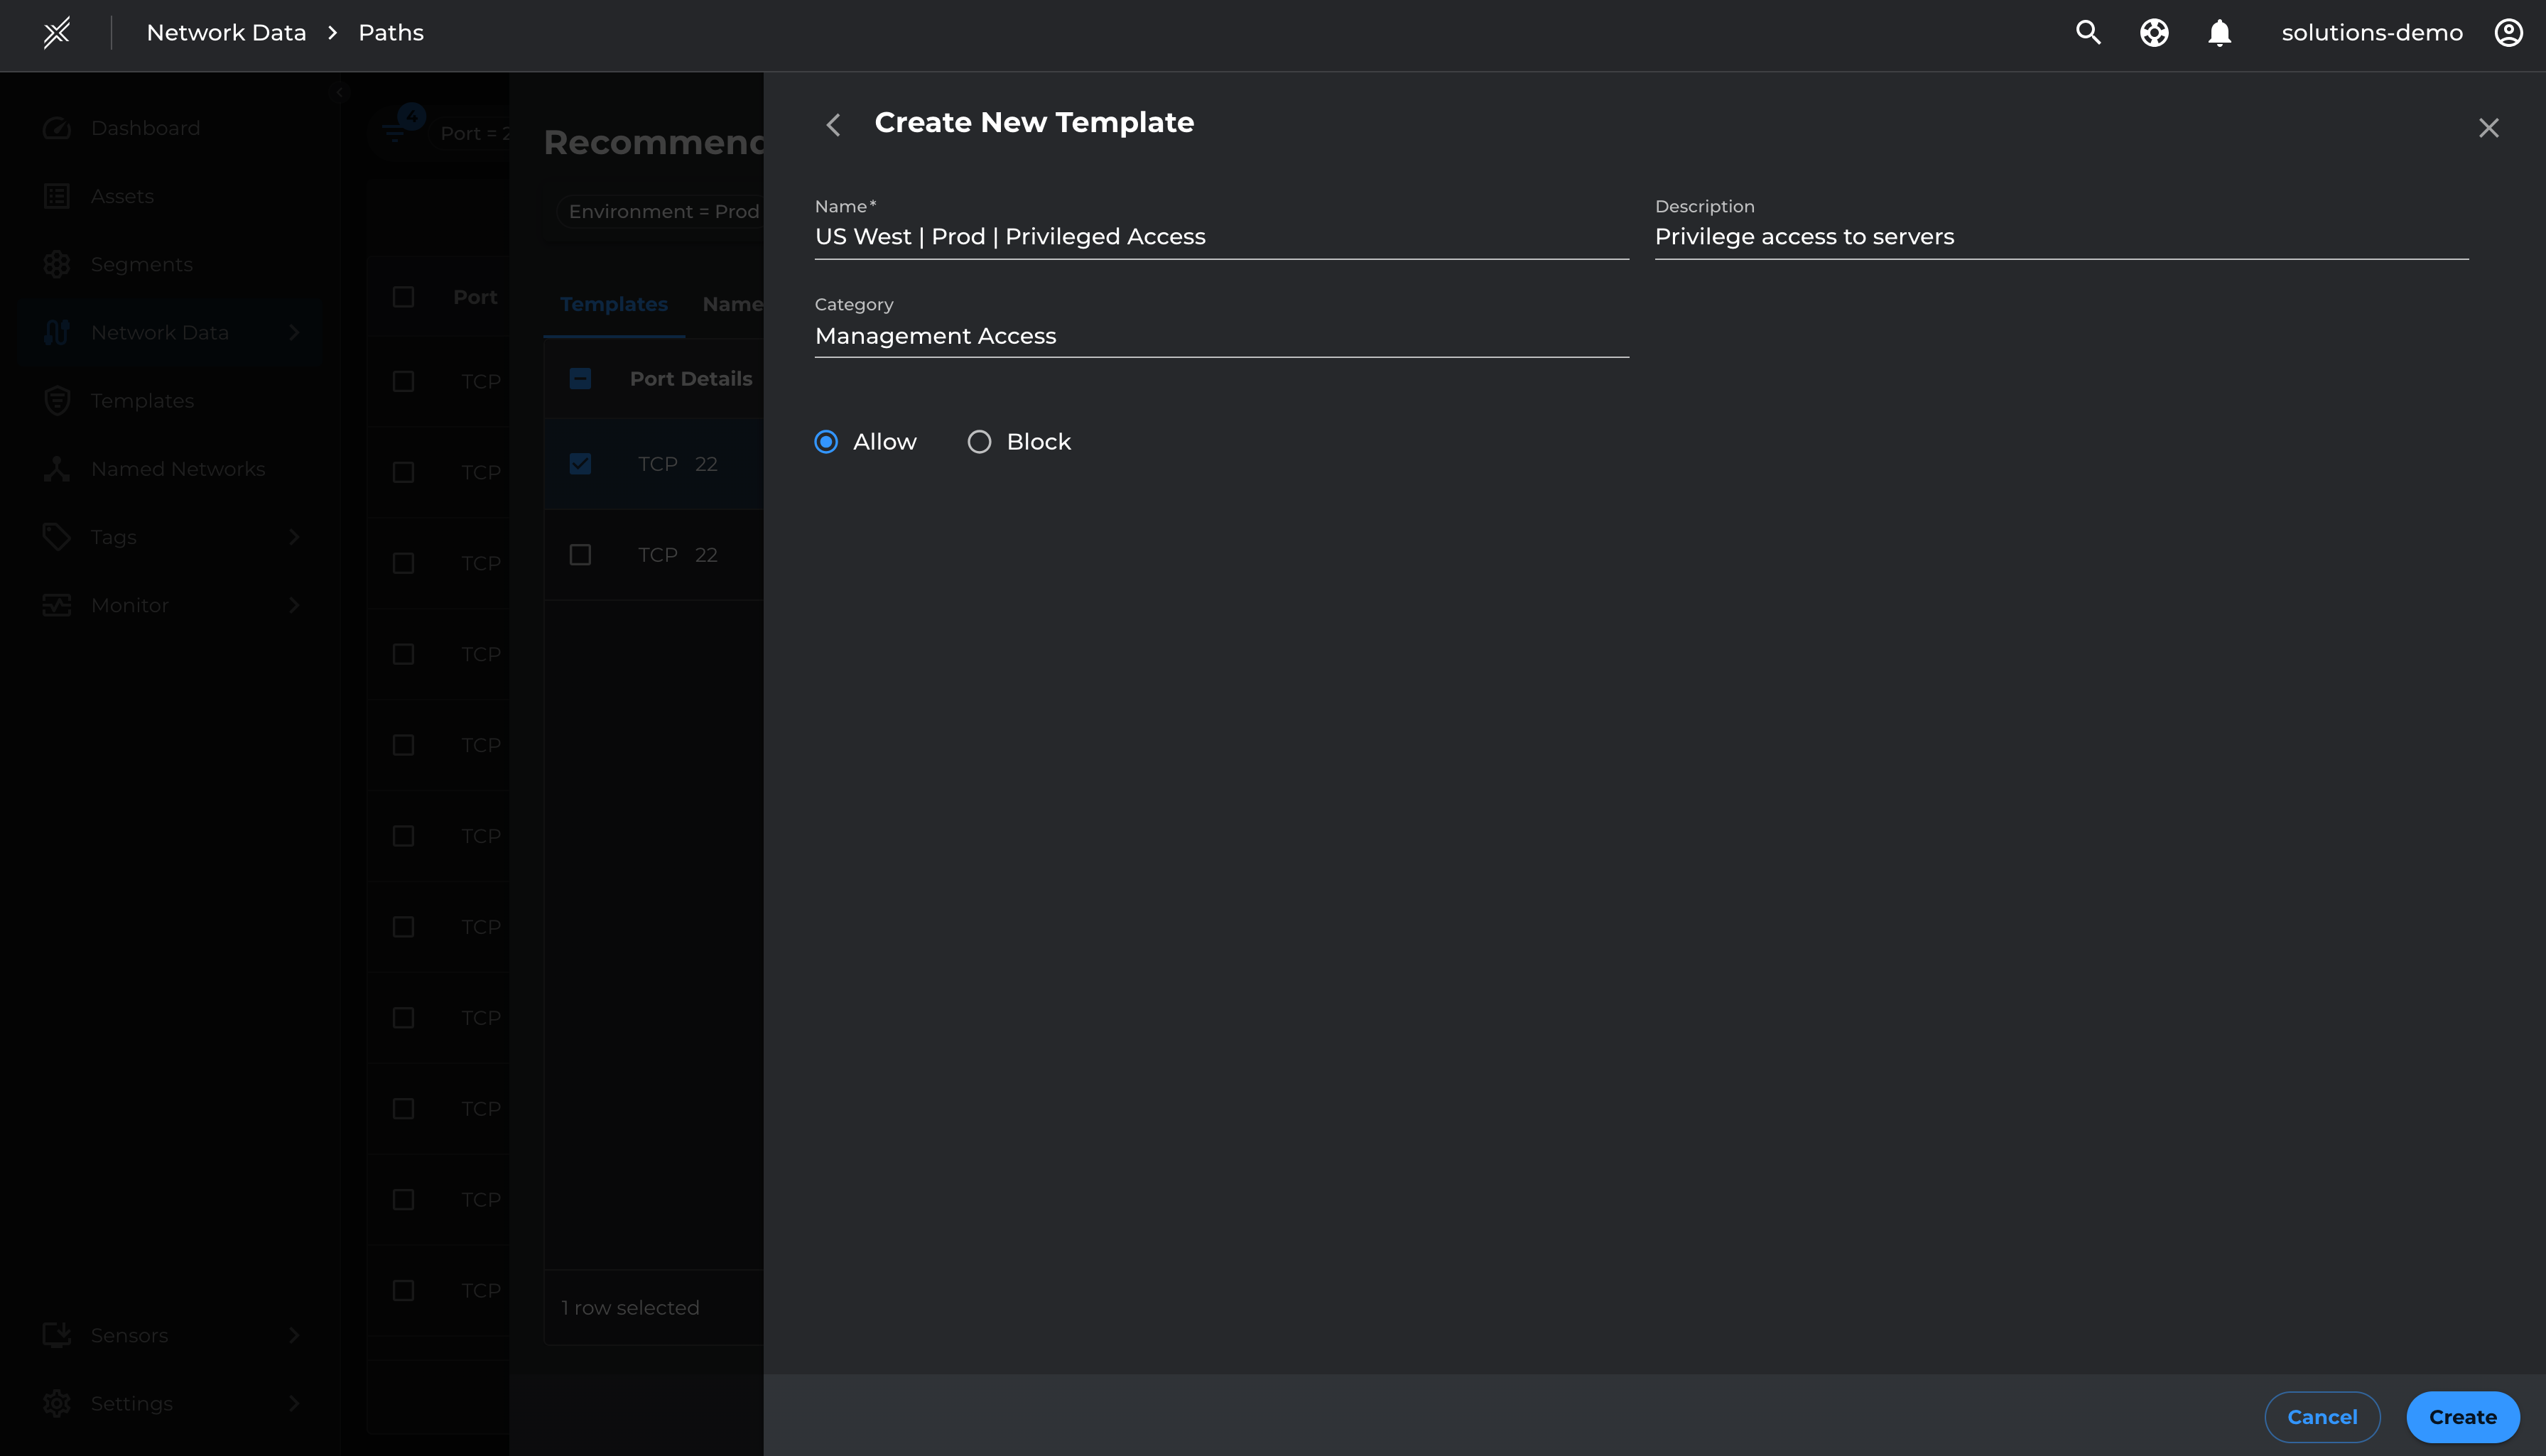

Do the same for TCP 443 and add to the US West | Prod | Privileged Access template created previously
We will follow the same process to create templates for US West Test environment for TCP 22 from IT-Jumpservers named network and TCP 80 from Dev-Ops-Bastion named network

Infrastructure Policy Templates
Infrastructure communications are usually from a large number of managed assets to a few Infrastructure services/ servers. This represents outbound communication from the asset's perspective.
Let us define policies for such communications between assets and infrastructure services such as DNS, AD, Domain controllers etc. Also define policies between servers and security services such as SIEM, vulnarability scanners and EDRs
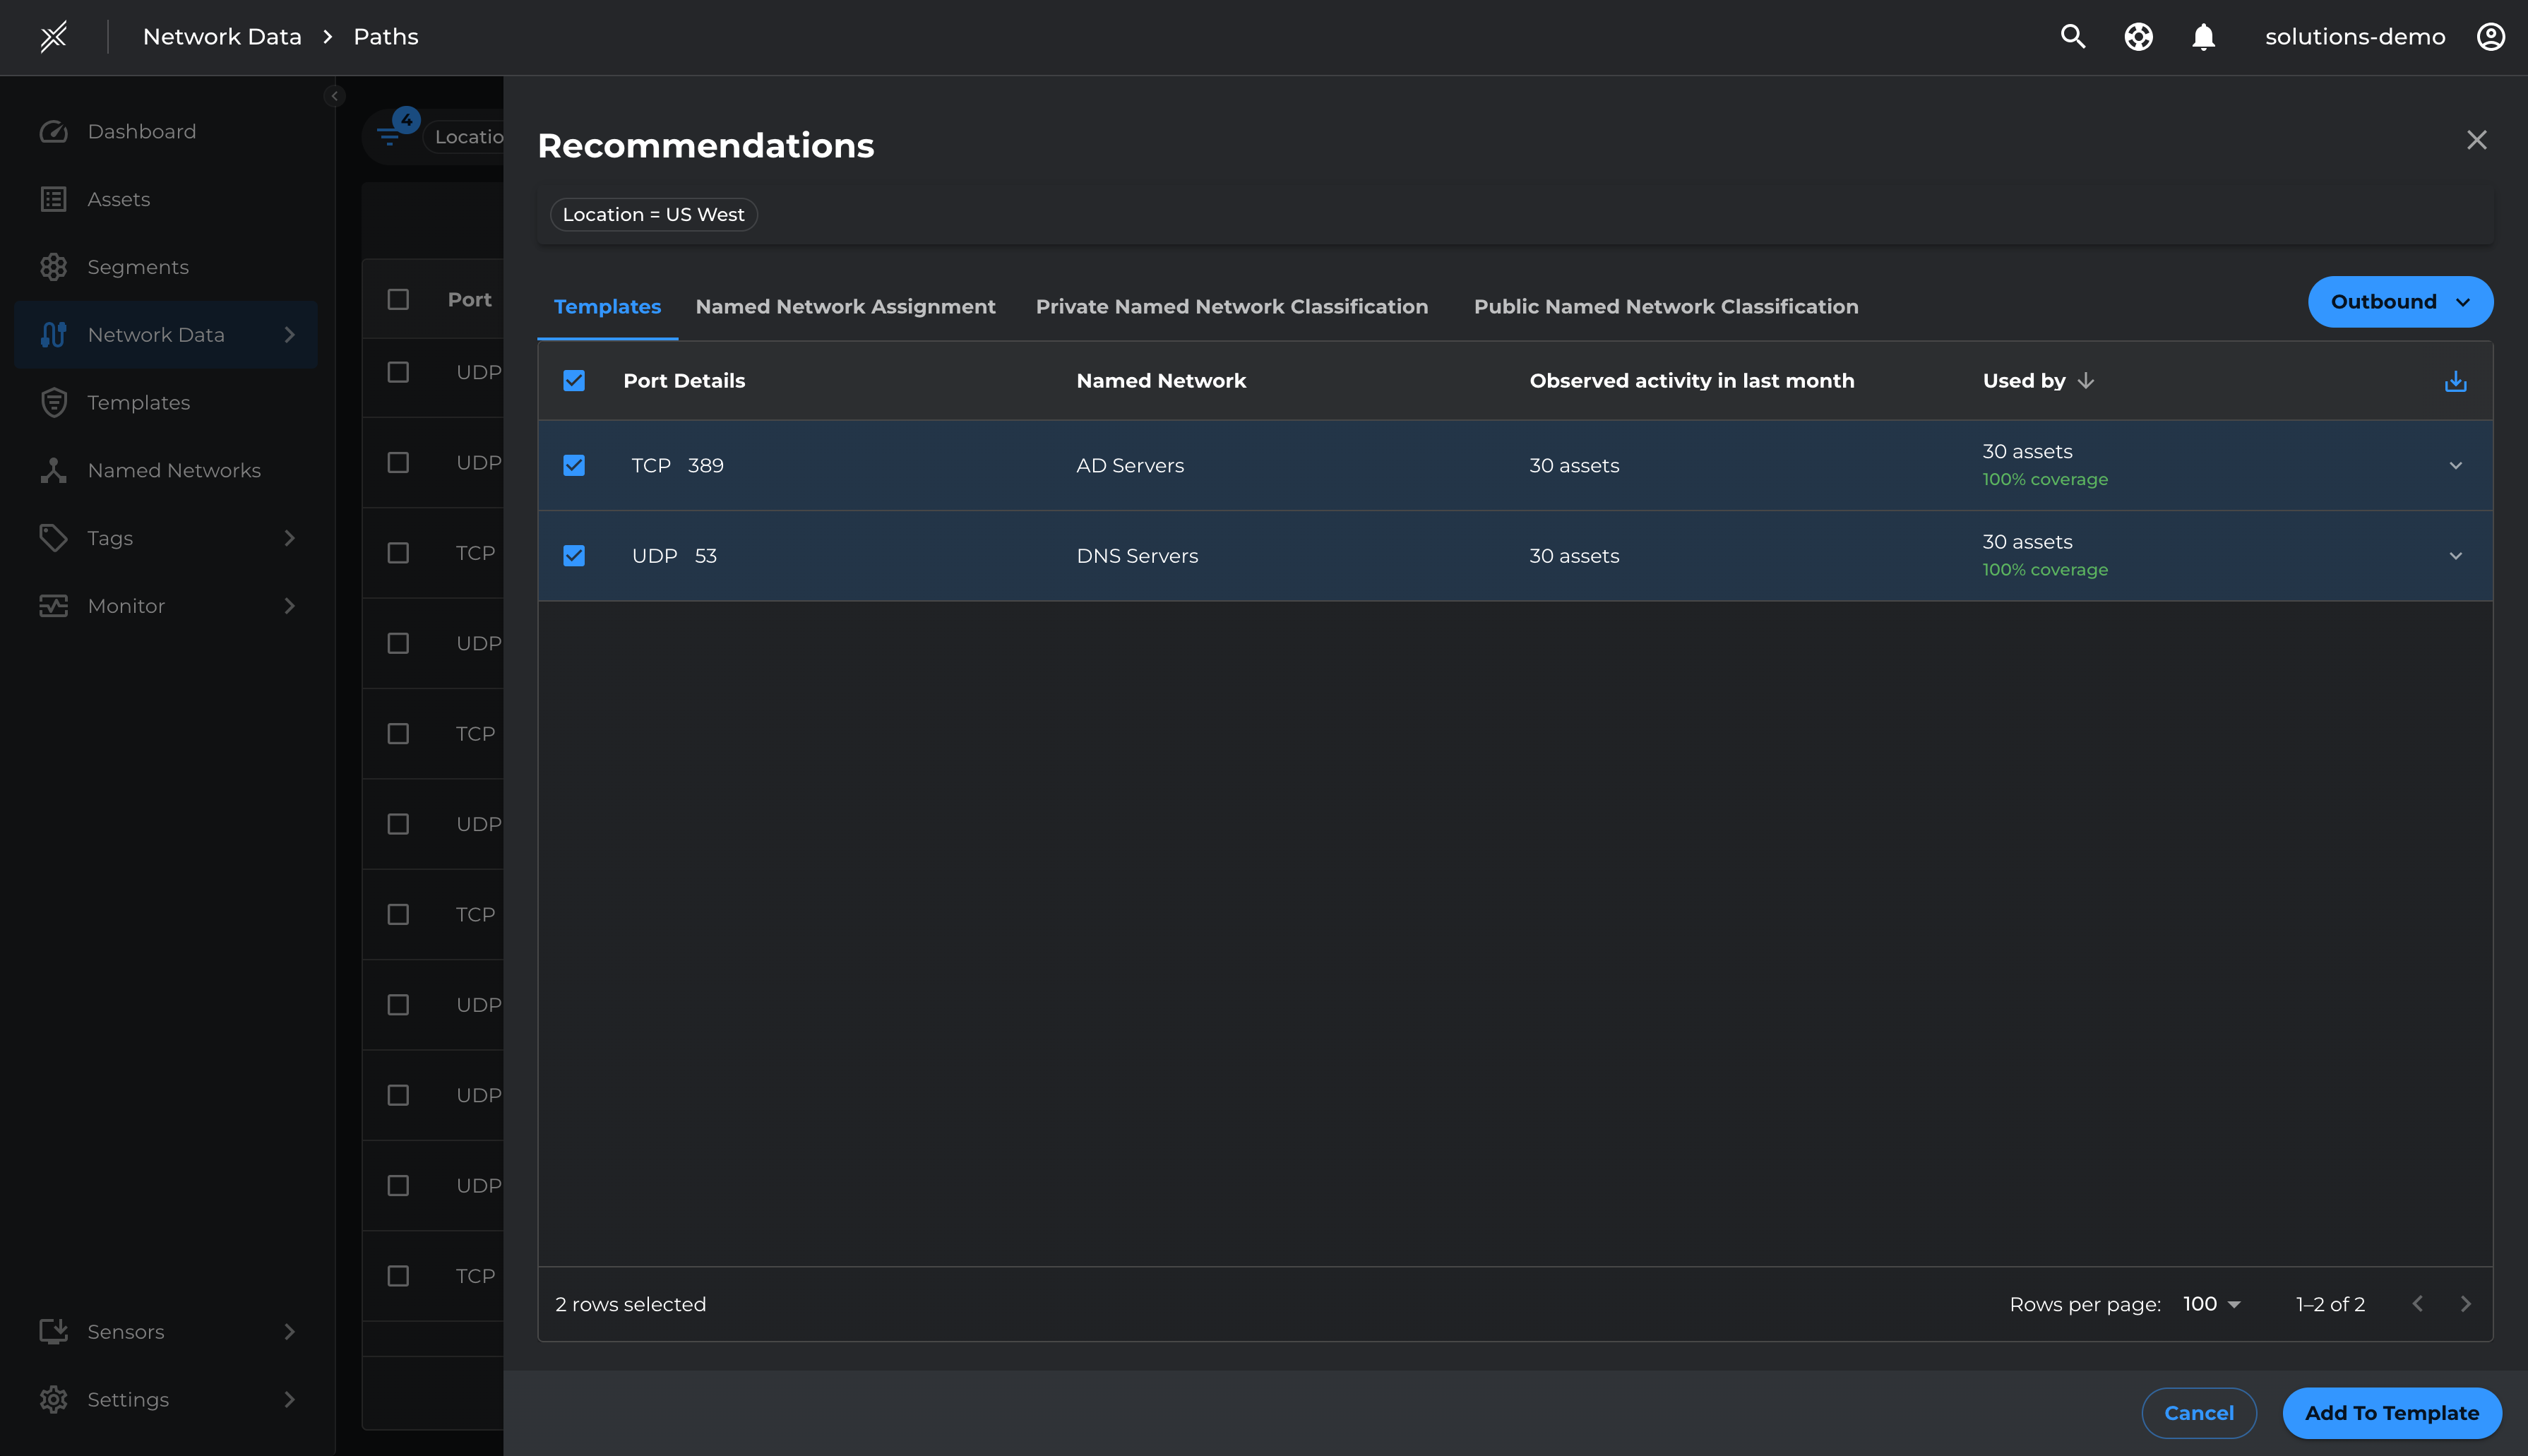
Leverage Path Template recommendation to create Infrastructure Templates
- Go to Network Data > Paths
- Filter by Location=US West, Direction=Outbound
- Click on Recommendation
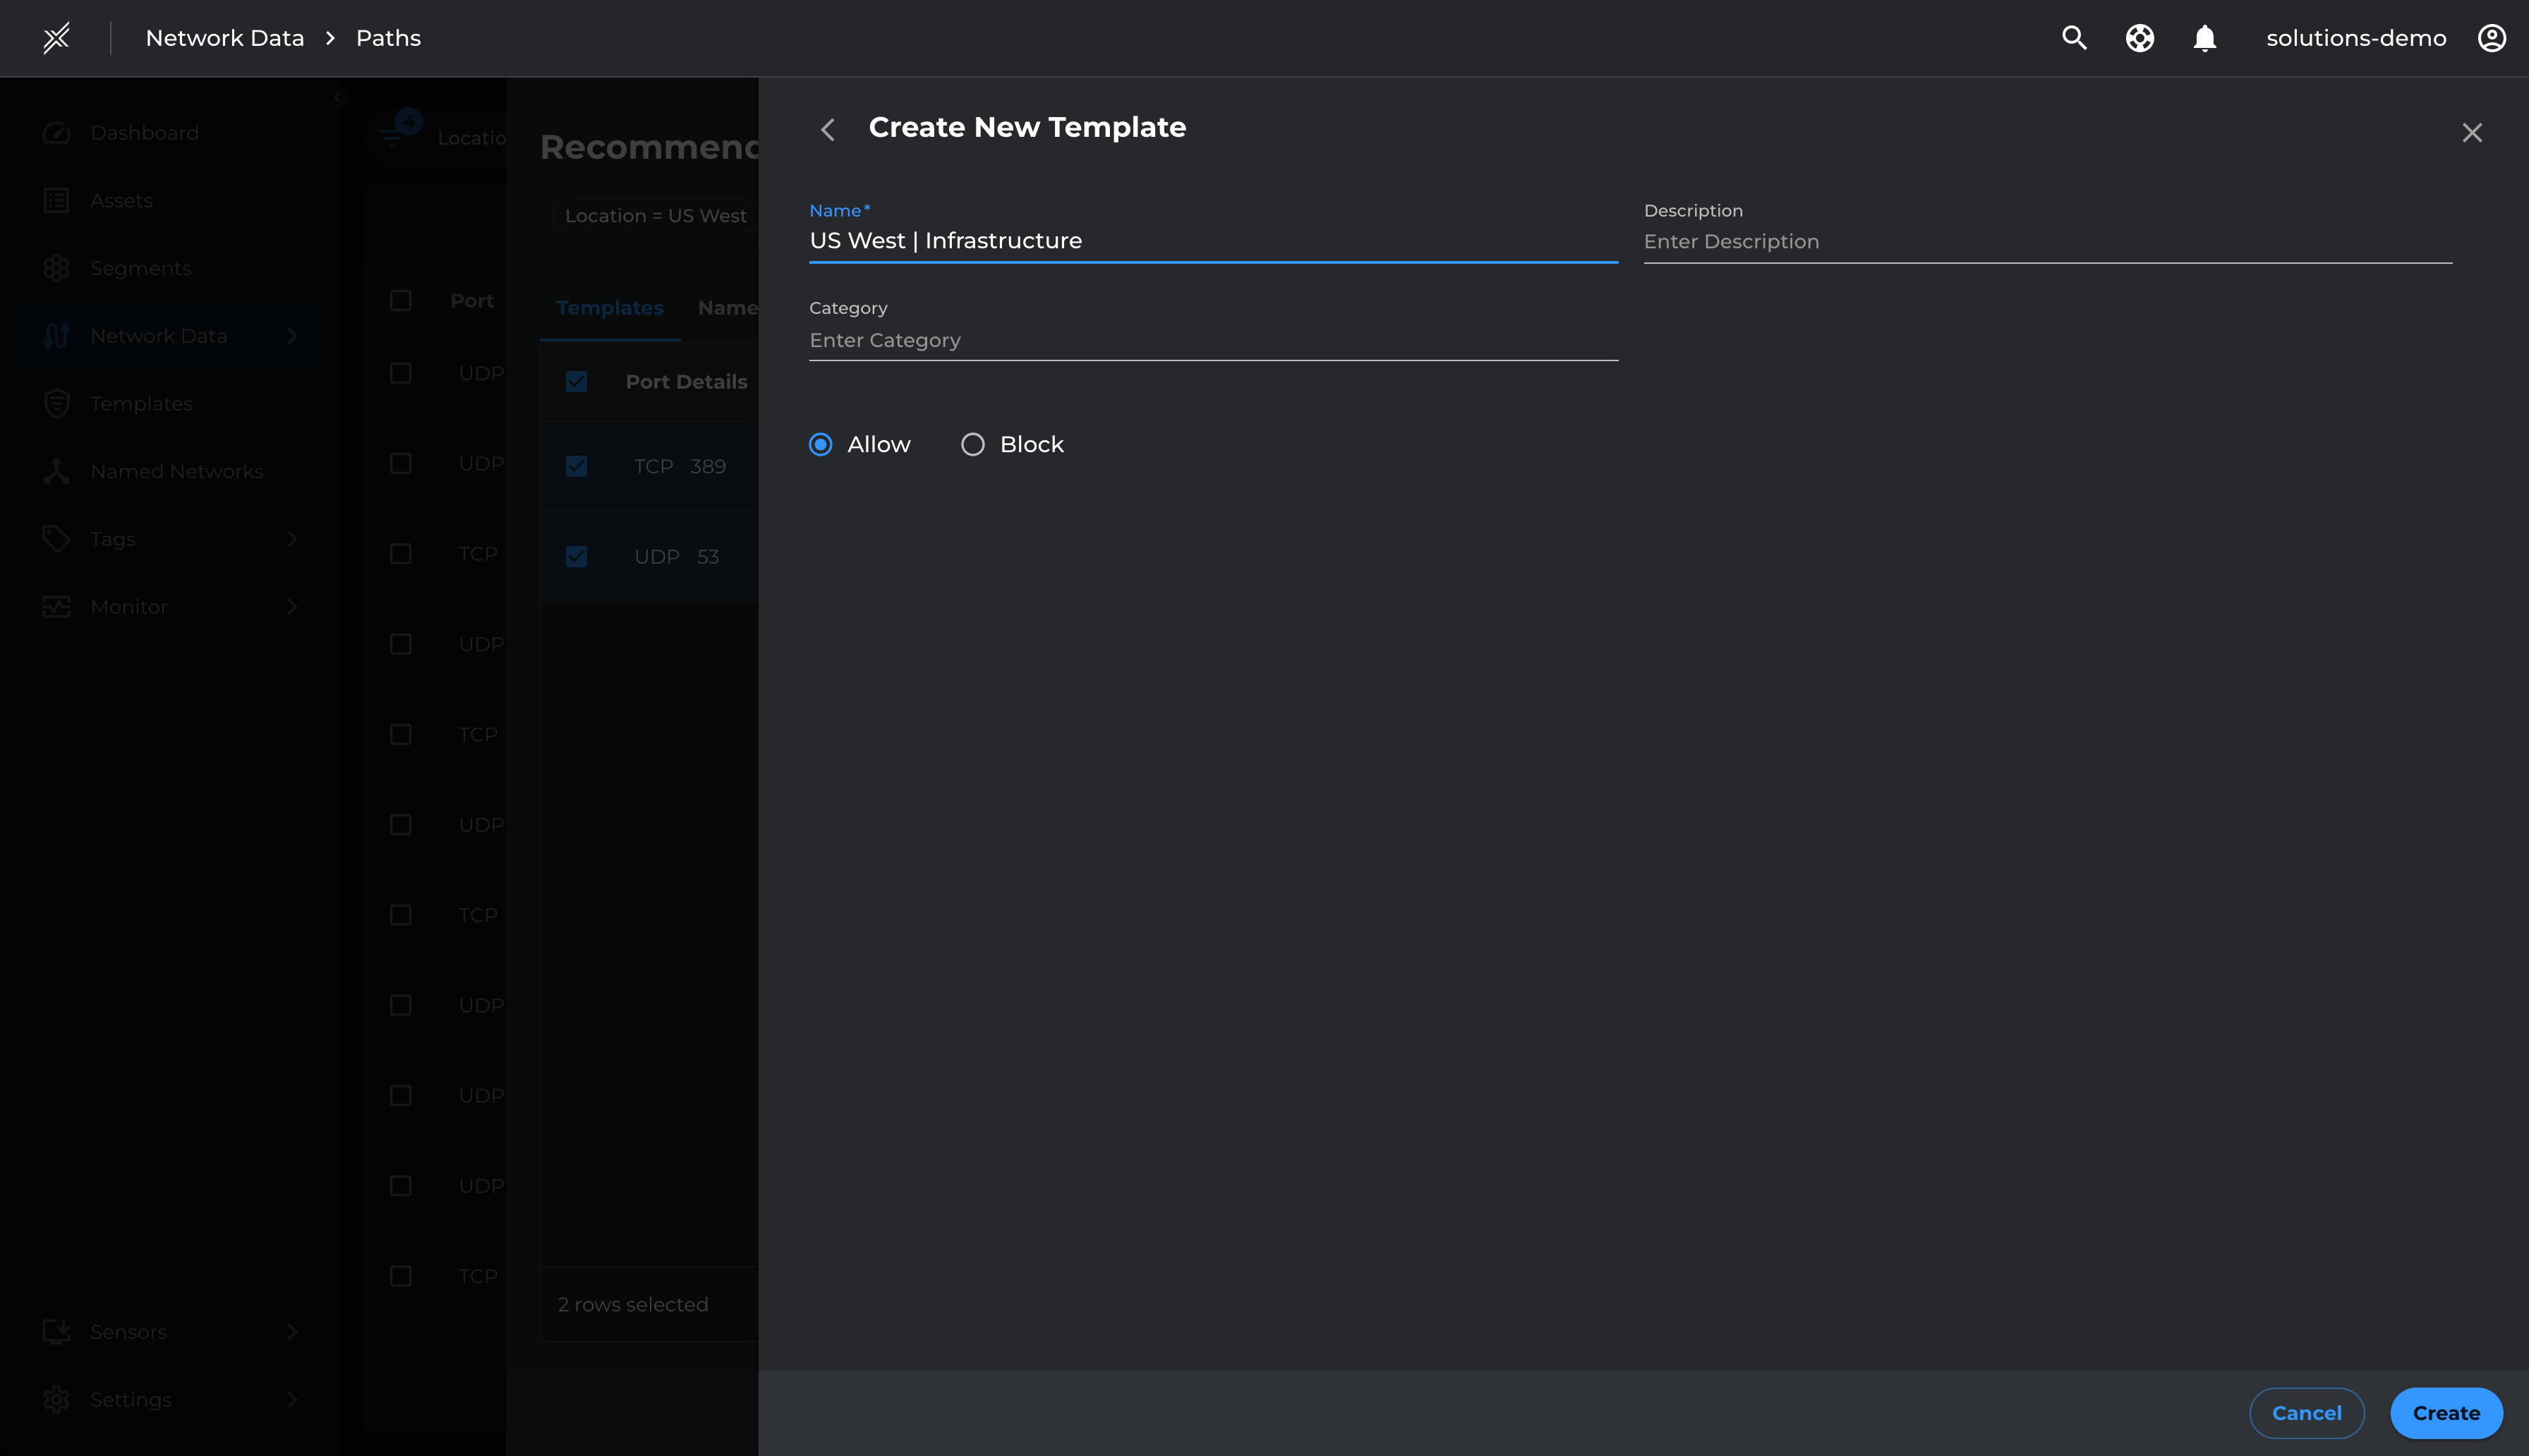
- Select the relevant infrastructure ports and Add To Template
- Name the Template as US West | Infrastructure and Save
Apply Management and Infrastructure Policy Templates to Segments
Now that we have defined the core named networks and templates for management and Infrastructure services, attach these named networks and templates to respective segments
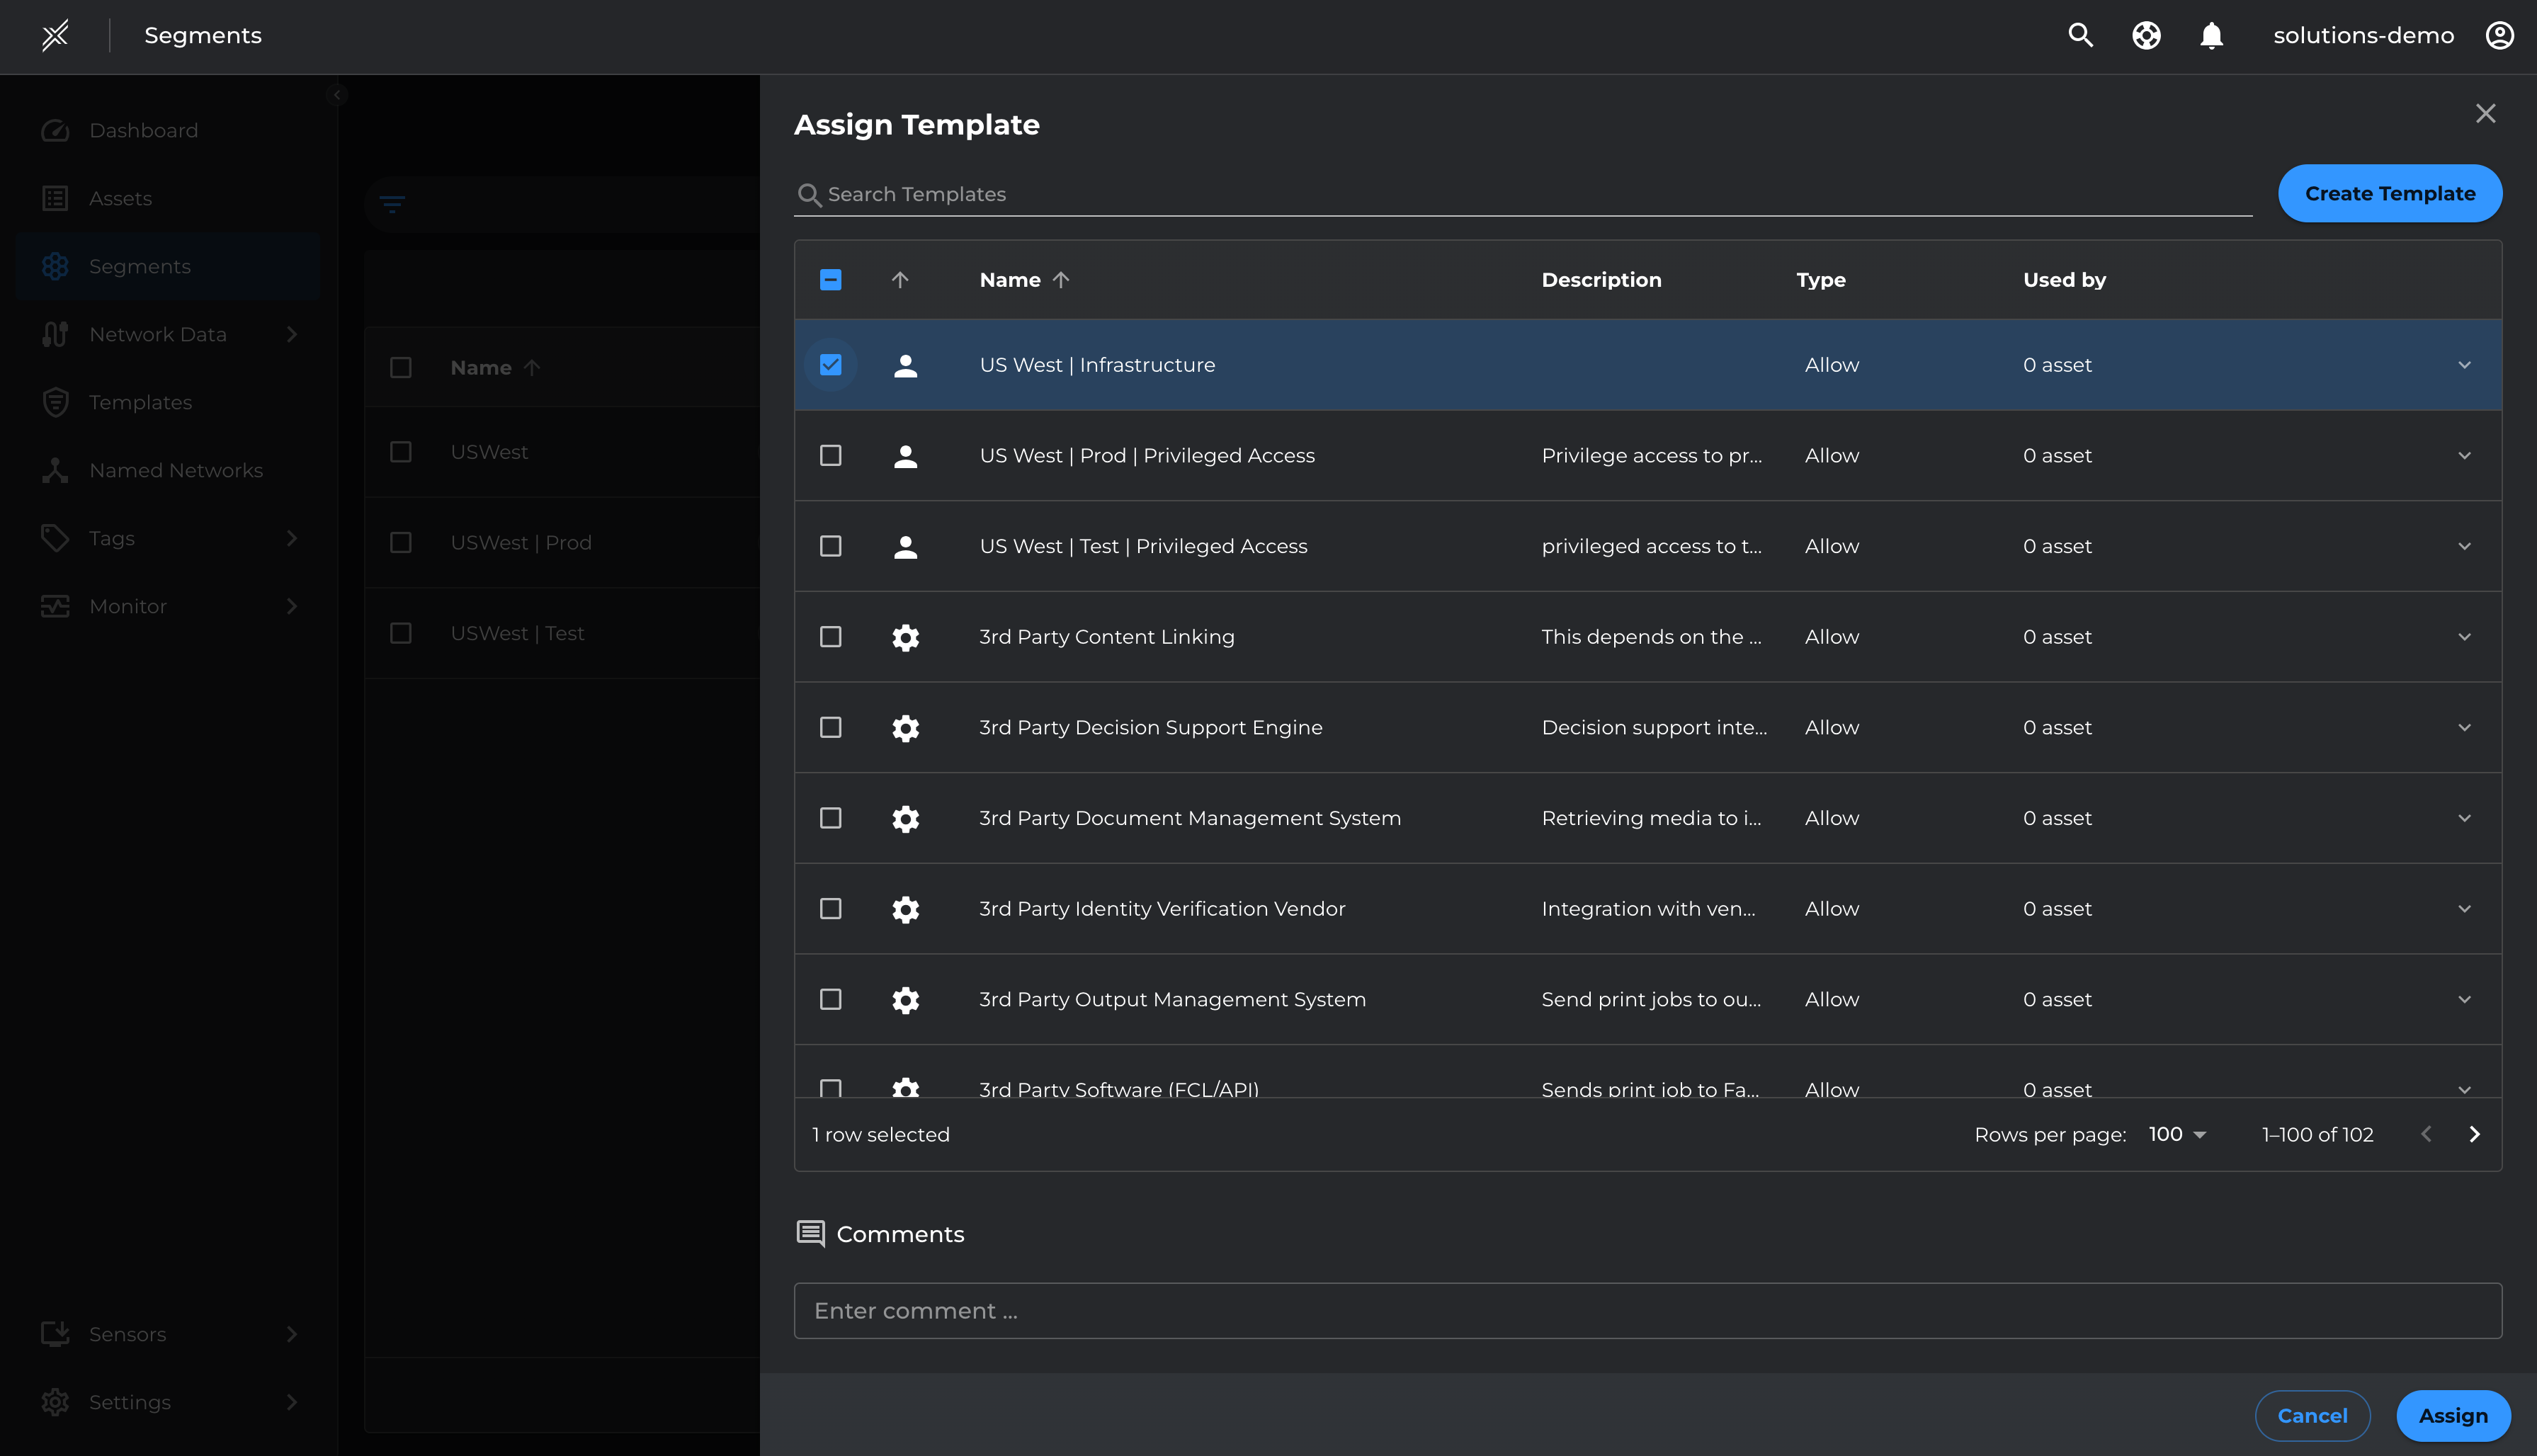
- Assign the US West | Infrastructure template to USWest Segment
- Assign the US West | Prod | Privileged Access template to USWest | Prod segment
- Assign the US West | Test | Privileged Access template to USWest | Test segment
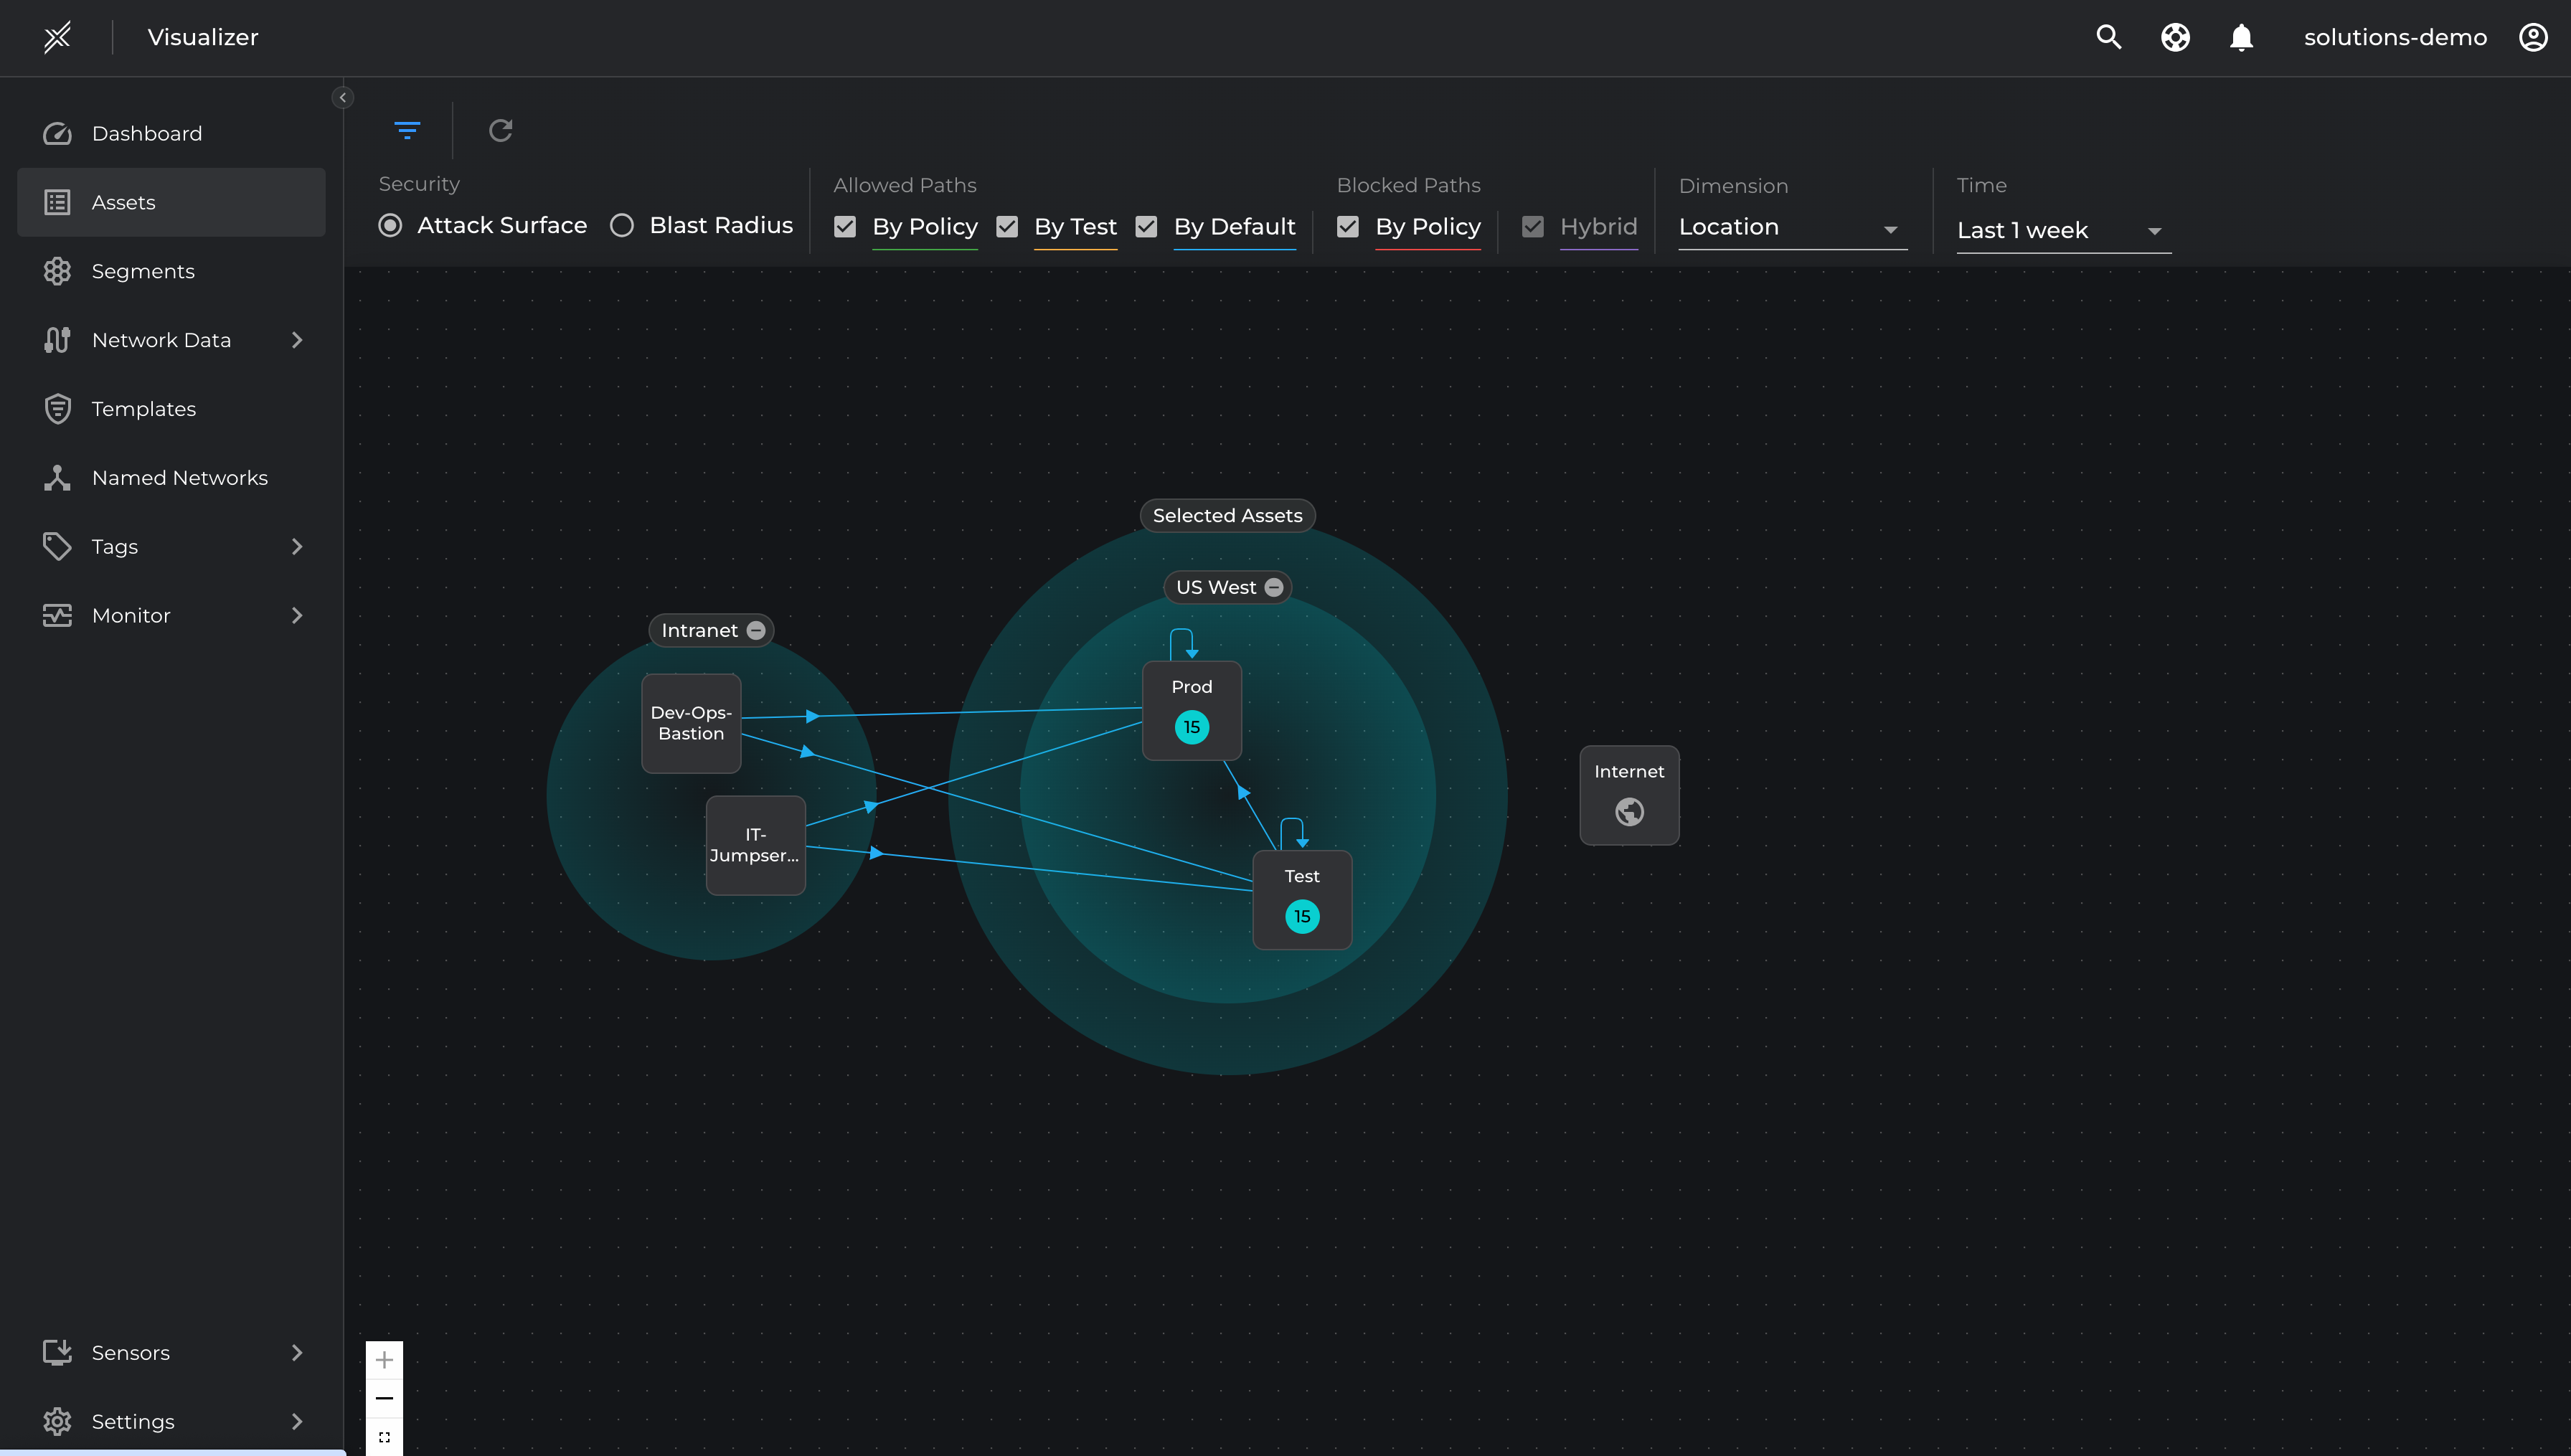
Visualize and Baseline
Once Named networks and templates are linked to their respective Microsoft Defender segments as per the steps above, The Xshield security platform will now identify all discovered ports and paths, marking them as allowed or denied based on policies defined for legitimate and illegitimate communication patterns.
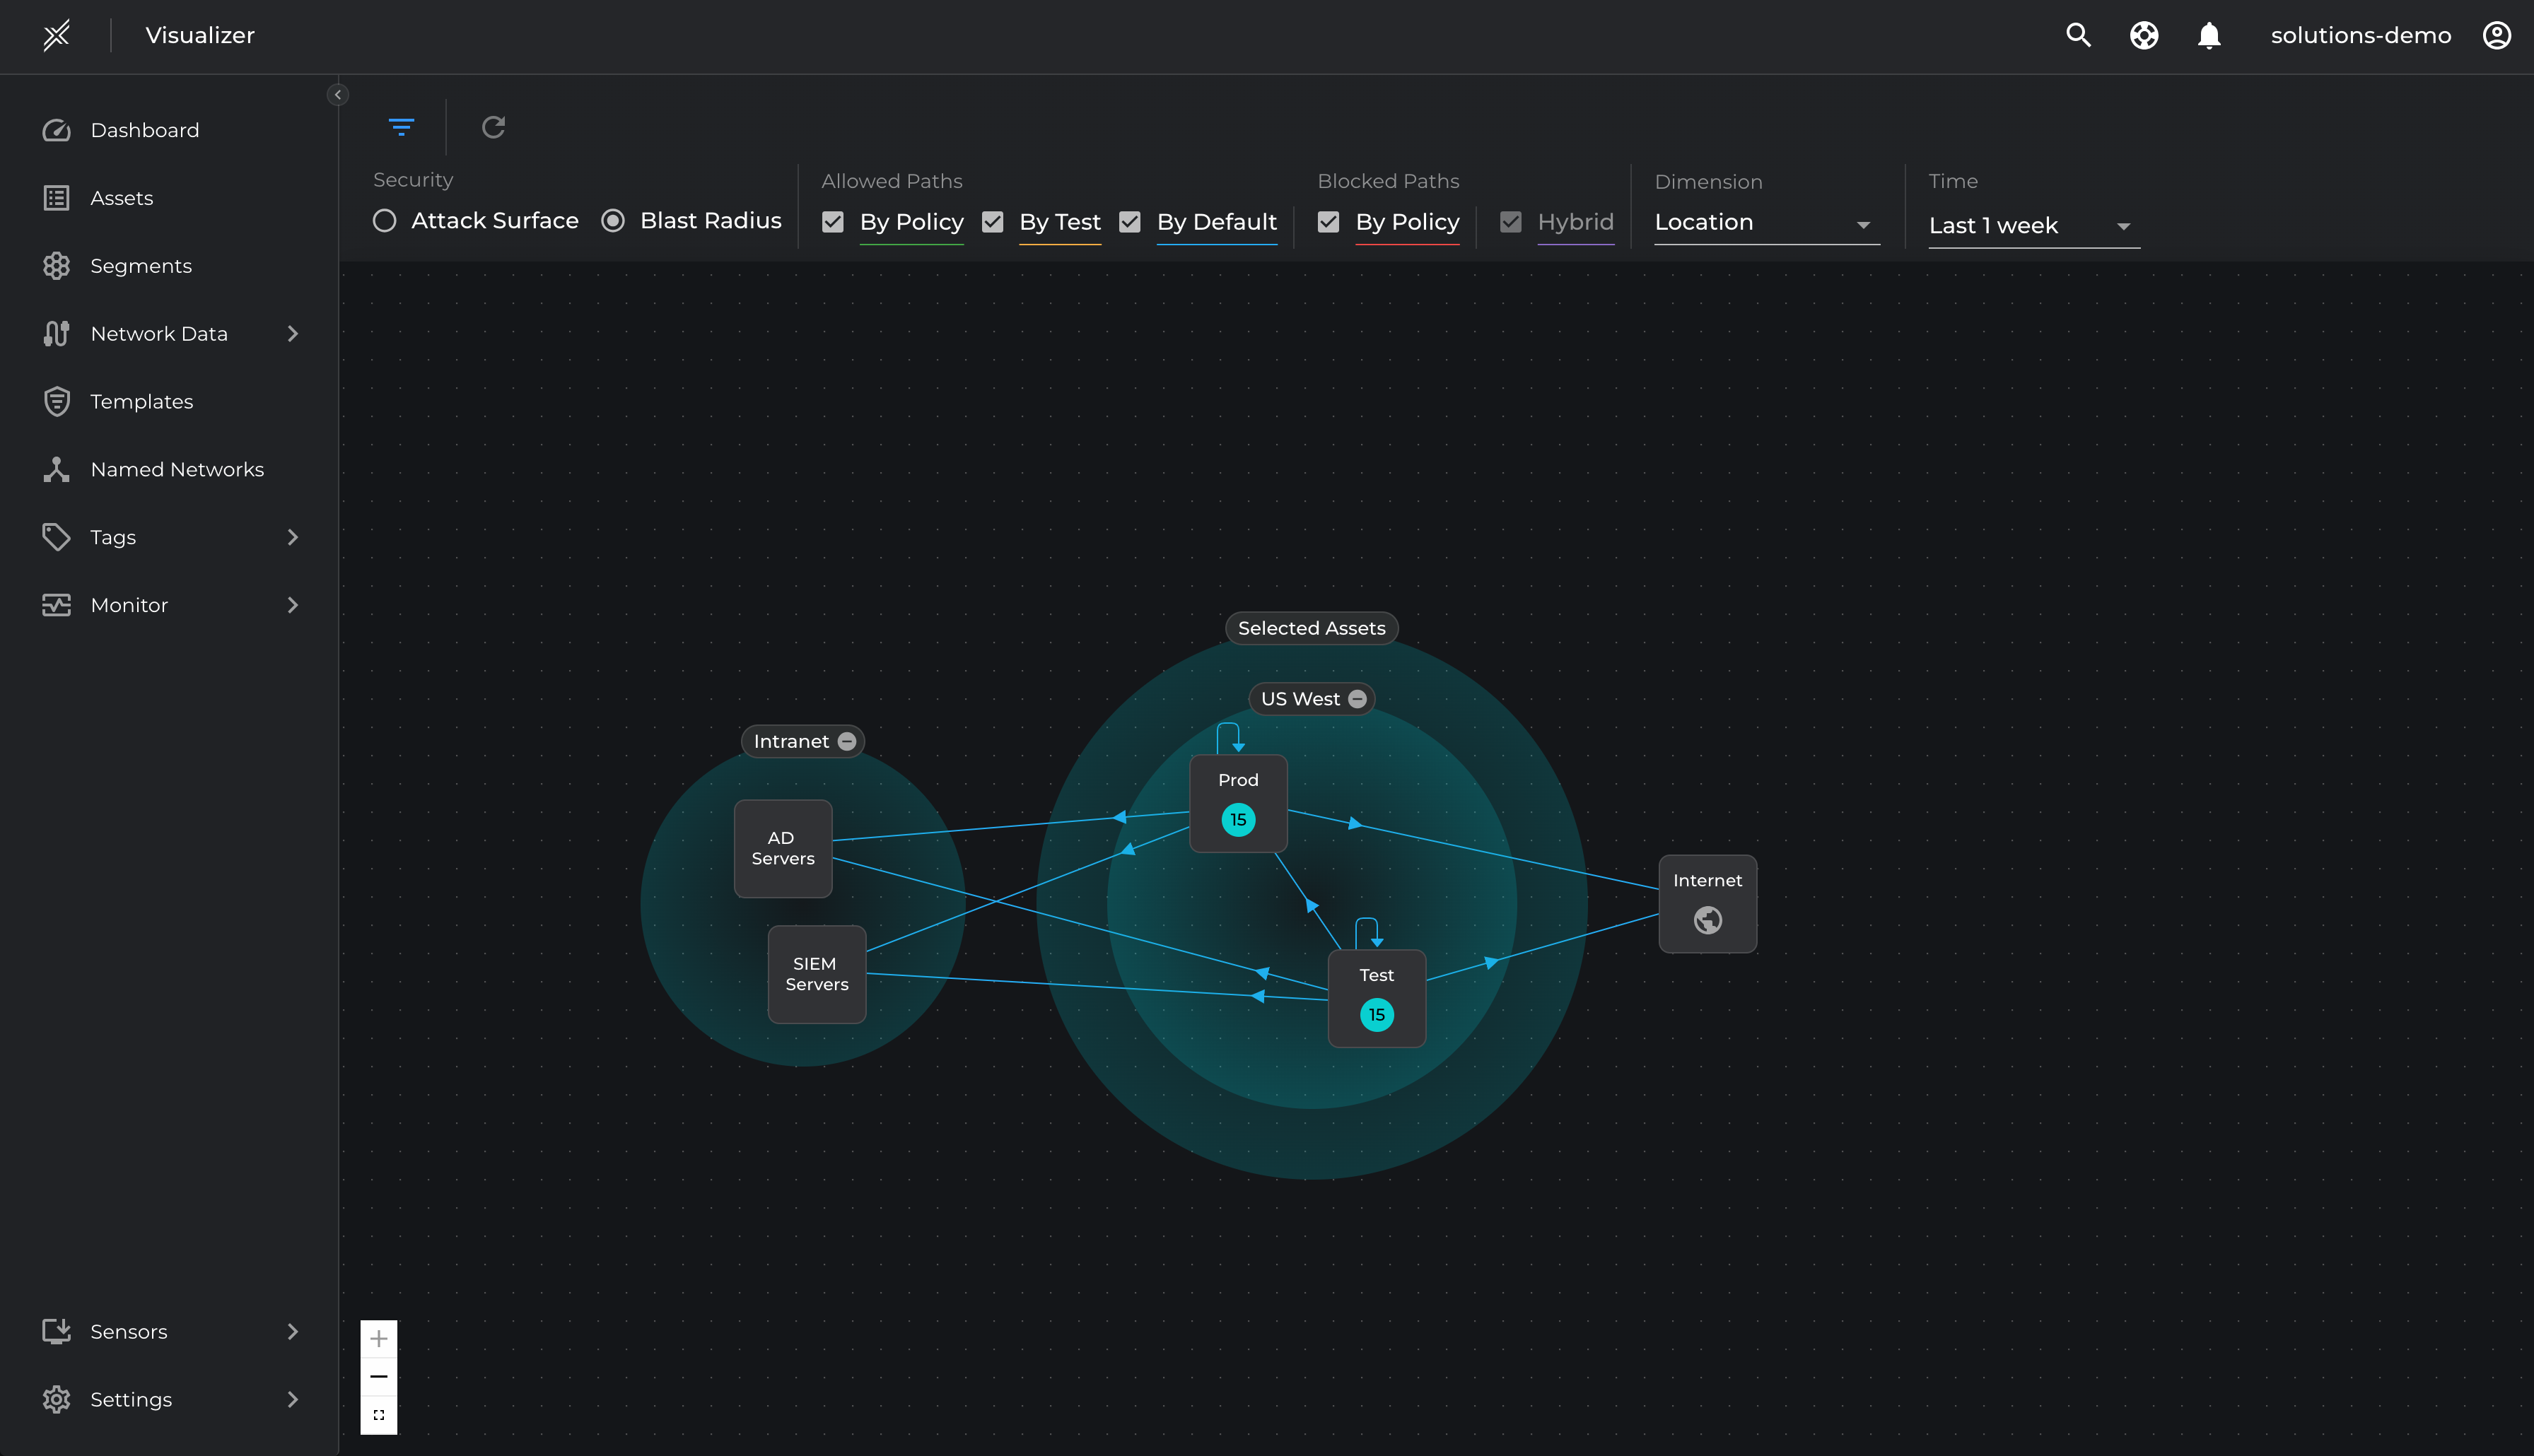
Visualize Microsoft Defender Segments
Visualize Microsoft Defender segments in panoptic map in context of infrastructure and management networks
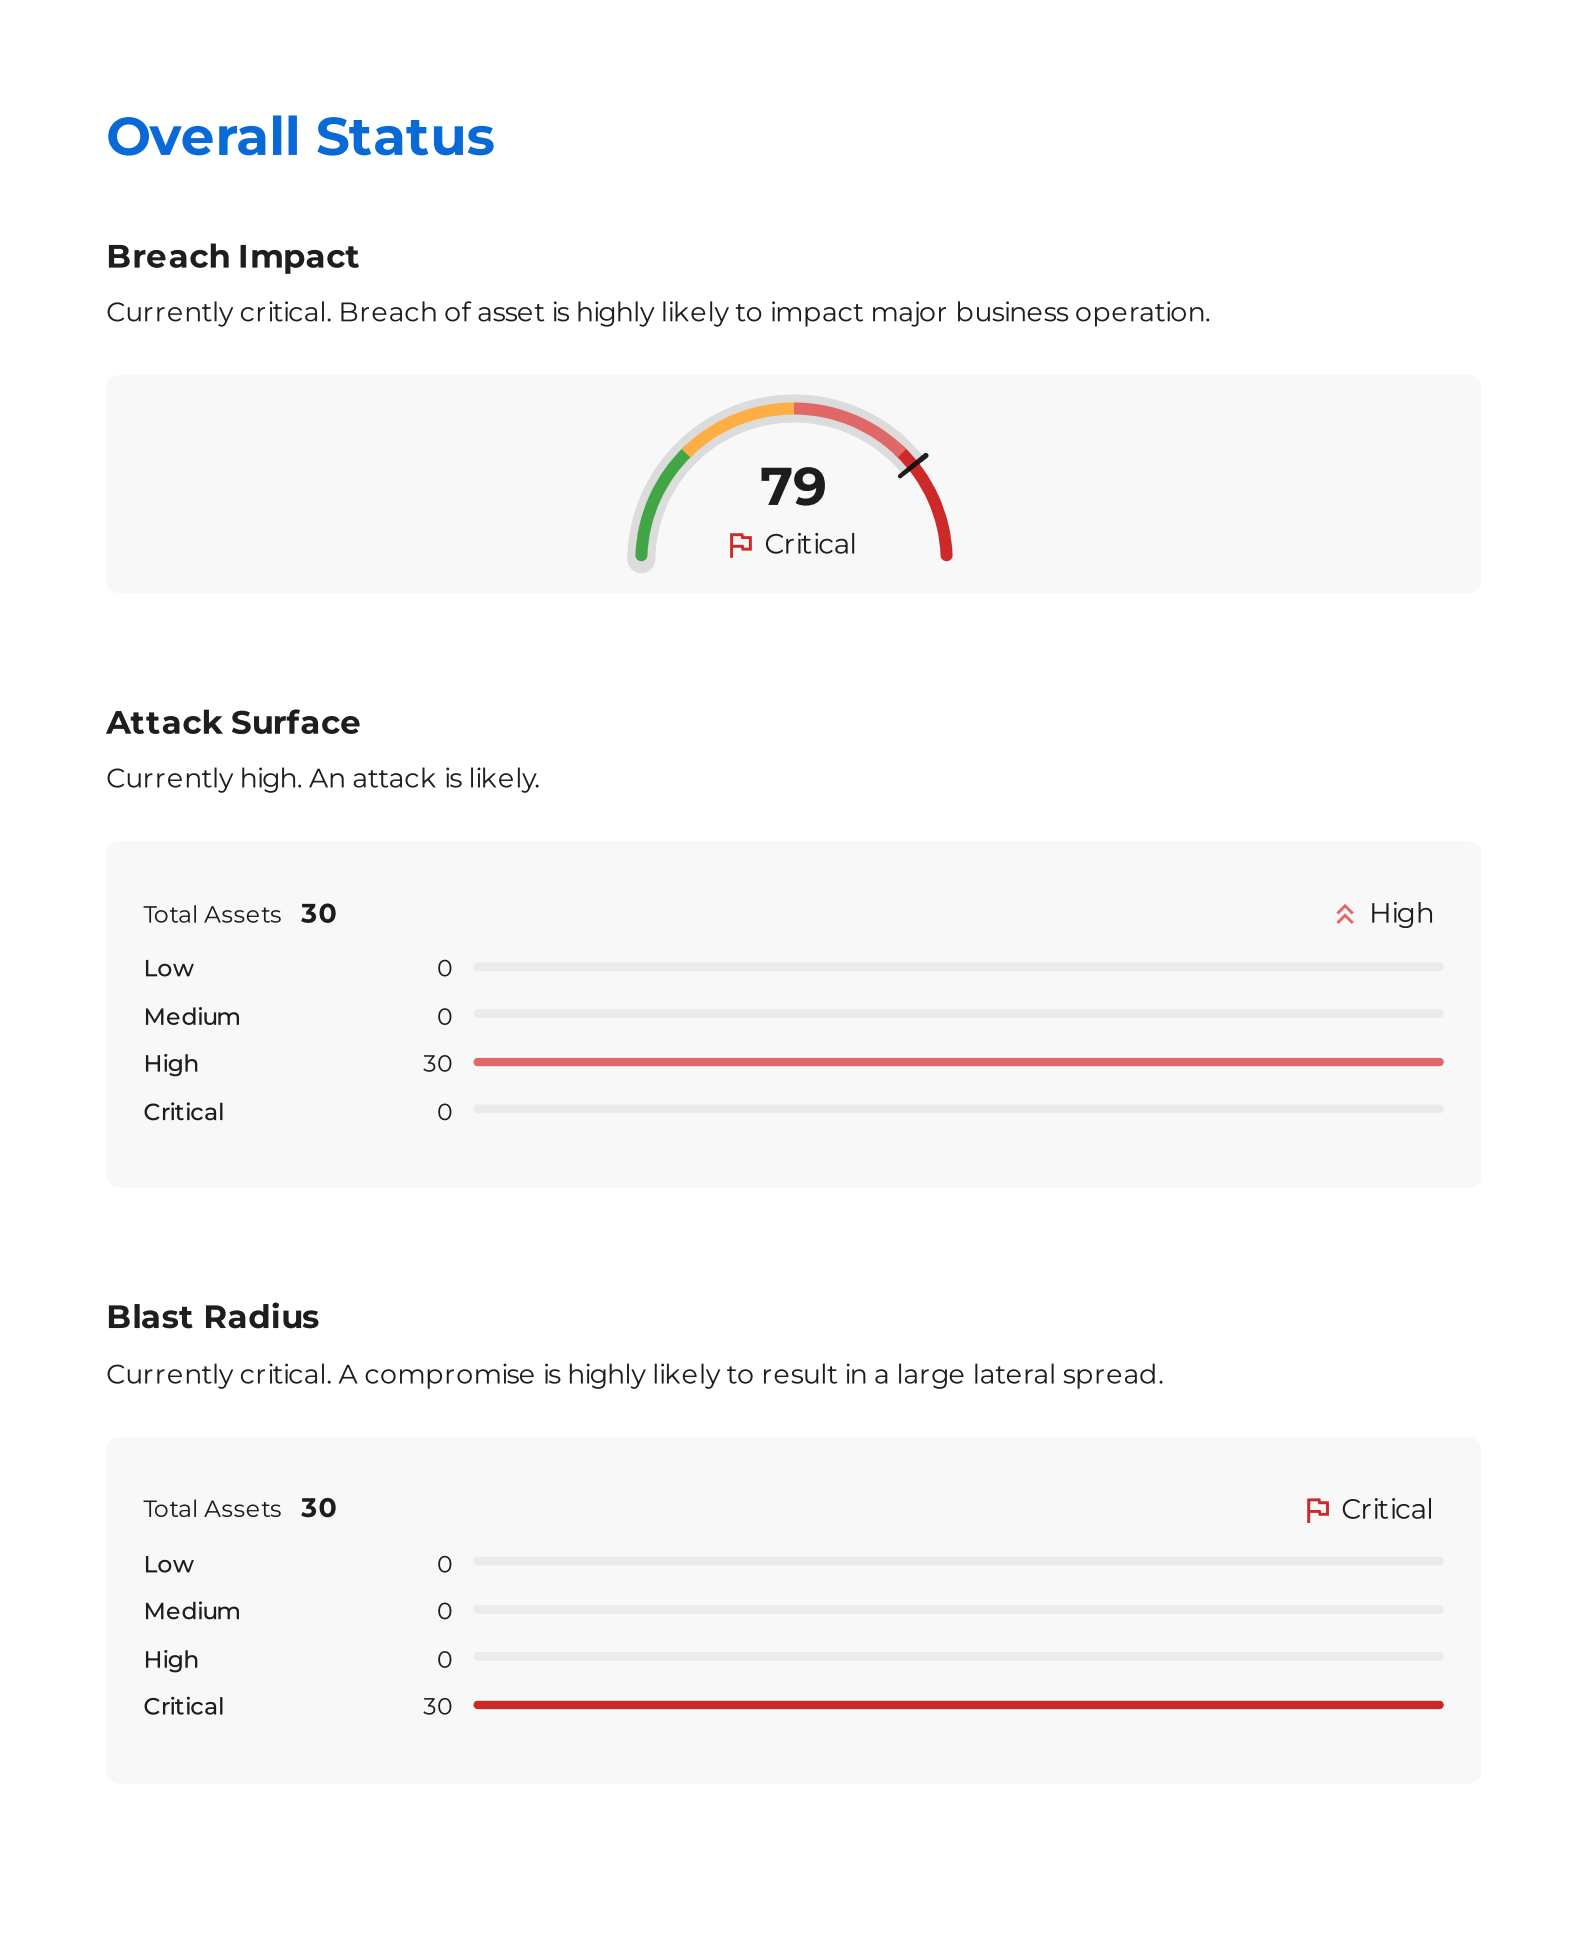
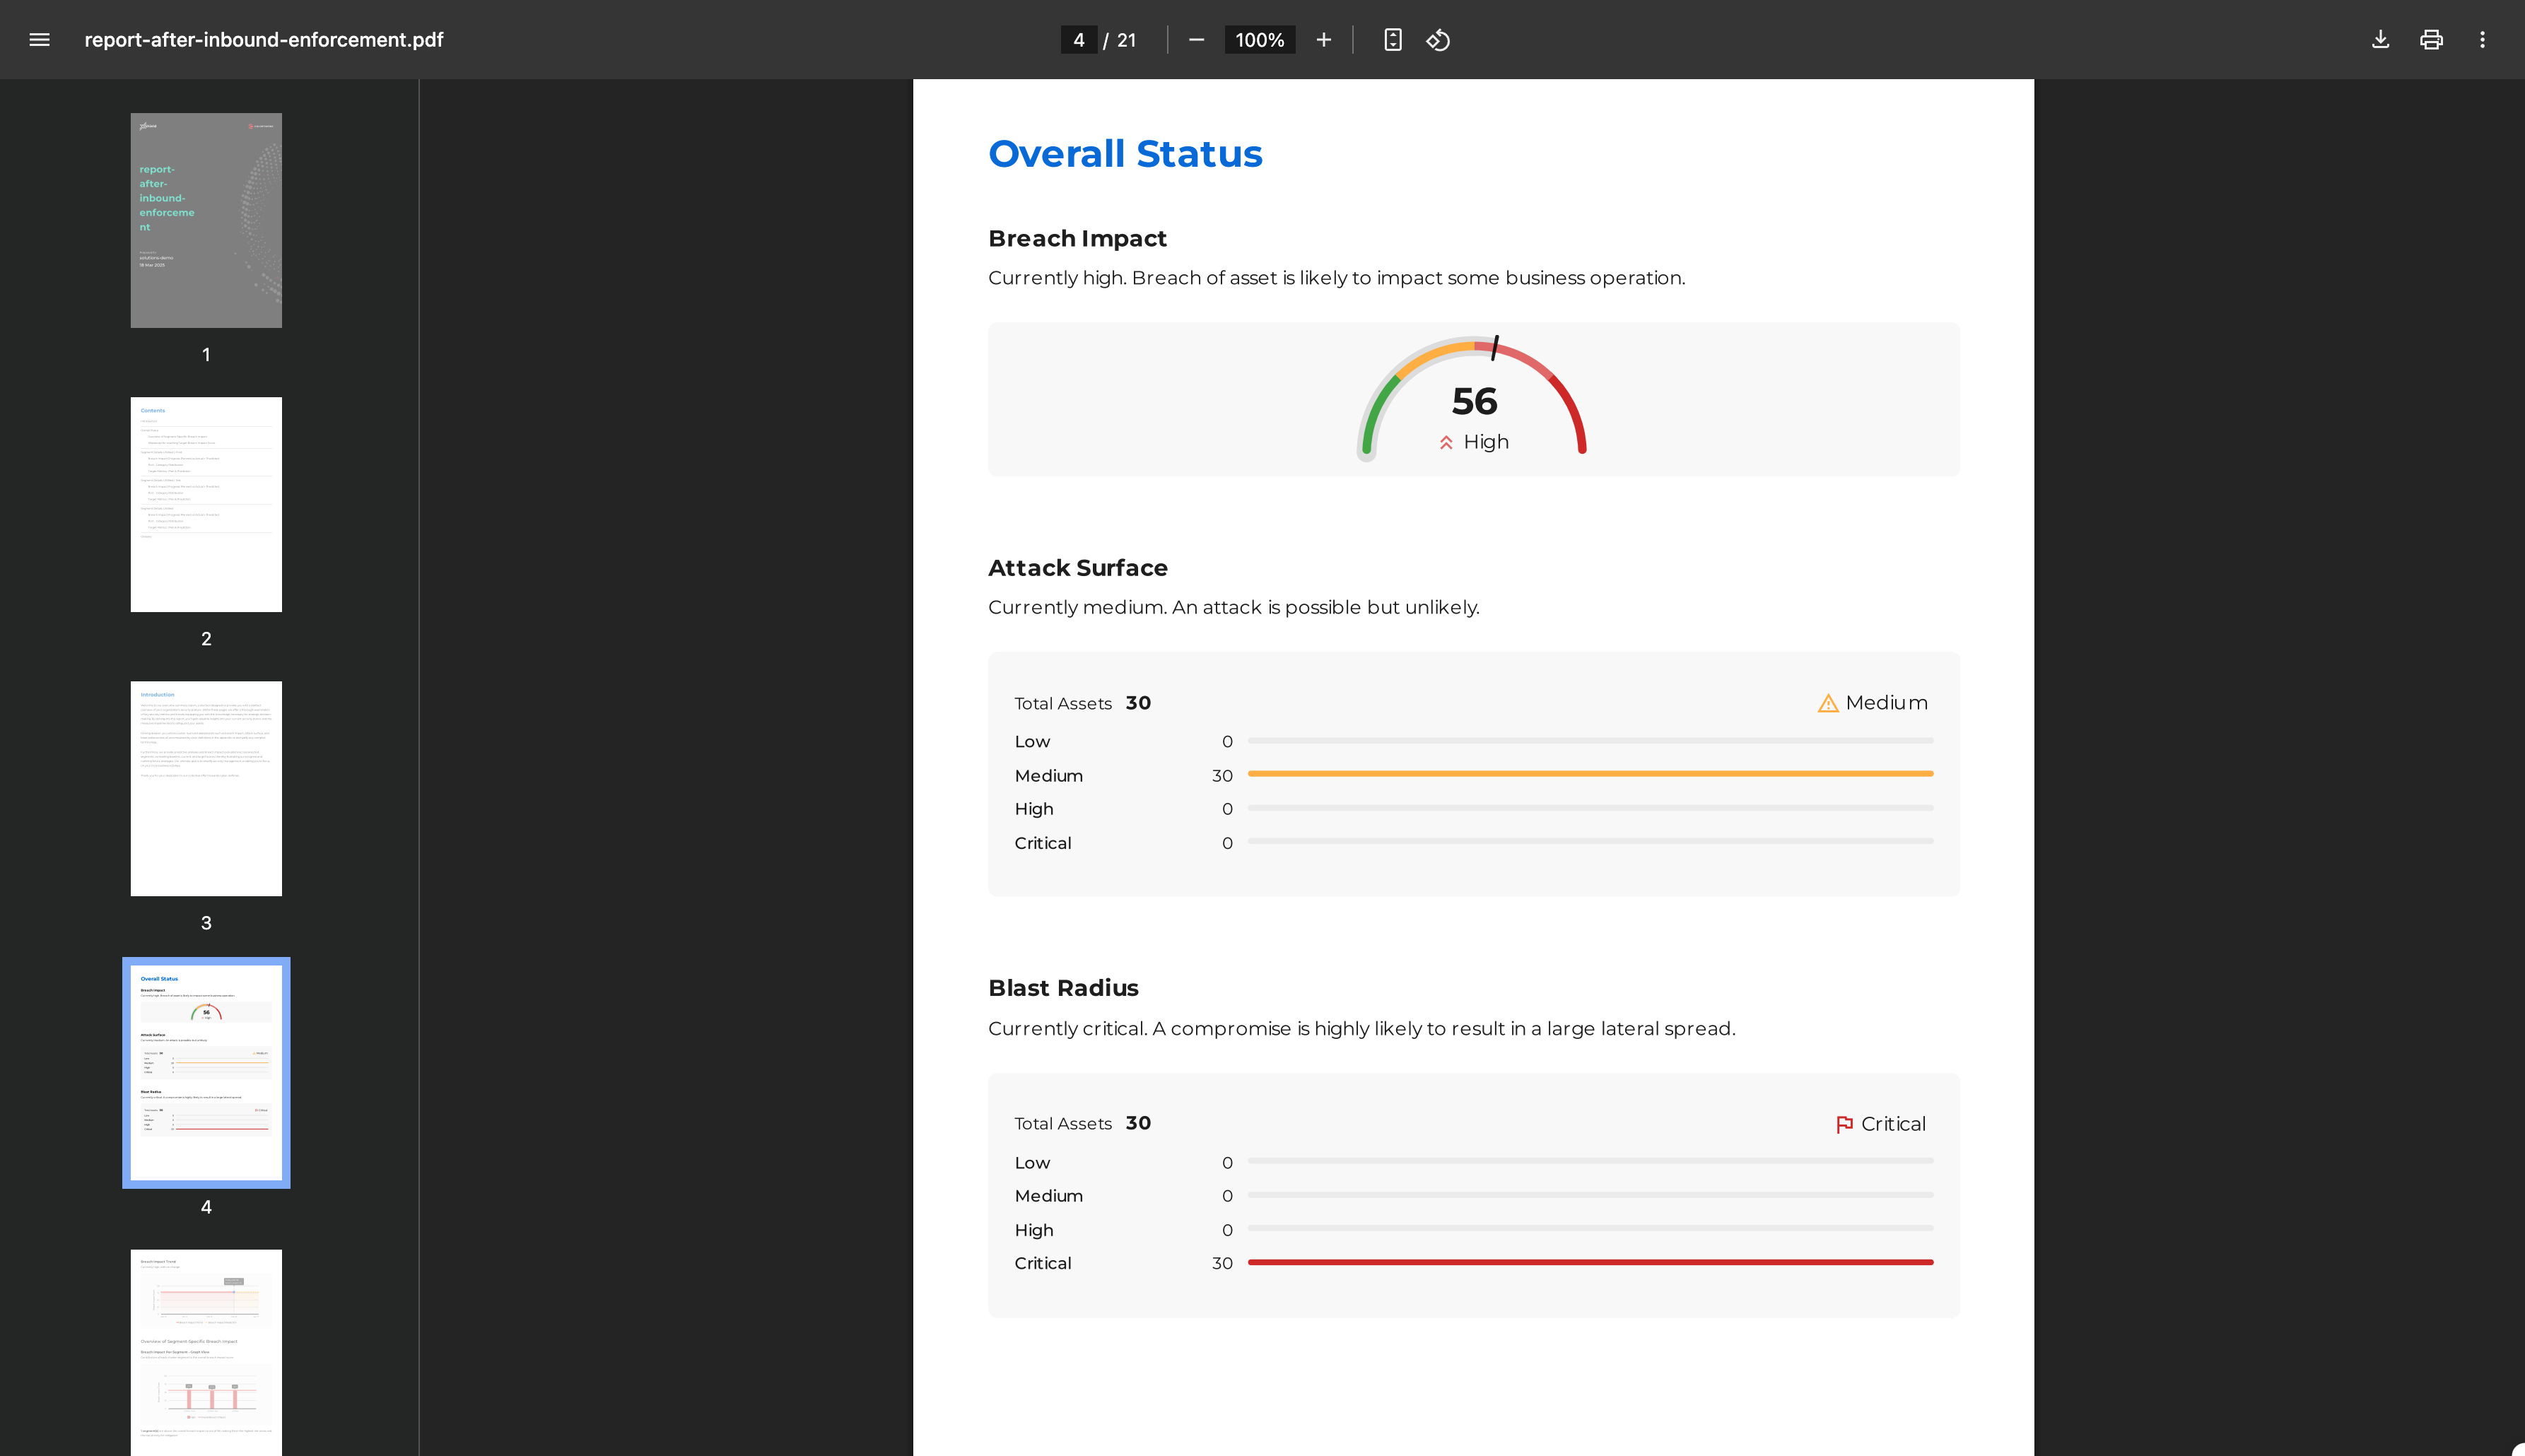
Run Baseline Reports
For all of the core segments run baseline reports with current breach metrics to establish the baseline
Generate Reports for Core Segments:
- Go to Segments, switch to Microsoft Defendertab, select all segments, and click 'Create Report'.
- A report request will be sent, and the report will be available in a few minutes.
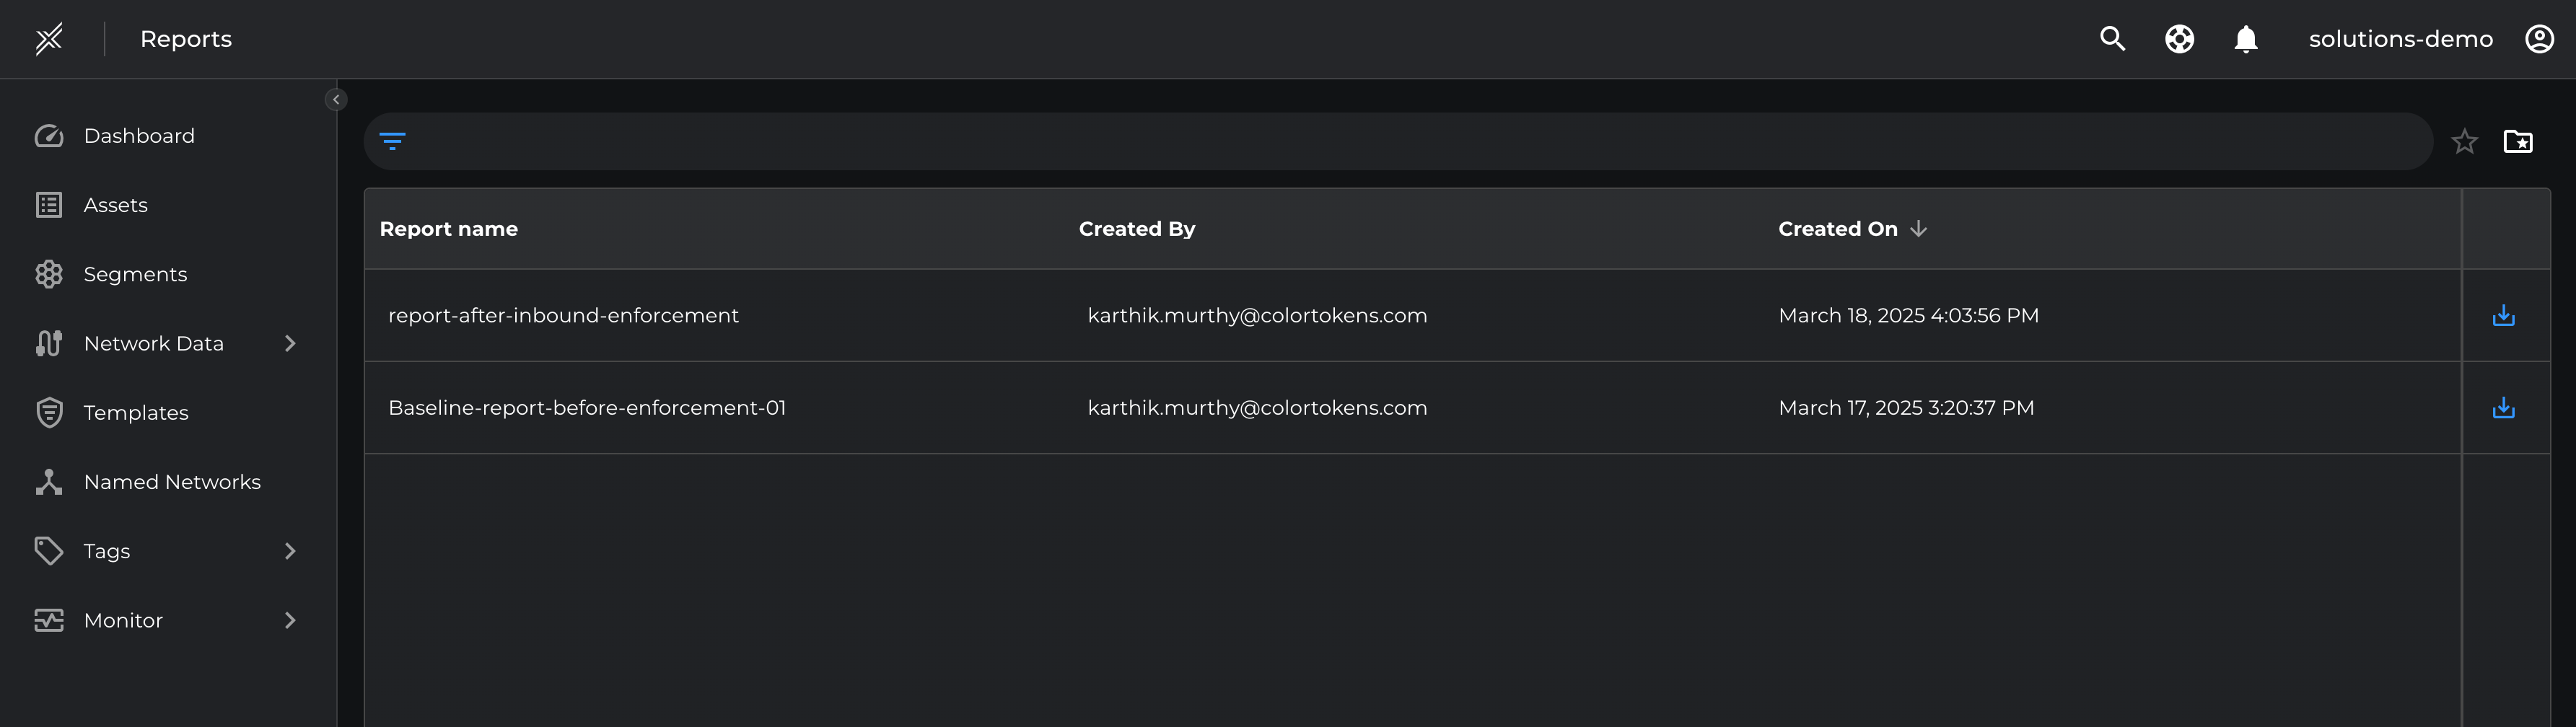
Download and Review Breach Metrics
- Navigate to Microsoft Defender Segments and click 'Reports'.
- Click the Download icon next to the report.
- Note the current value of breach score.
Reduce Attack Surface
Block Malicious and High Risk Ports
To start eliminating any malicious traffic and ensure assets are protected from unauthorized sources we will leverage block templates and assign it to the US West segment.
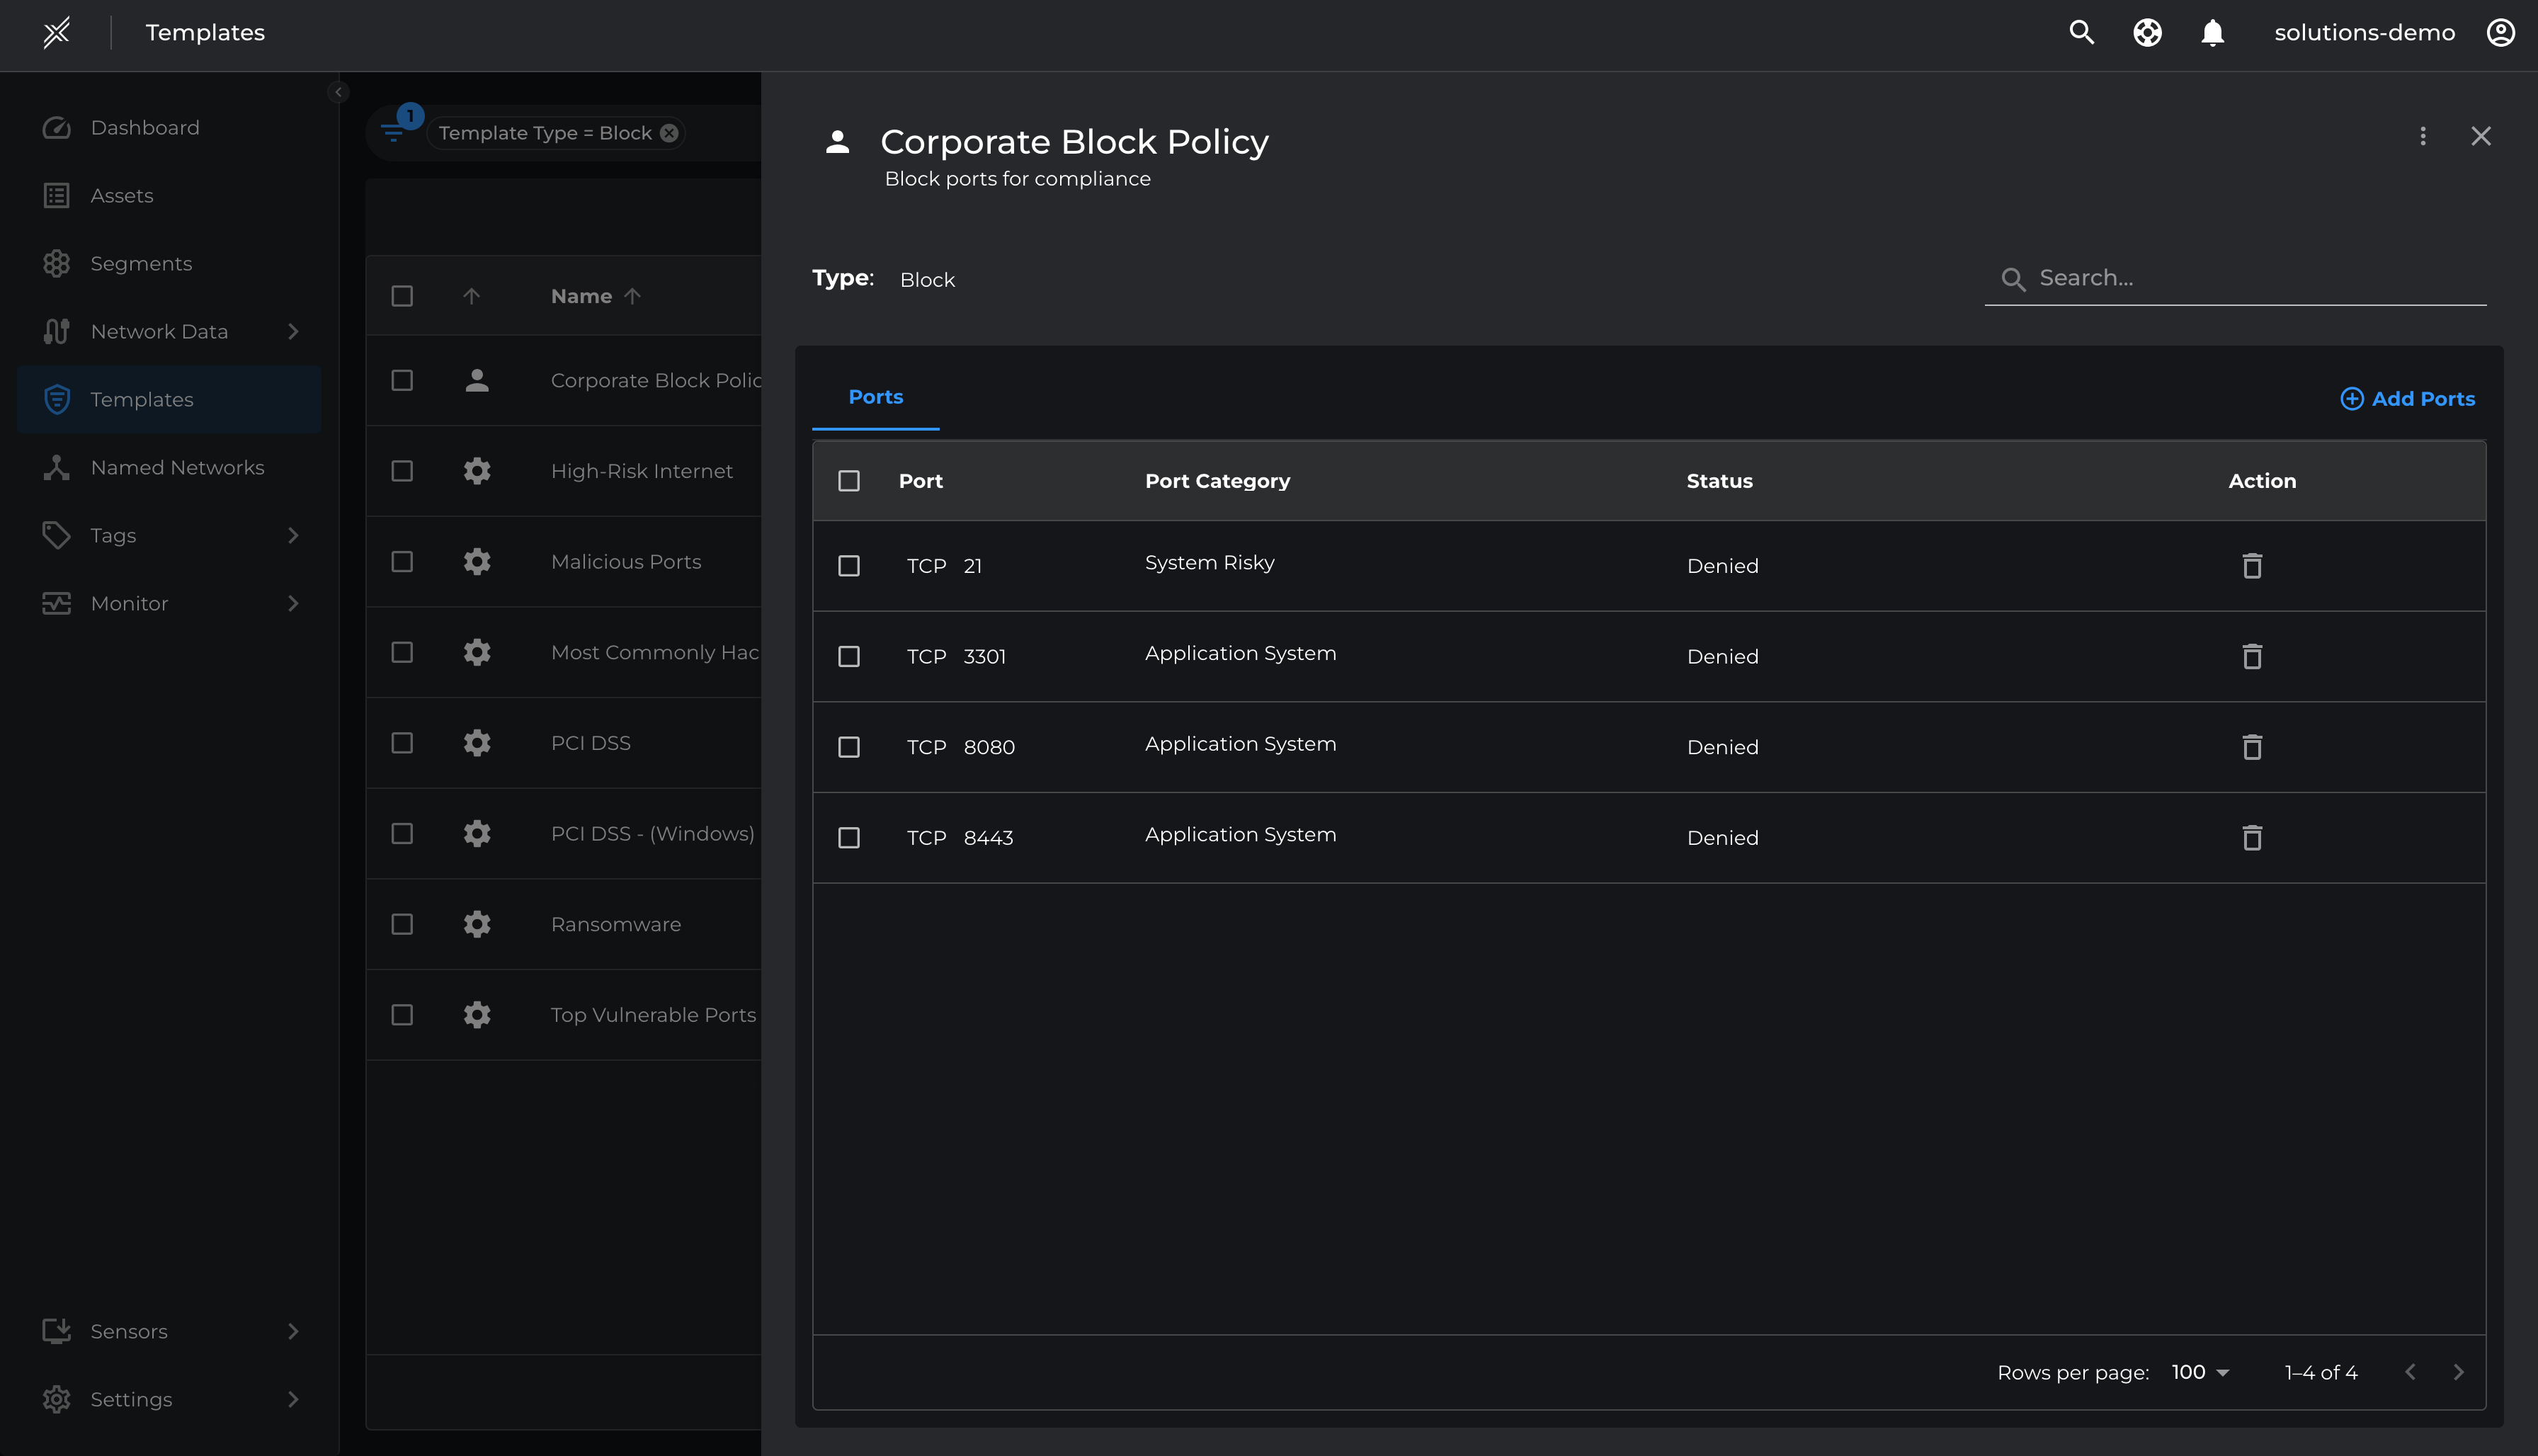
- Go to Templates > Create Template
- Select type as 'Block'
- Add ports that are blocked as per the corporate policy. In our example we are blocking vulnerable ports such as TCP 21, TCP 3301, TCP 8080, TCP 8443
- Name it as Corporate Block Policy and click Create
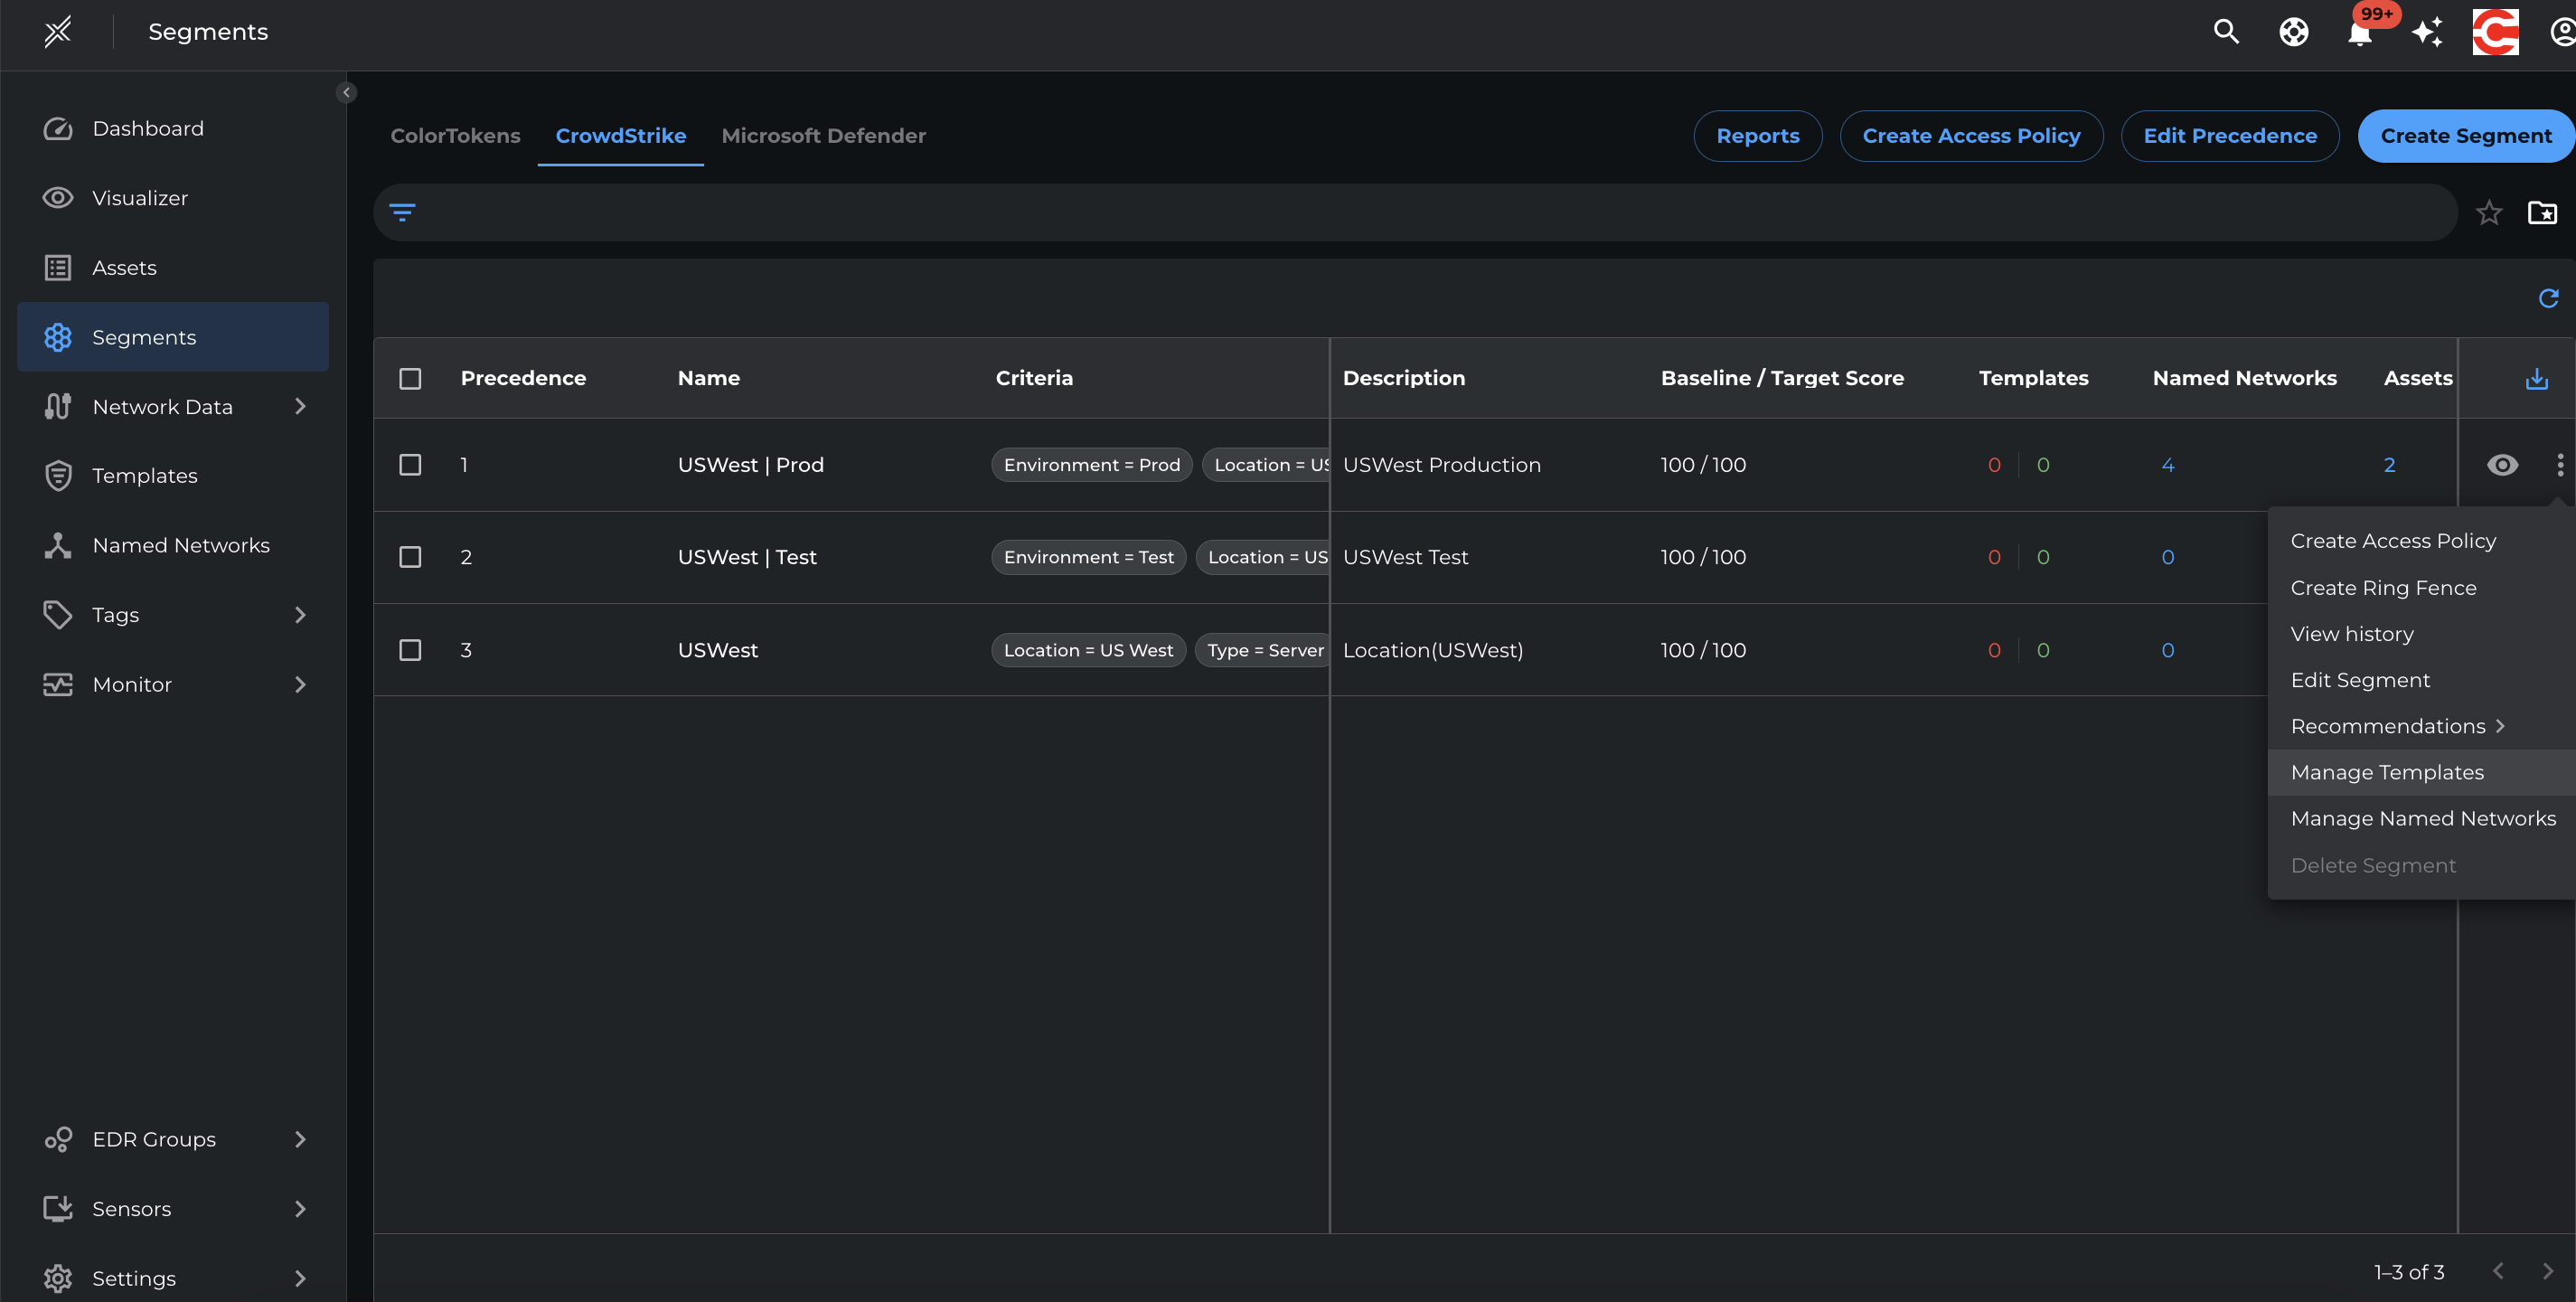
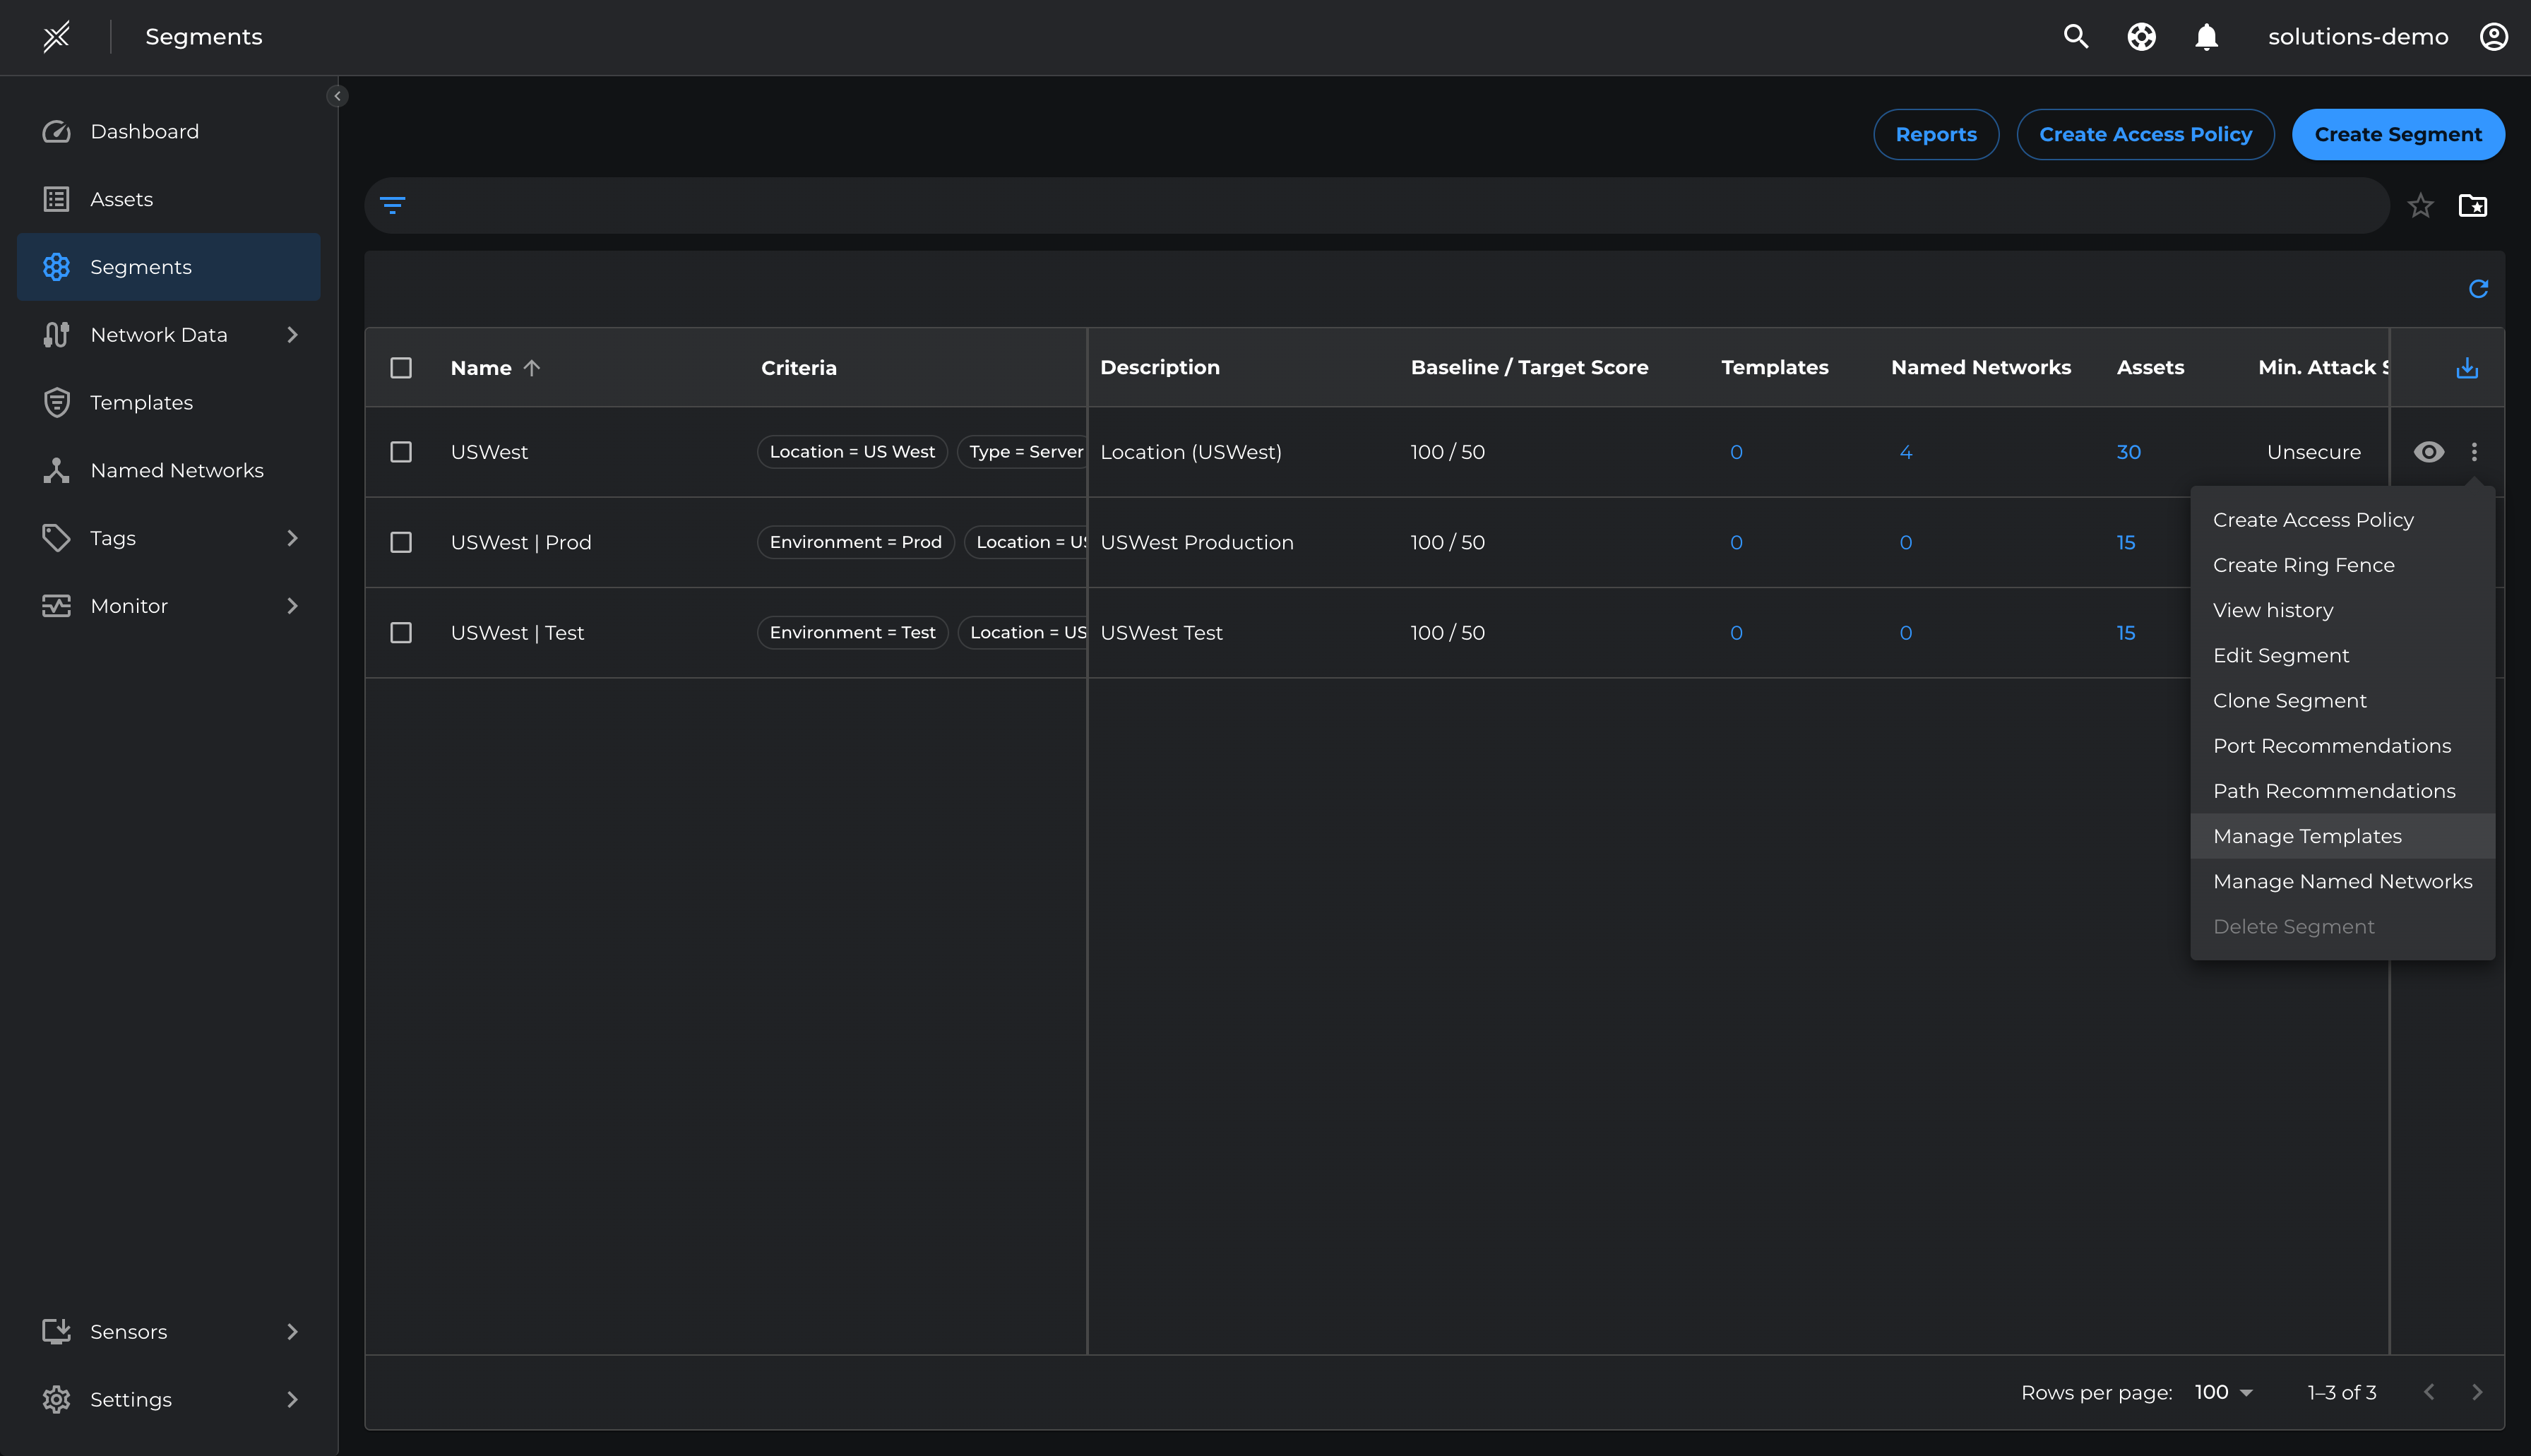
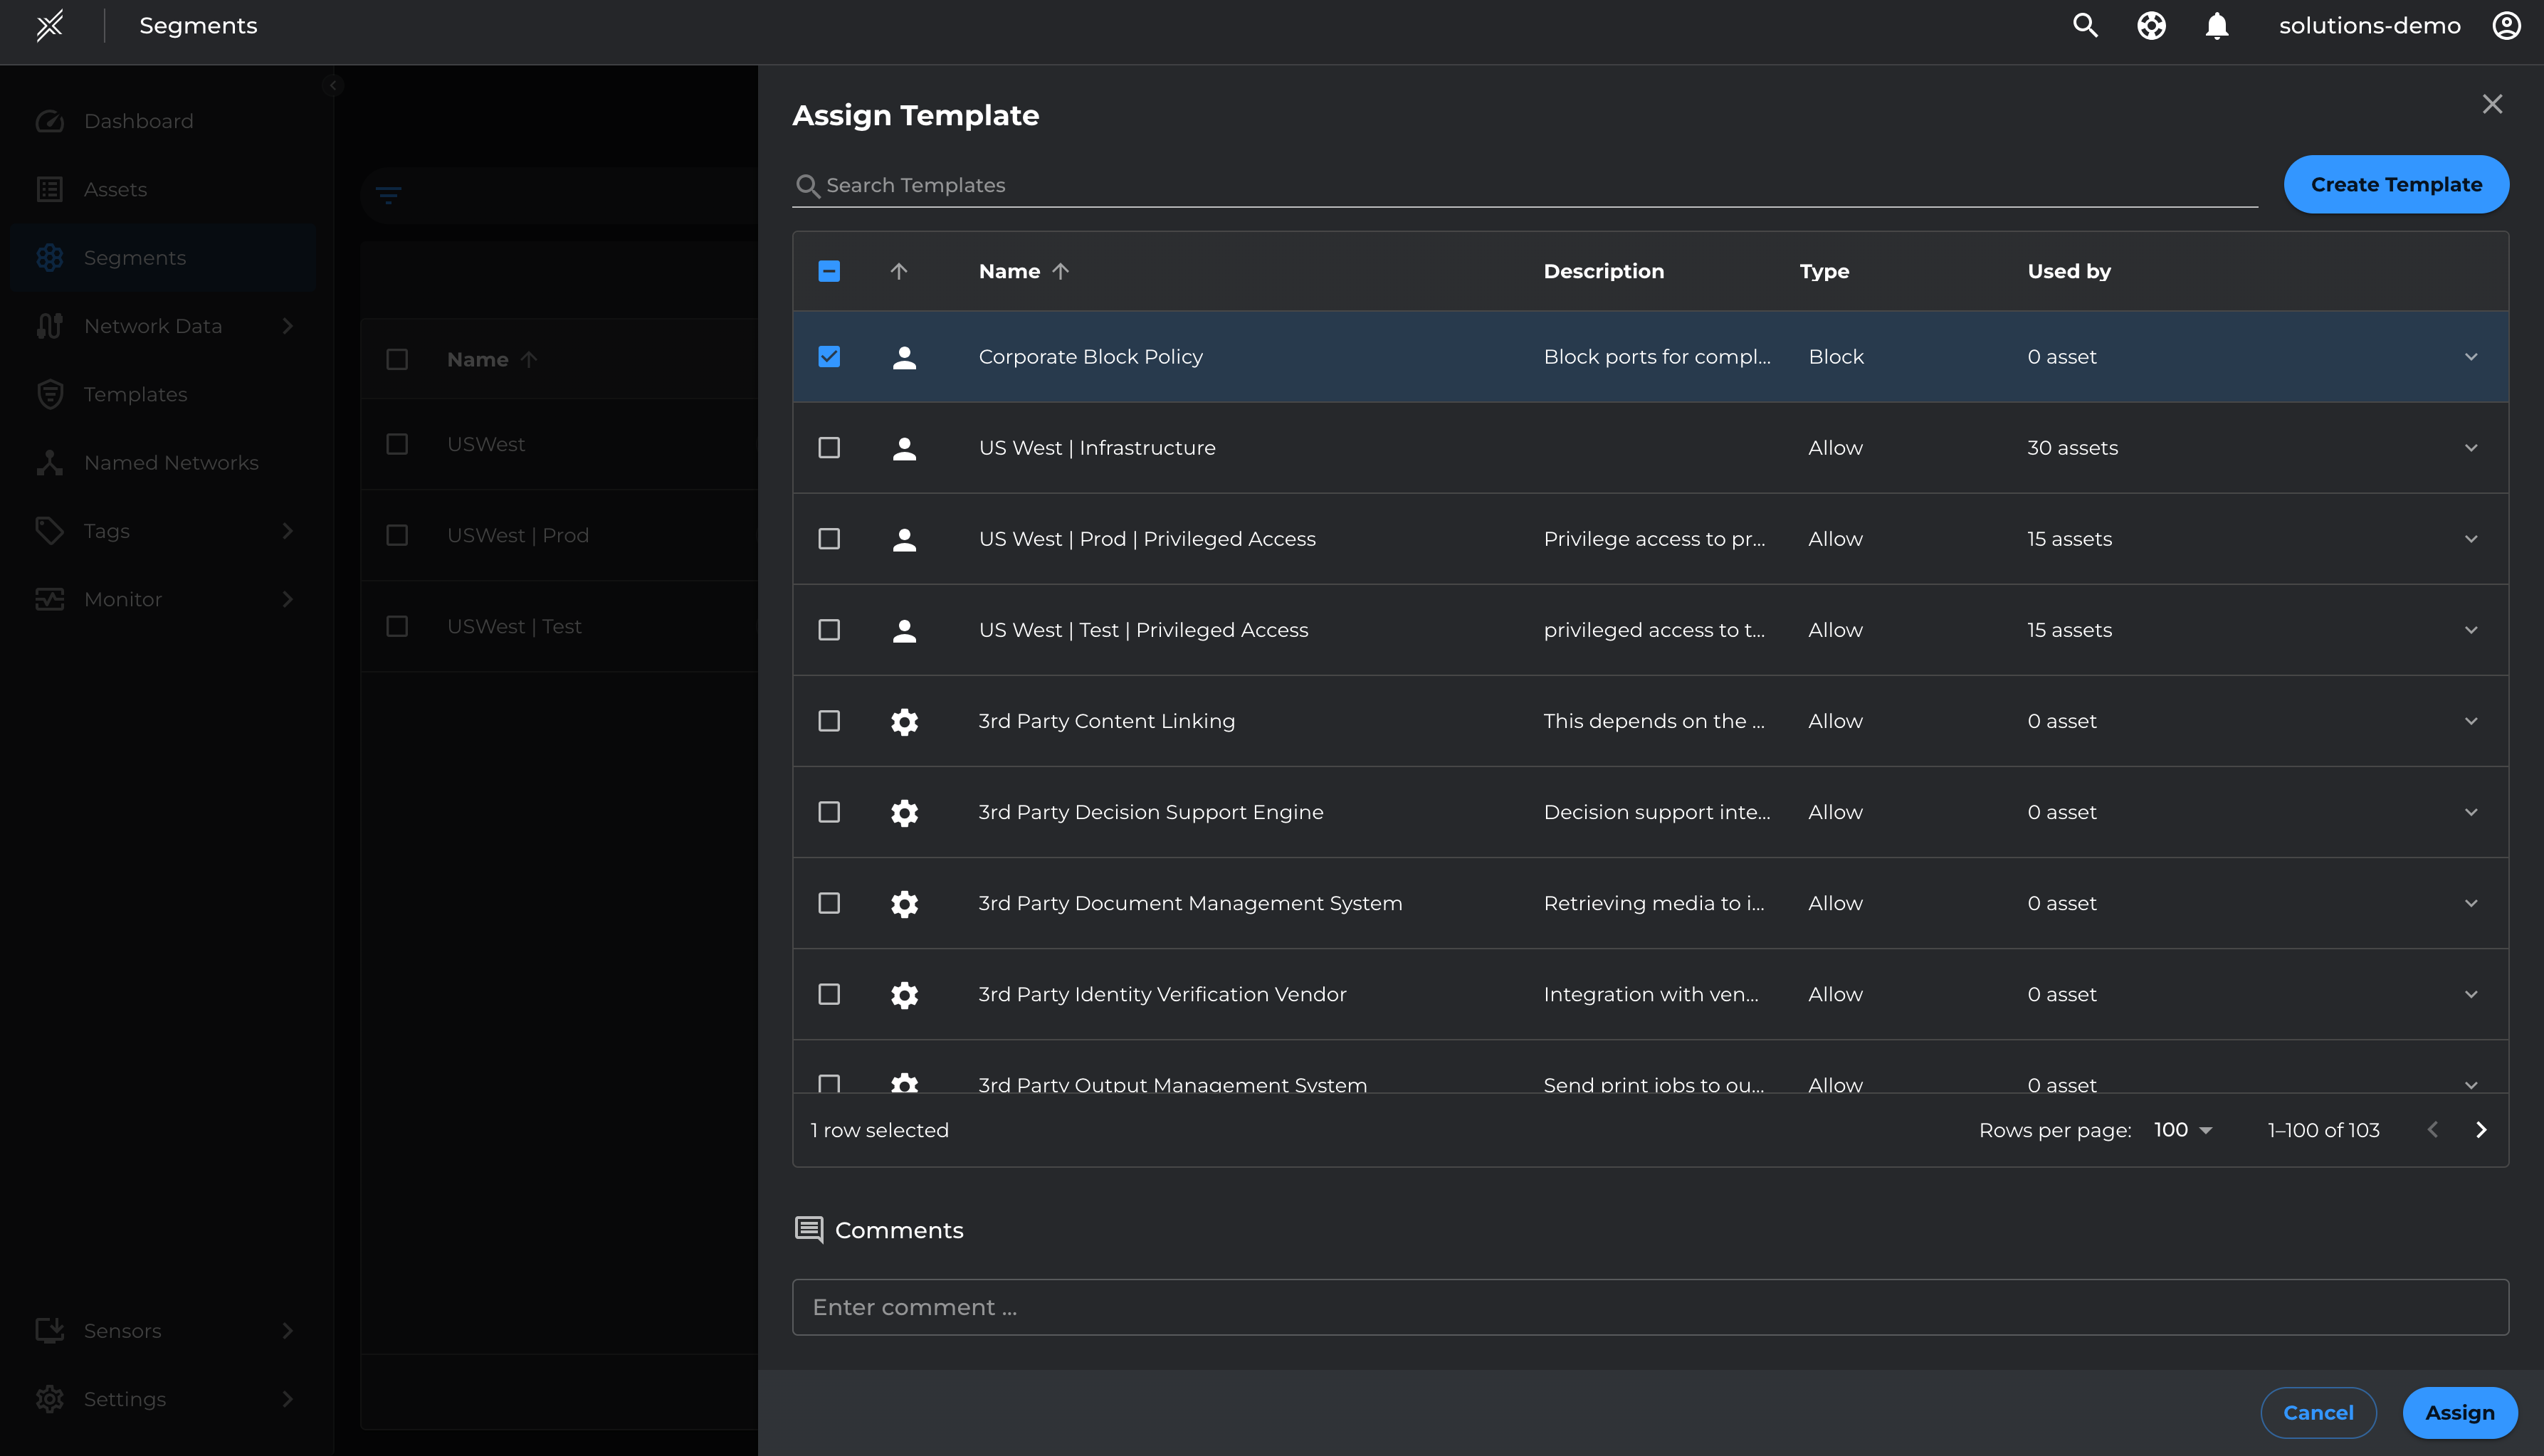
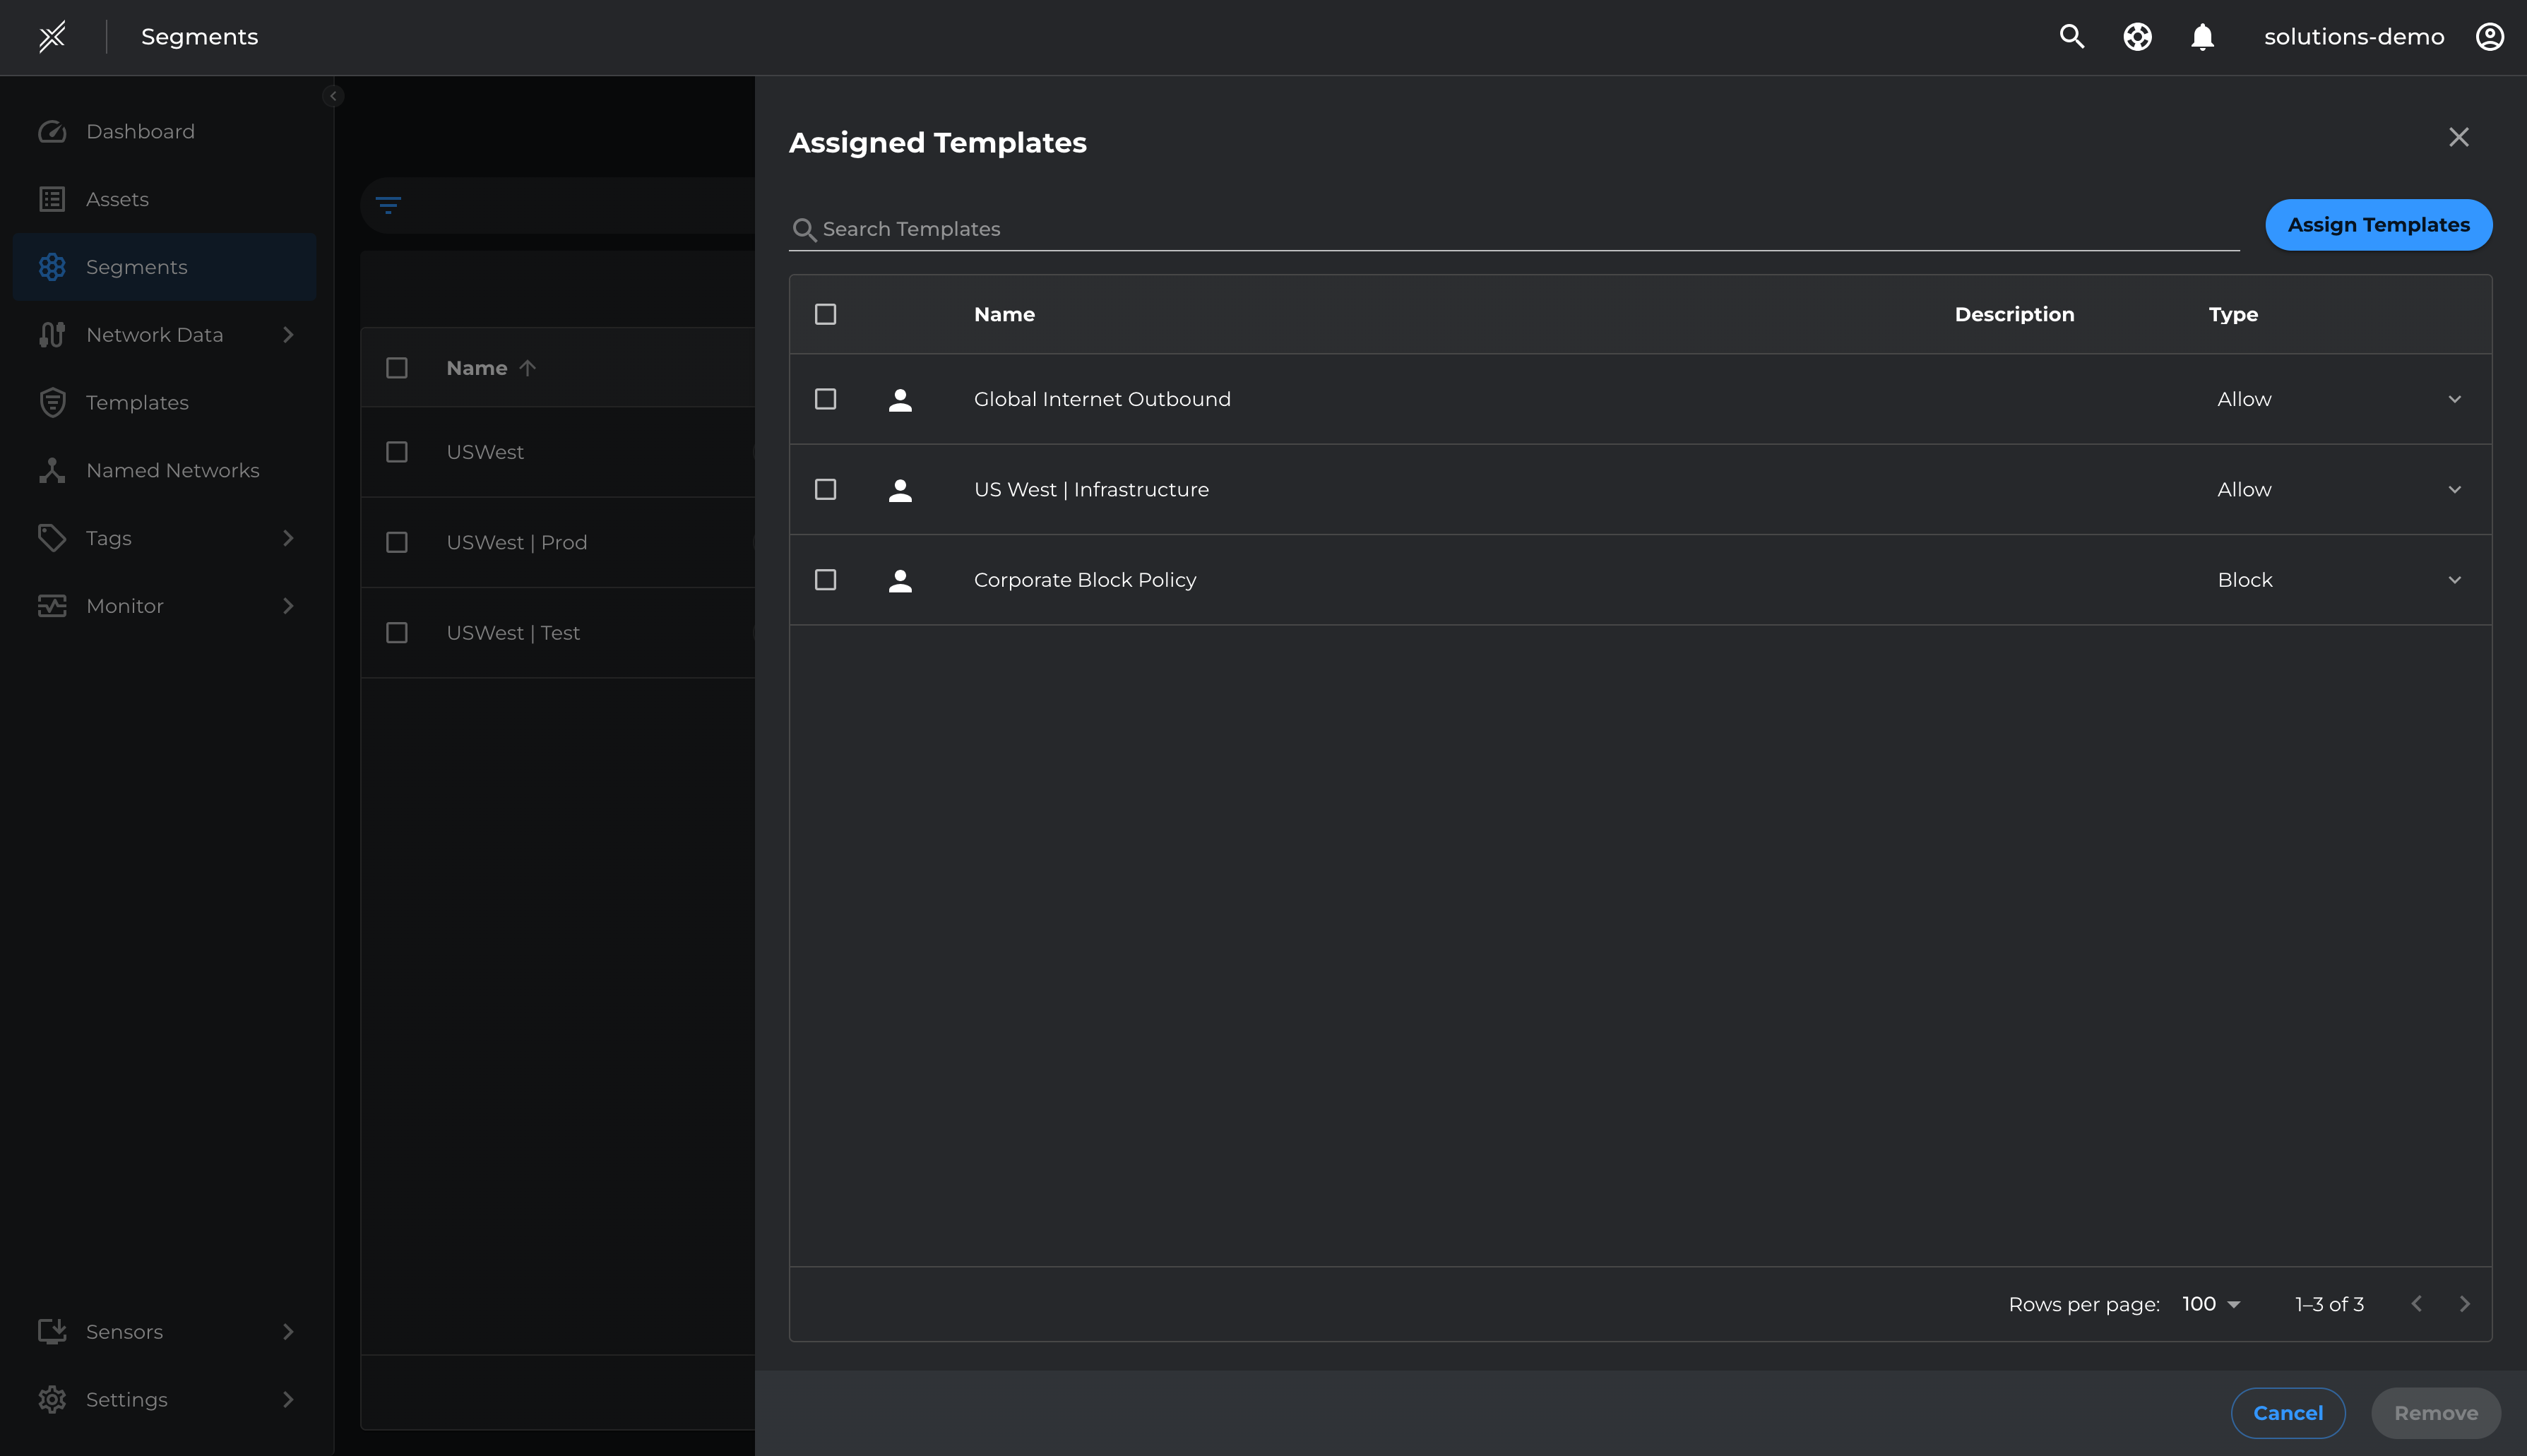
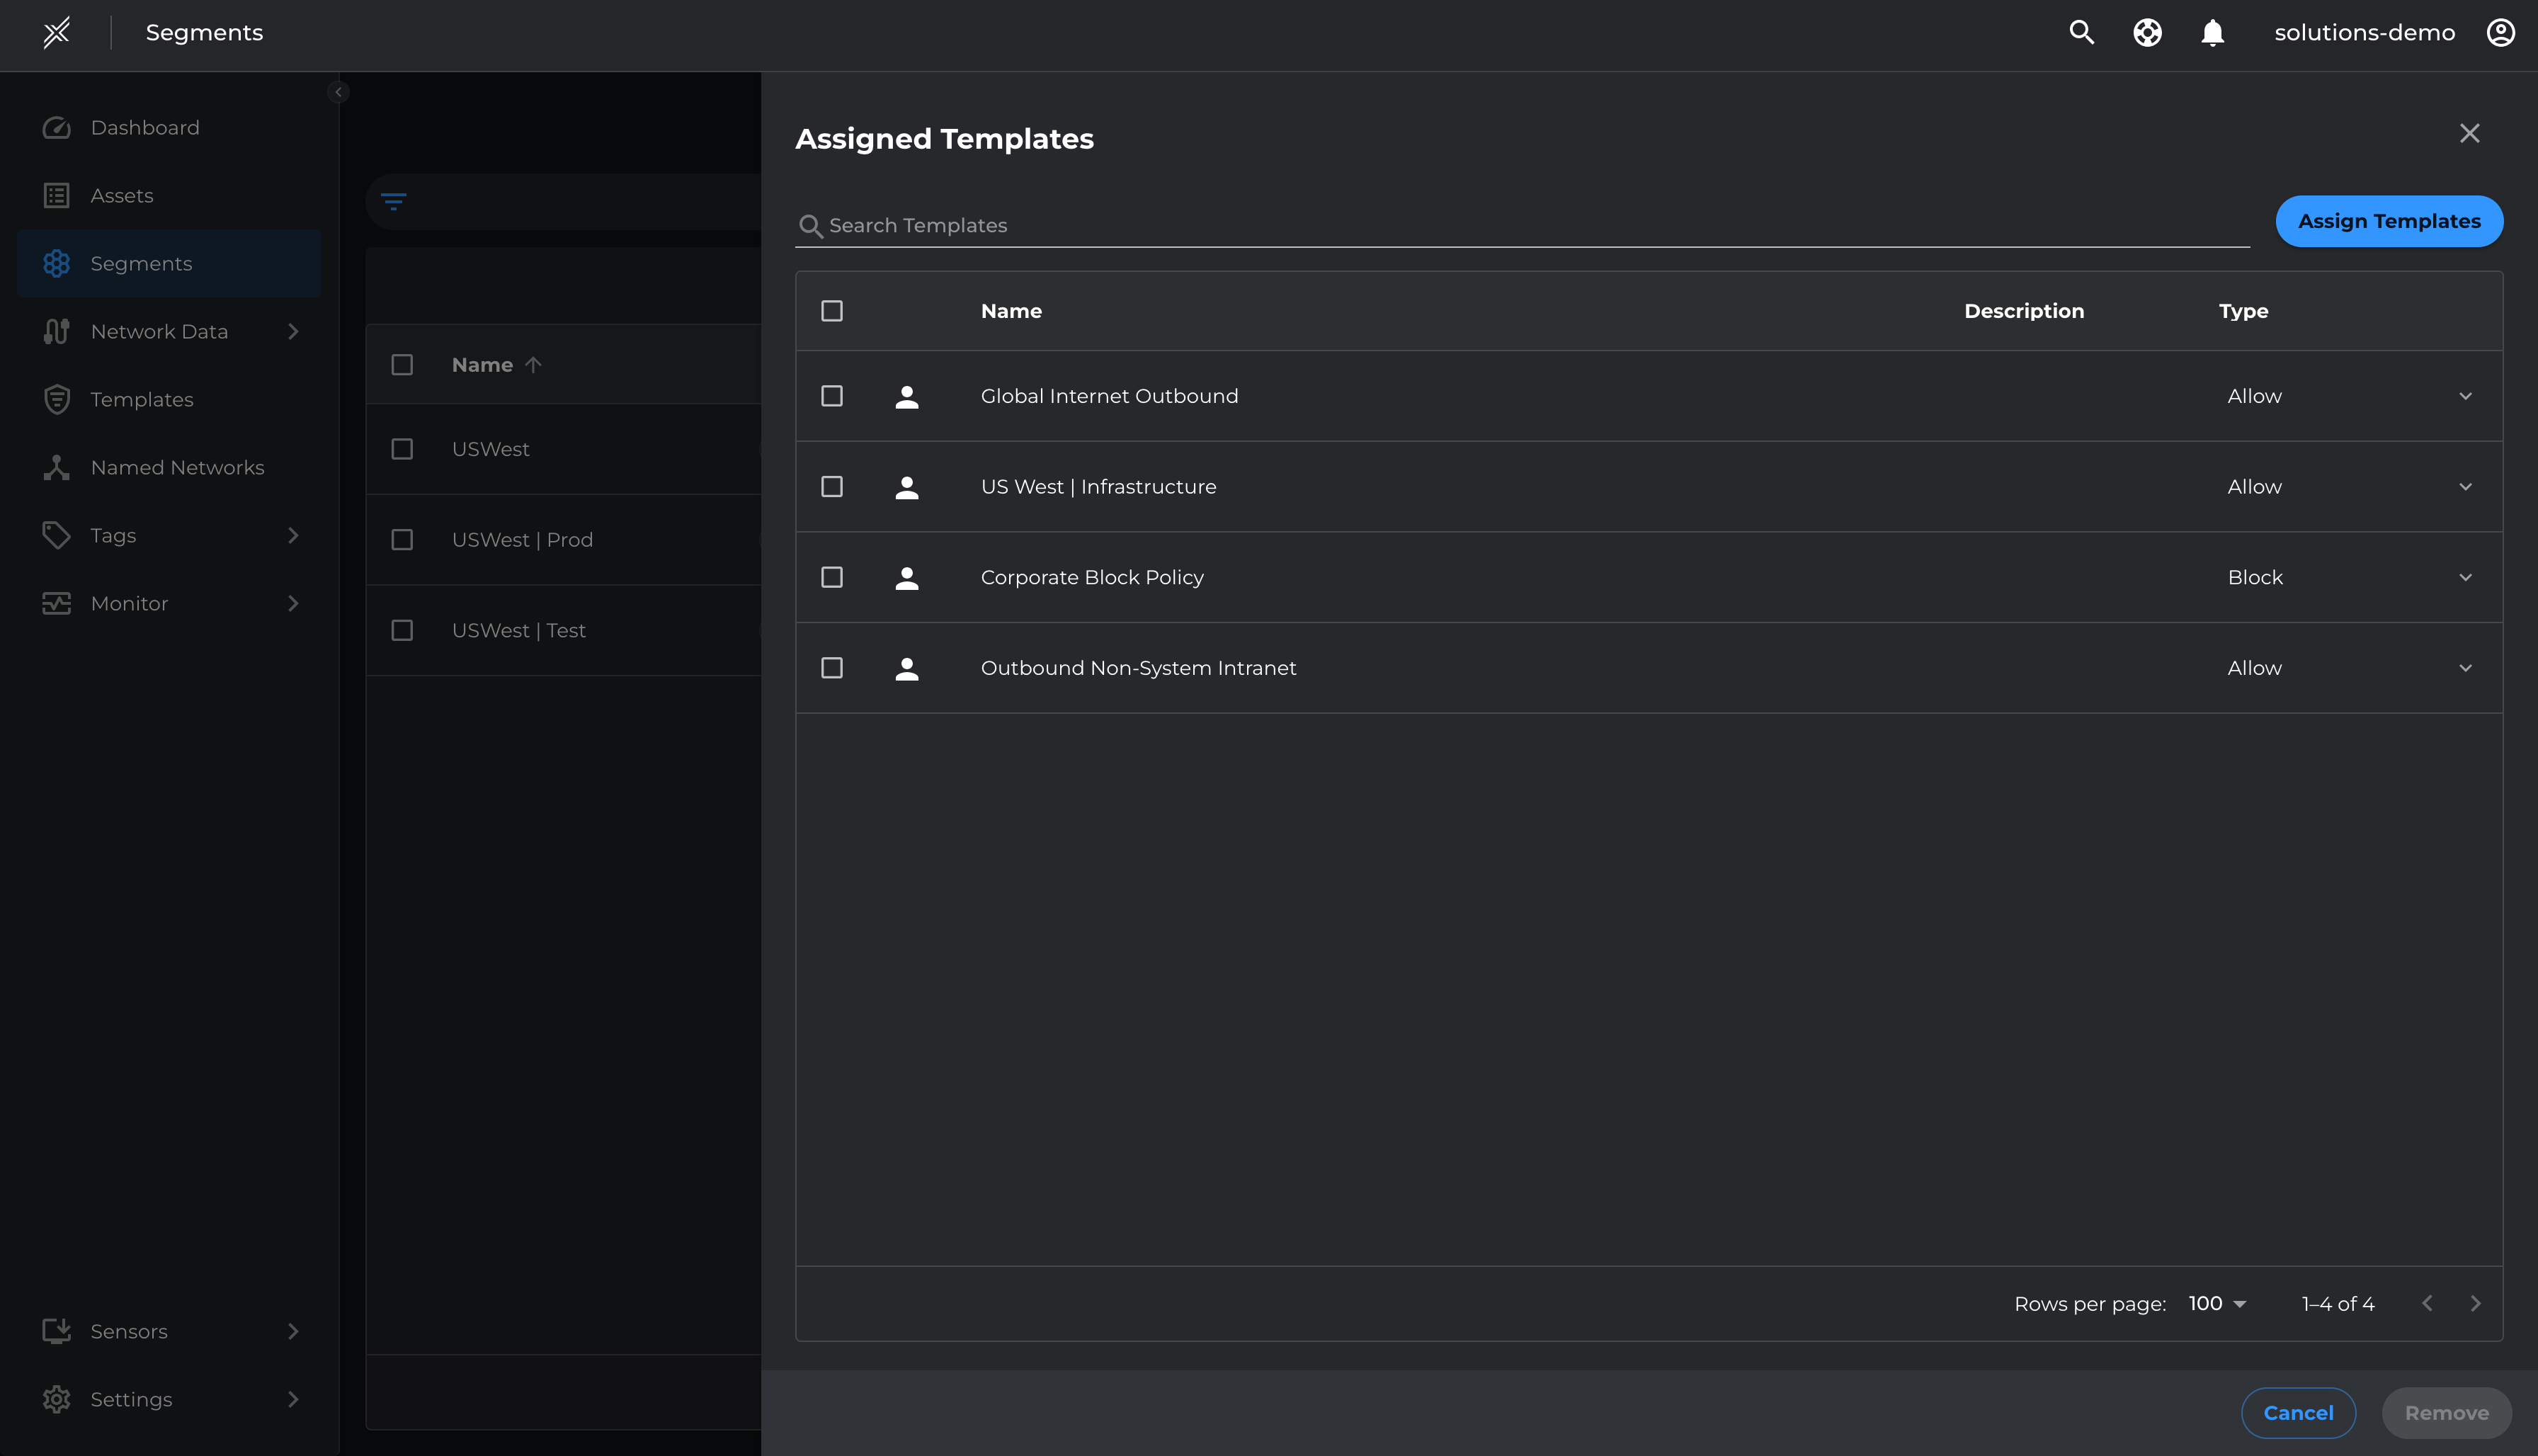
Now that the Block Template is created, we will assign it to the US West segment
- Go to Segments > Microsoft Defender > > click on the 3 dots at the end of the segment> Manage Templates
- Click on Assign Templates and select the Corporate Block Policy template and click Assign
Please note that the policies defined in the Block Templates will be applied and enforced on the matching assets irrespective of the enforcement state of the Asset (i.e even if the Asset is in Unsecure state)
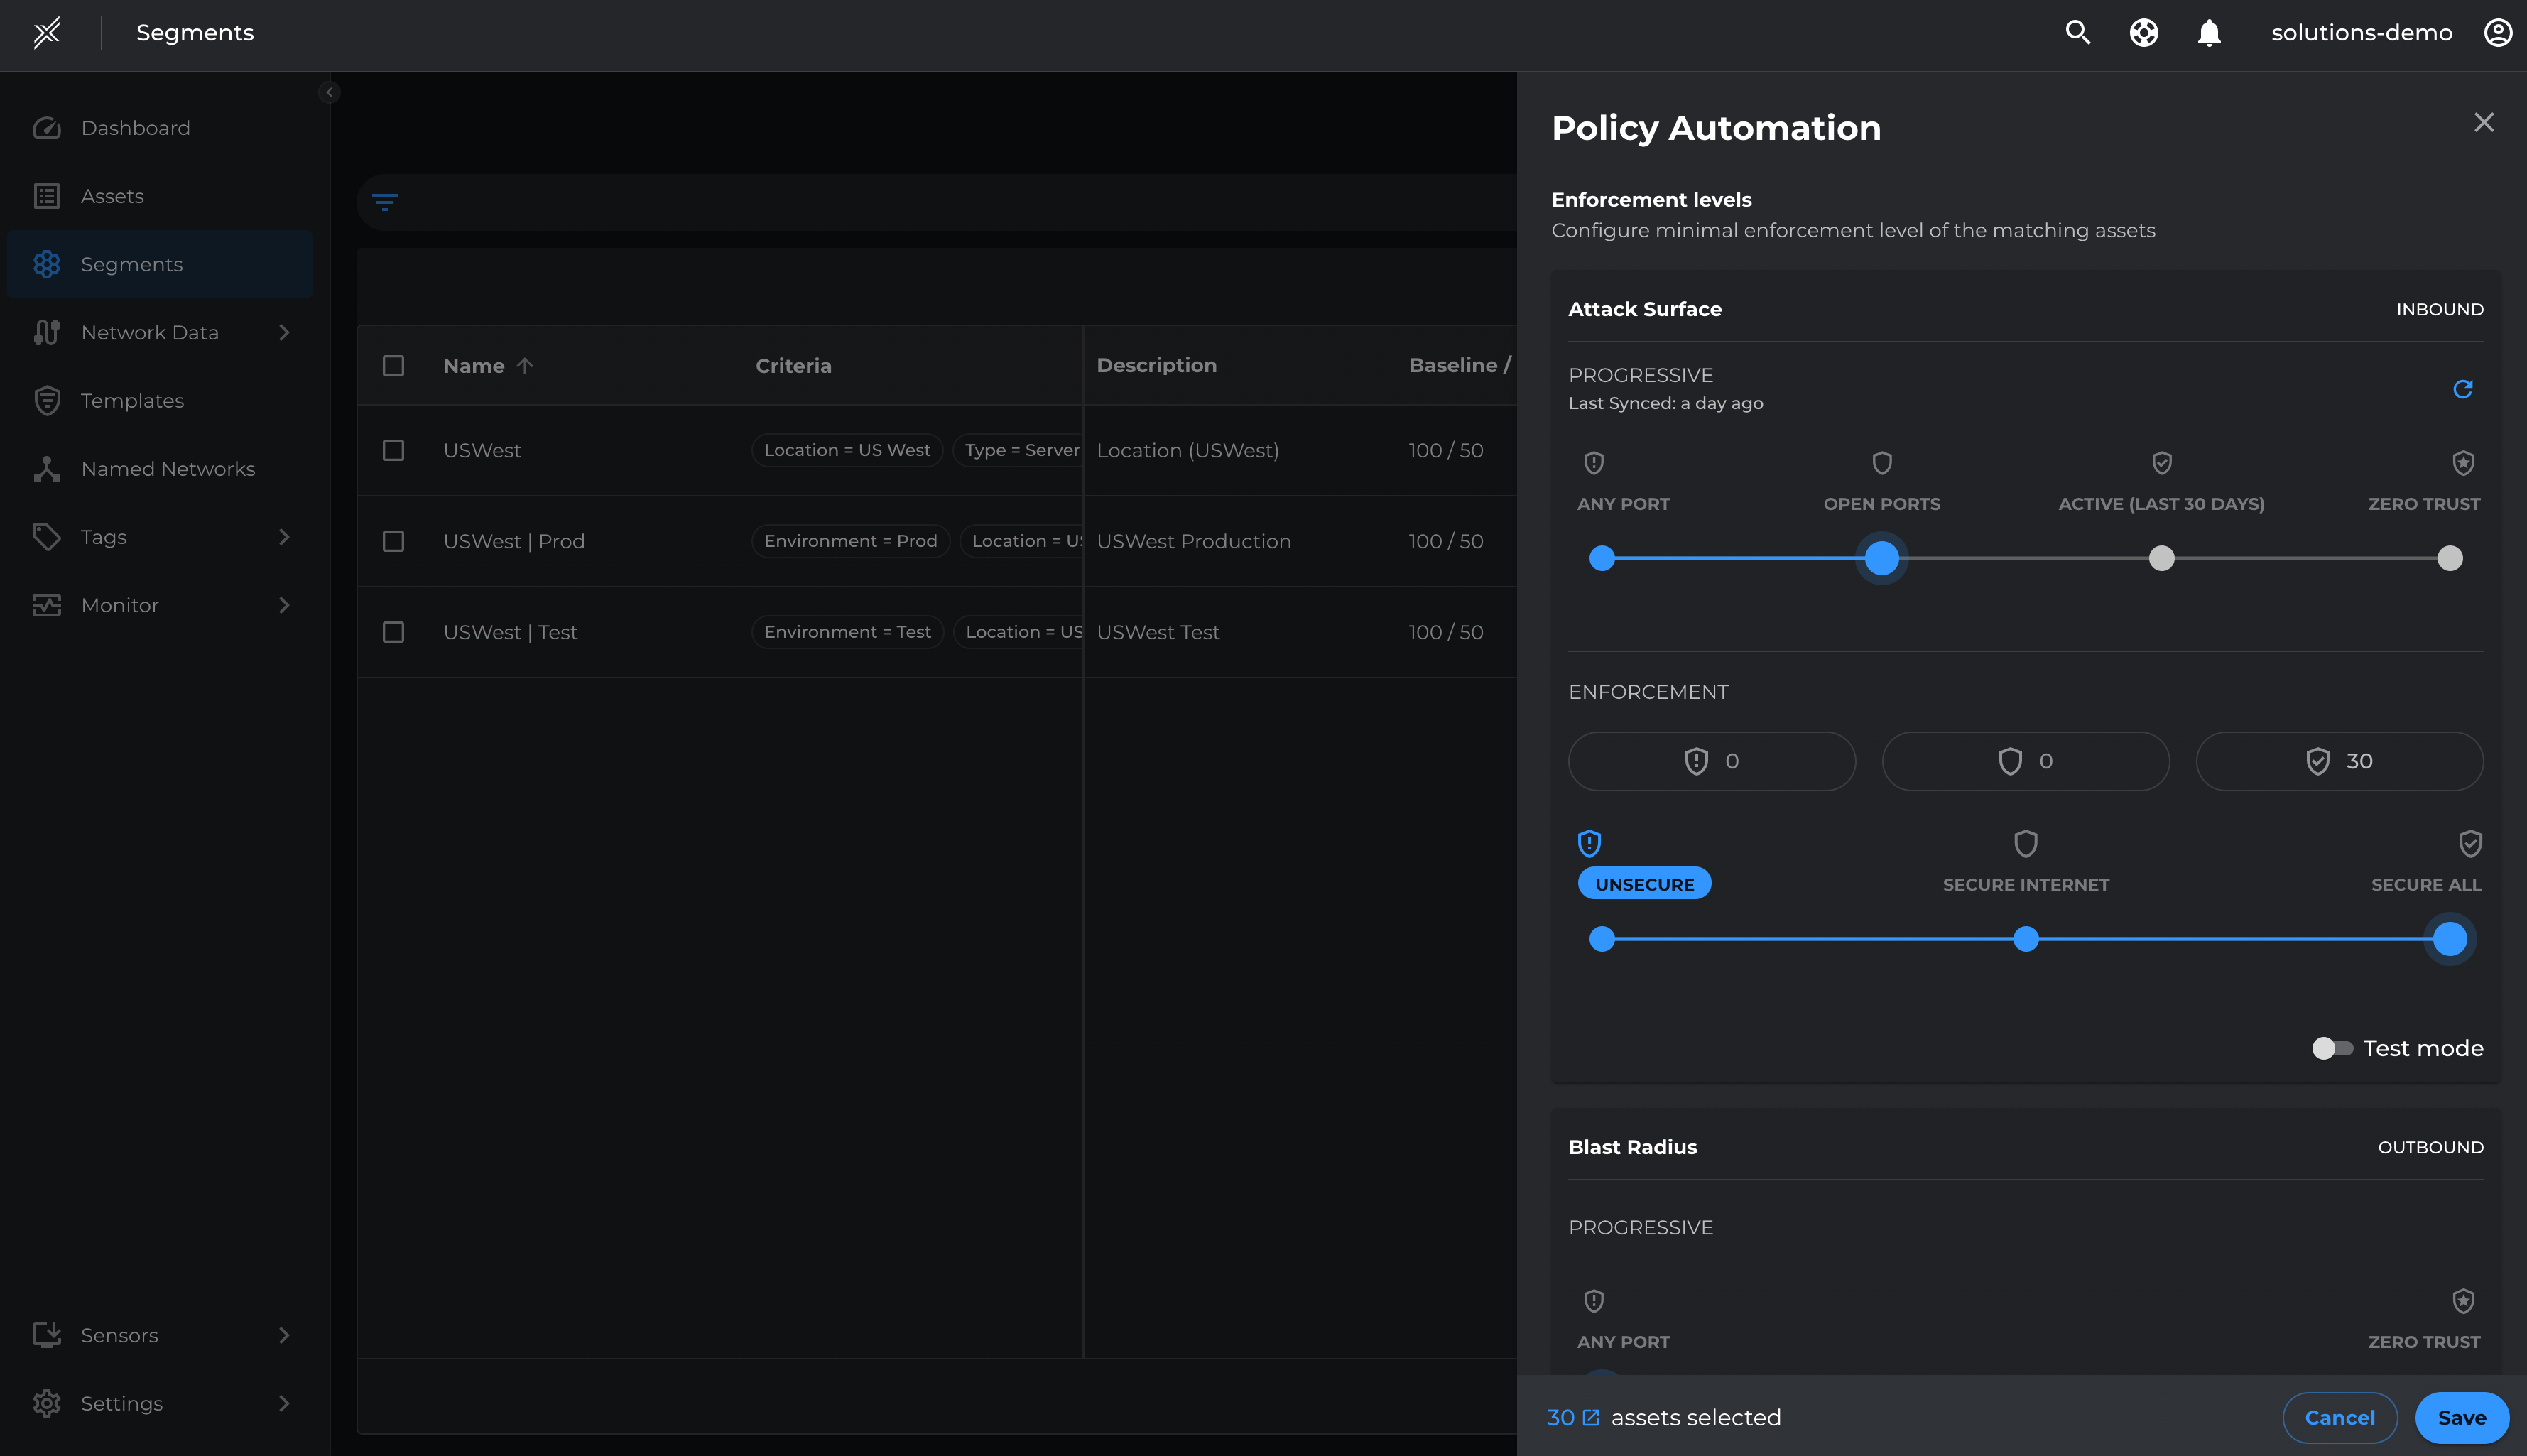
Deploy Inbound Test-Mode
With templates set for blocking malicious ports and allowing inbound essential communications, we will move assets to Inbound Enforcement in Test Mode, applying policies without blocking non-template traffic by-default.
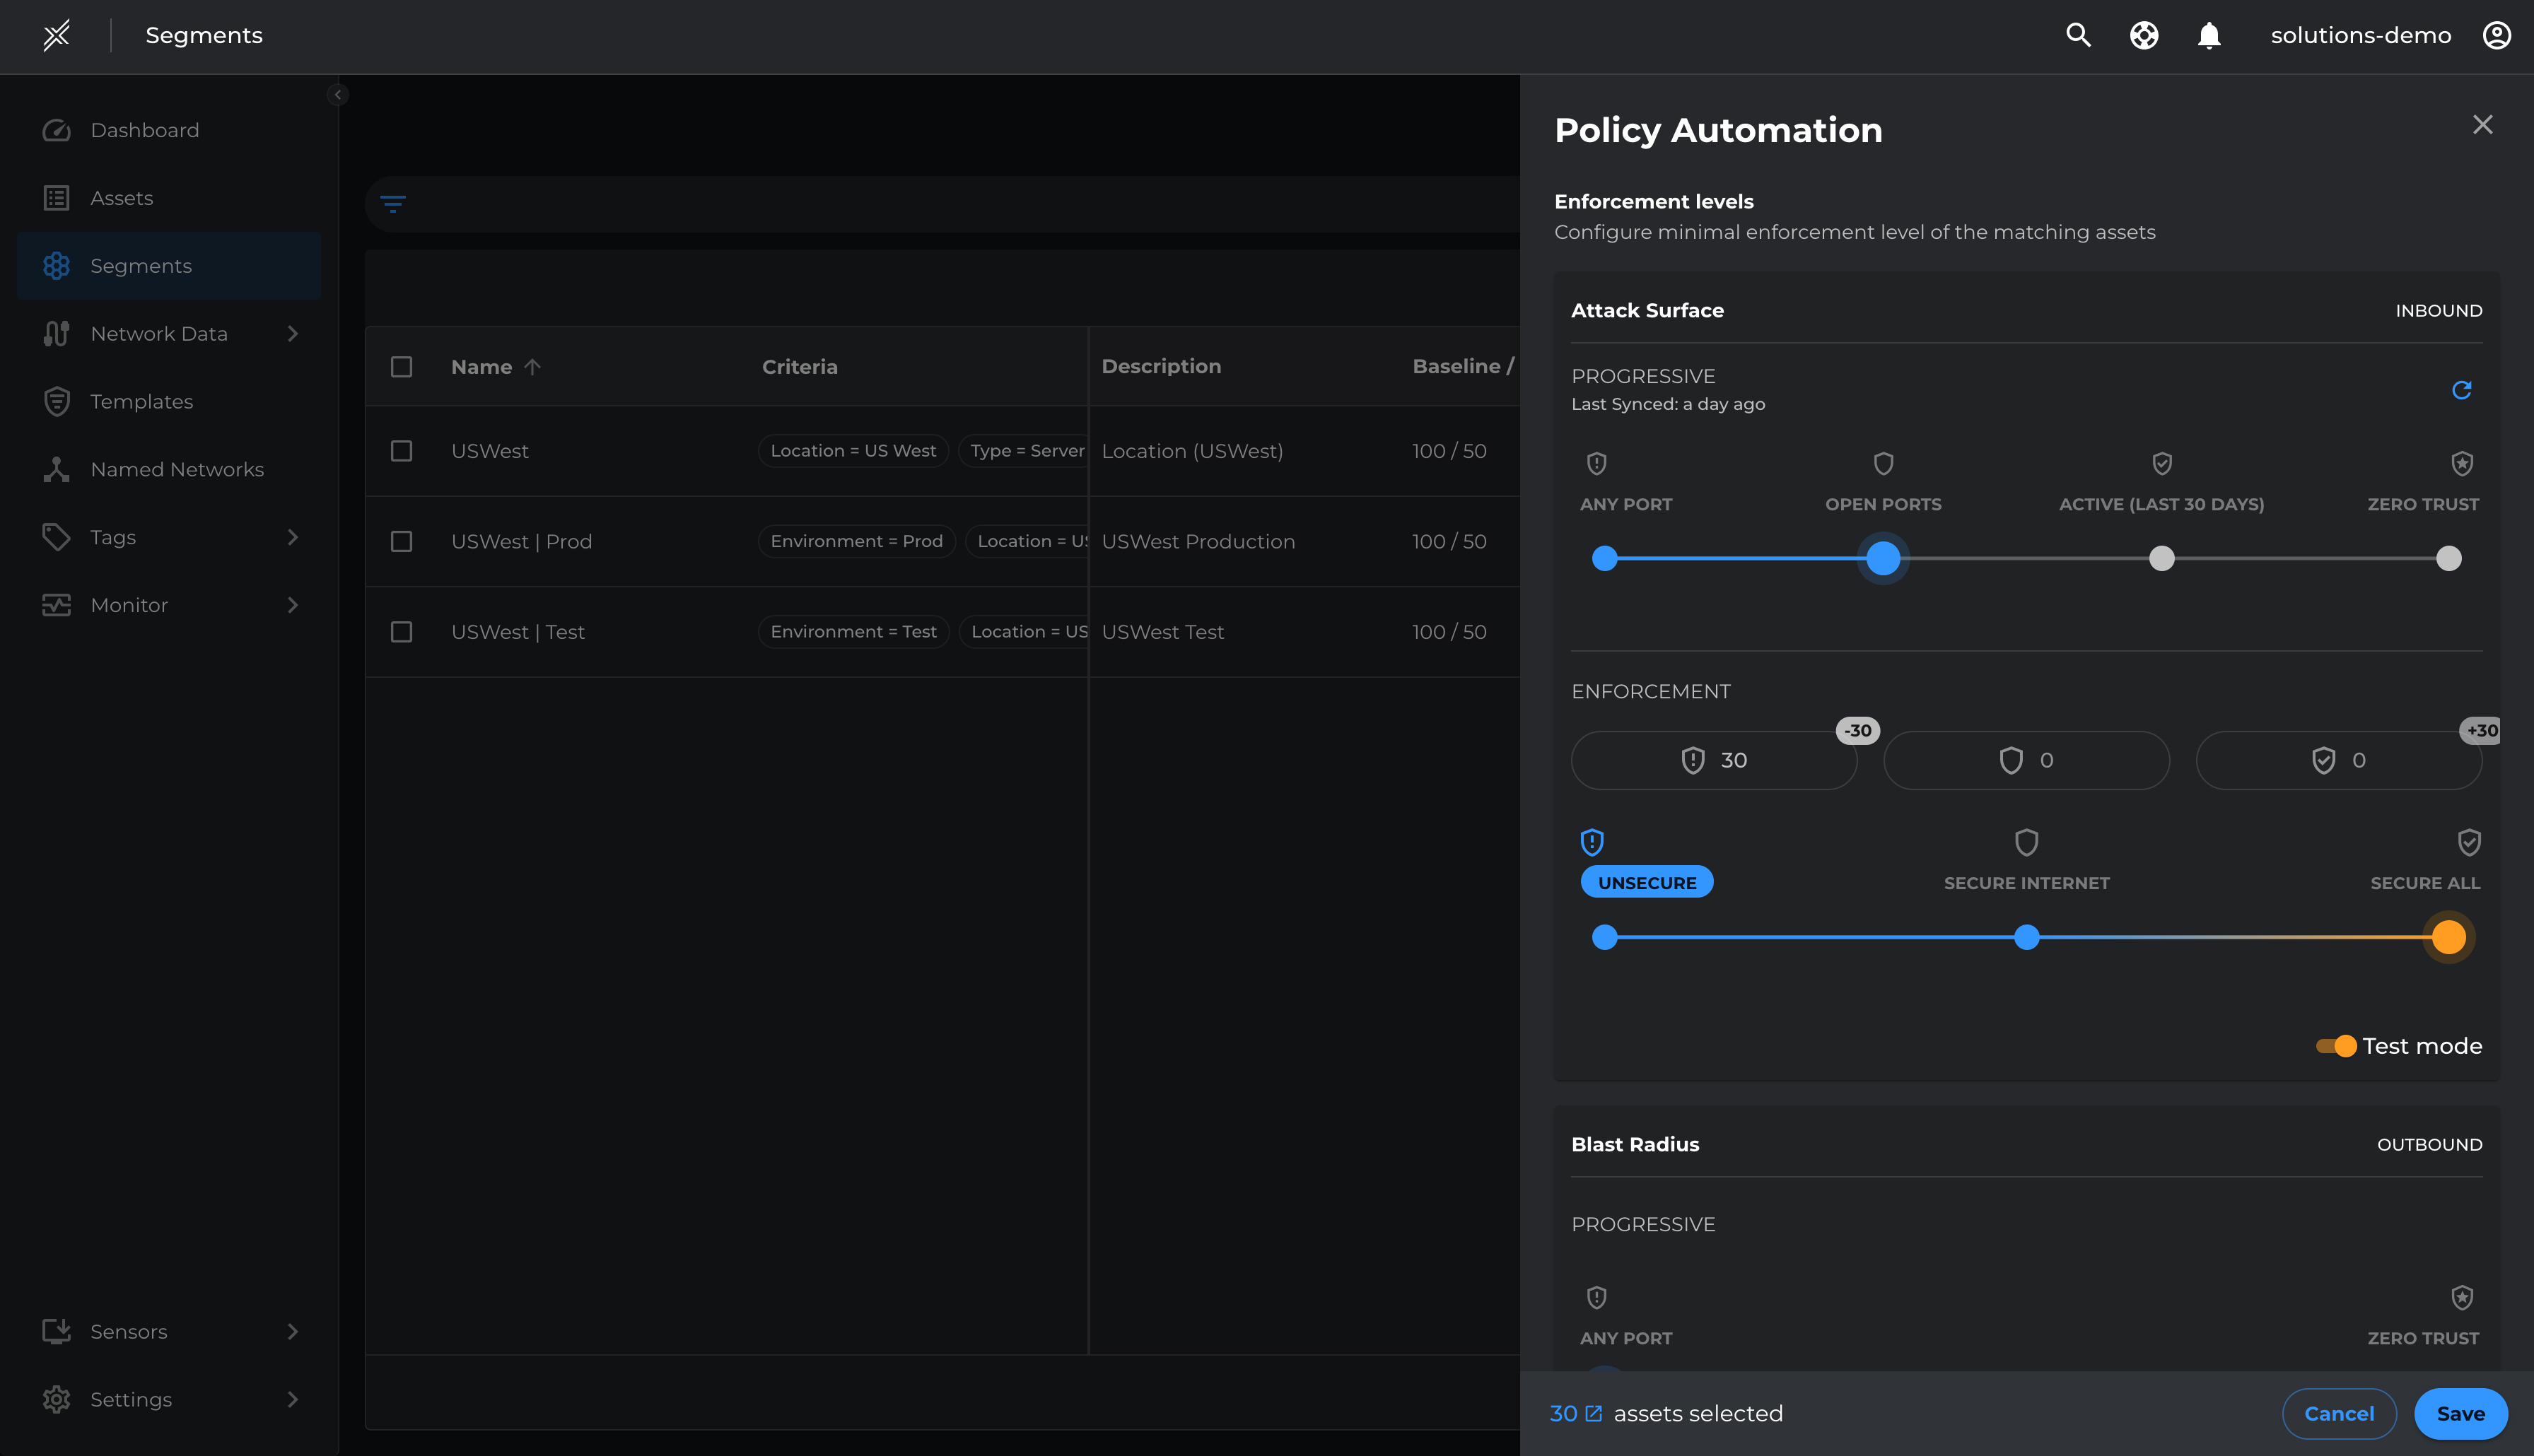
- Go to each Microsoft Defender segment > click on the 3 dots at the end > click on configure policy automation
- Move the slider on Attack Surface Enforcement to Secure All. Ensure Test Mode is selected > Save
- Repeat the same on all 3 segments
Resolve Violations and Enforce Inbound
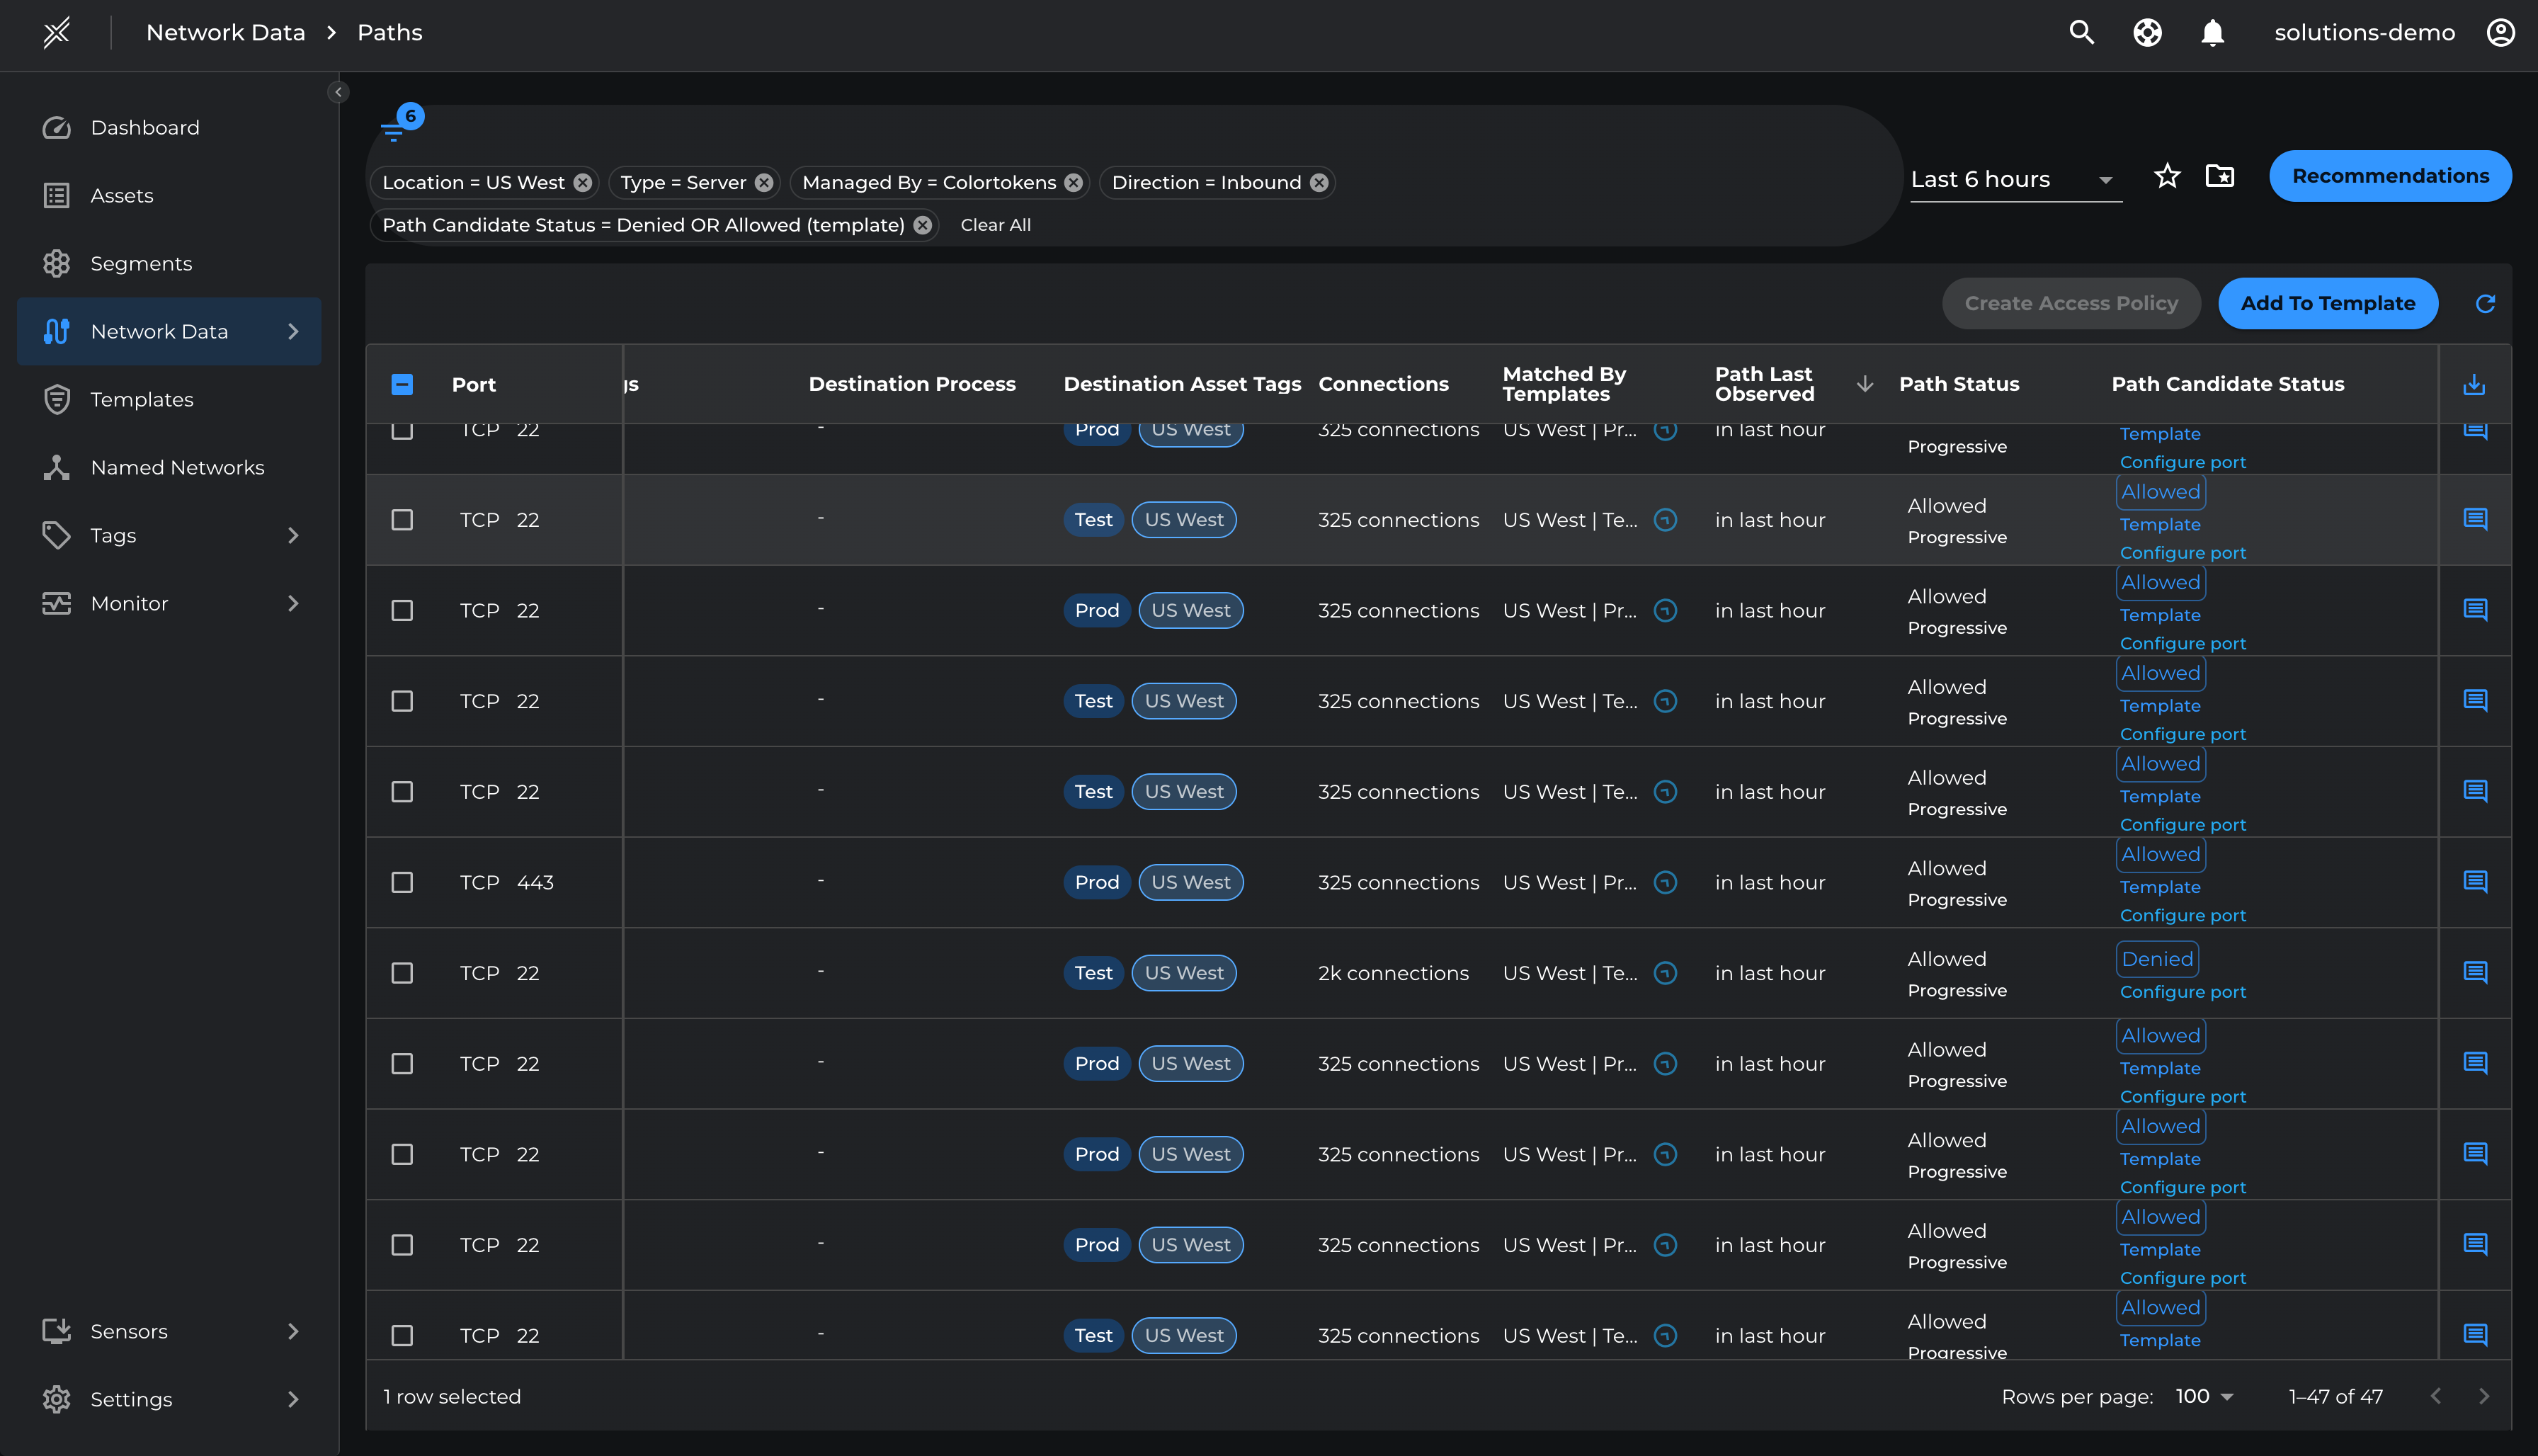
Review the paths with Path Candidate Status 'Allowed Template' and 'Denied'. These paths will be Allowed or Denied respectively once the Assets are moved from Inbound Test mode to Inbound Enforce mode.
- Go to Network Data > Paths
- Filter by Location=US West, Type=Server, Direction=Inbound, Path Candidate Status=Denied and Allowed(template).
- Ensure that these are authorized or unauthorized traffic that must be allowed or denied respectively. To allow a path, select the path and click 'Add To Template' and select respective Template > Save
Once the violations are taken care, enforce the Attack Surface
- Go to each Microsoft Defender segment > click on the 3 dots at the end > click on configure policy automation
- Move the slider on Attack Surface Enforcement to Secure All. Ensure Test Mode is unselected > Save
- Repeat the same on all 3 segments
Run Progress Reports
Generate Reports for Core Segments:
- Go to Segments, switch to Microsoft Defendertab, select all segments, and click 'Create Report'.
- A report request will be sent, and the report will be available in a few minutes.
Download and Review Breach Metrics
- Navigate to Segments, switch to Microsoft Defendertab, and click 'Reports'.
- Click the Download icon next to the report.
- Note the reduction in the breach score.
Reduce Blast Radii
Outbound Internet Access
To ensure access to SaaS and other critical Internet services, we will permit outbound TCP 80/443 and ICMP communications to the Internet for core segments by creating an Outbound Internet Template and applying it to the core segments.
- Go to Templates > Create Template
- In Outbound Paths > Add TCP 80, TCP 443, UDP 443 and ICMP to Internet(Public) named network > Create
- Go to Segments > USWest > Manage Templates > Assign Template > Global Internet Outbound > Assign

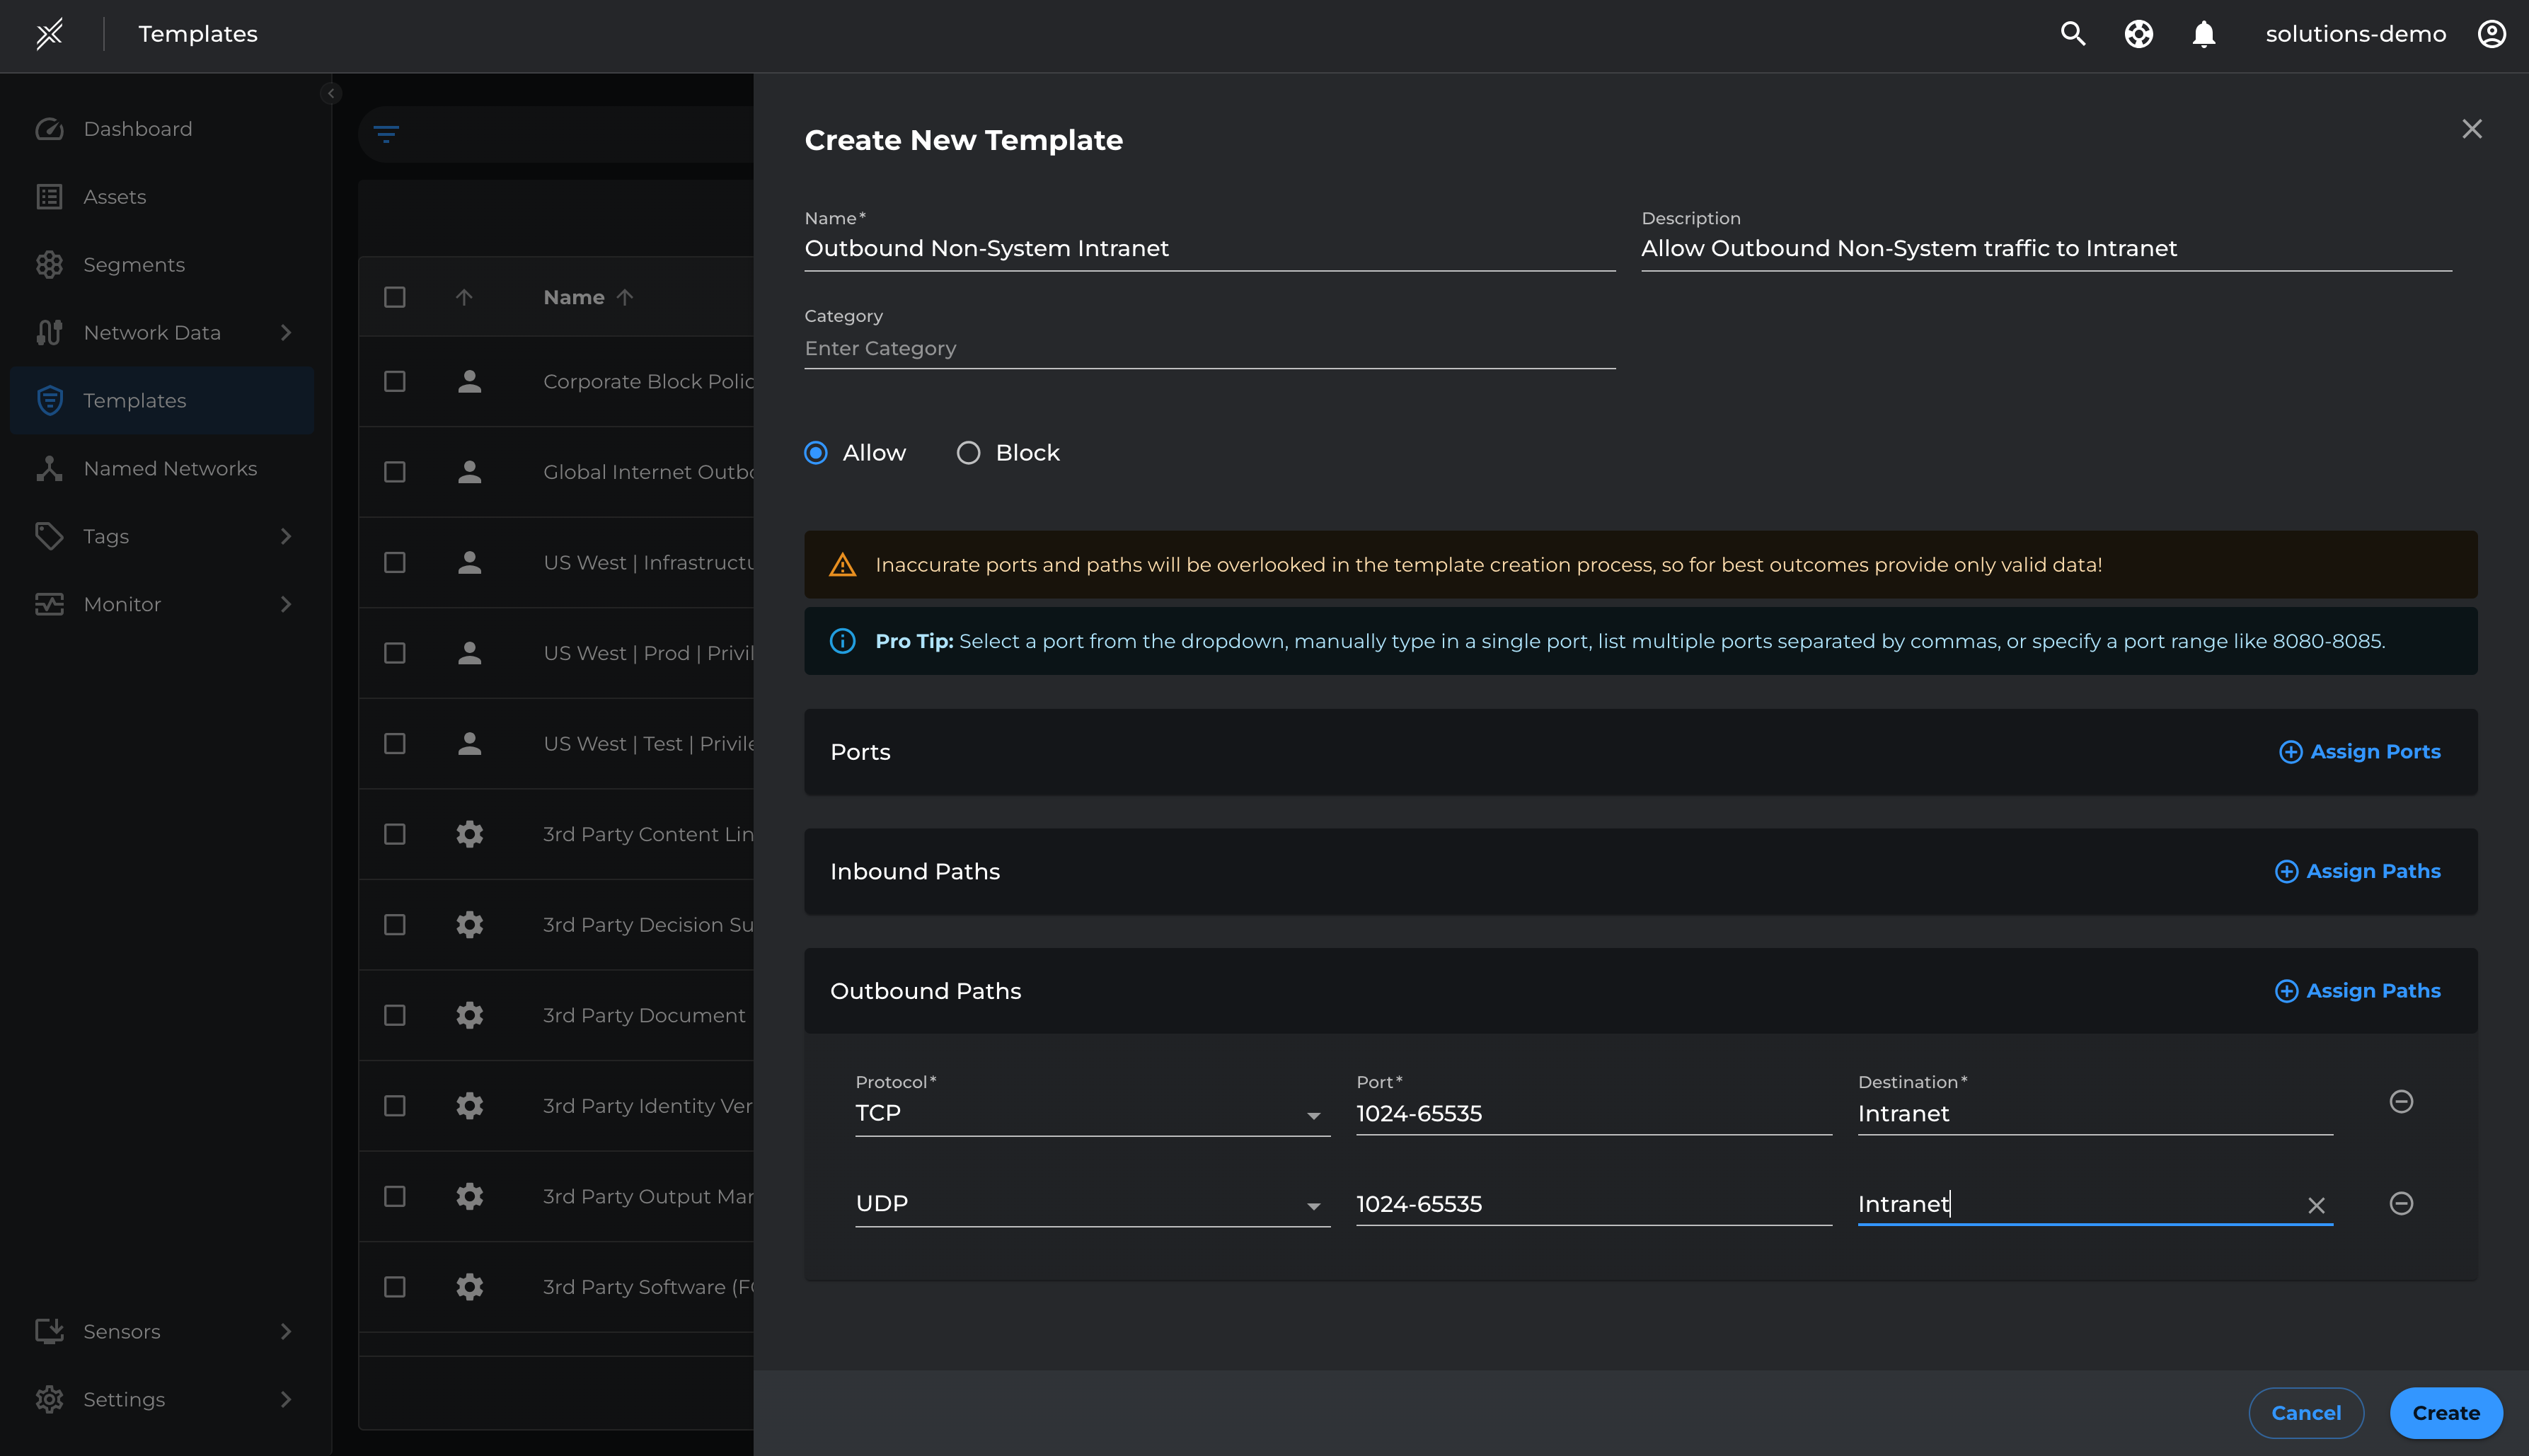
Outbound Intranet Access
To ensure seamless enforcement without disruptions and maintain uninterrupted non-system communications, we will permit outbound non-system communications (ports 1024-65535) to the Intranet for core segments.
This will be achieved by creating an outbound Intranet template for non-system communications and applying it to the core segments.
- Go to Templates > Create Template
- In Outbound Paths > Add TCP 1024-65535, UDP 1024-65535 to Intranet named network > Create
- Go to Segments > USWest > Manage Templates > Assign Template > Outbound Non-System Intranet > Assign
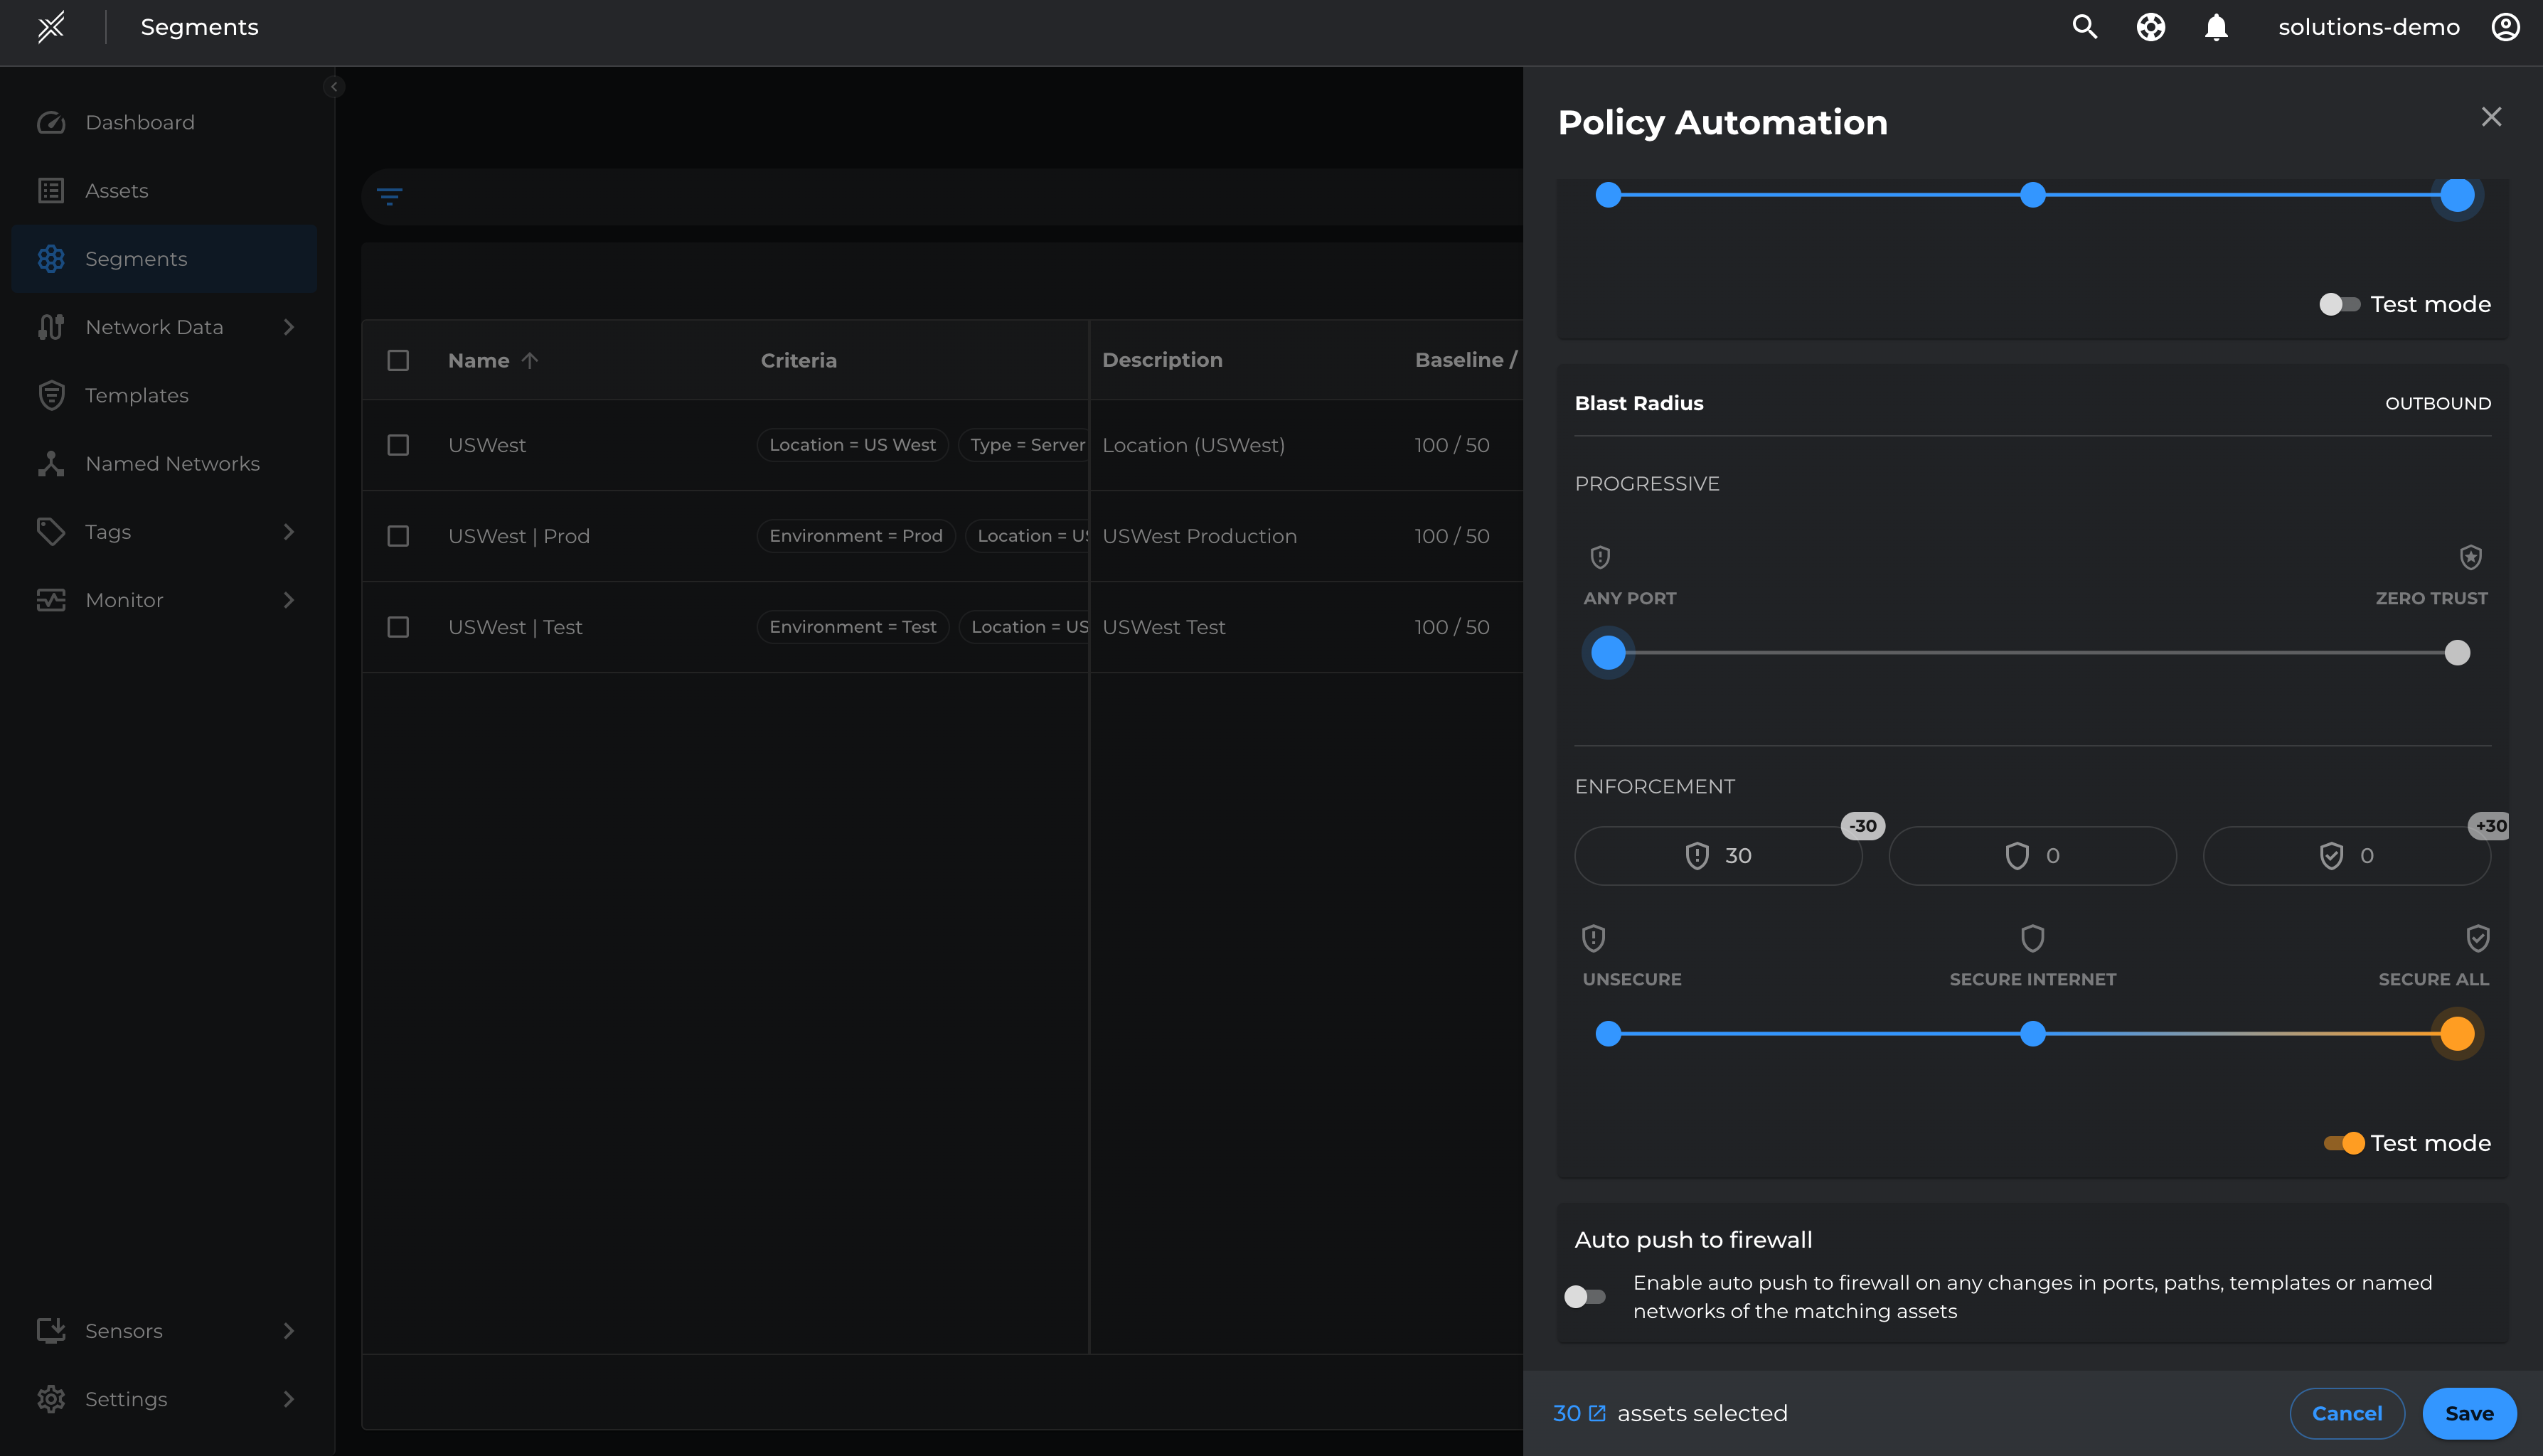
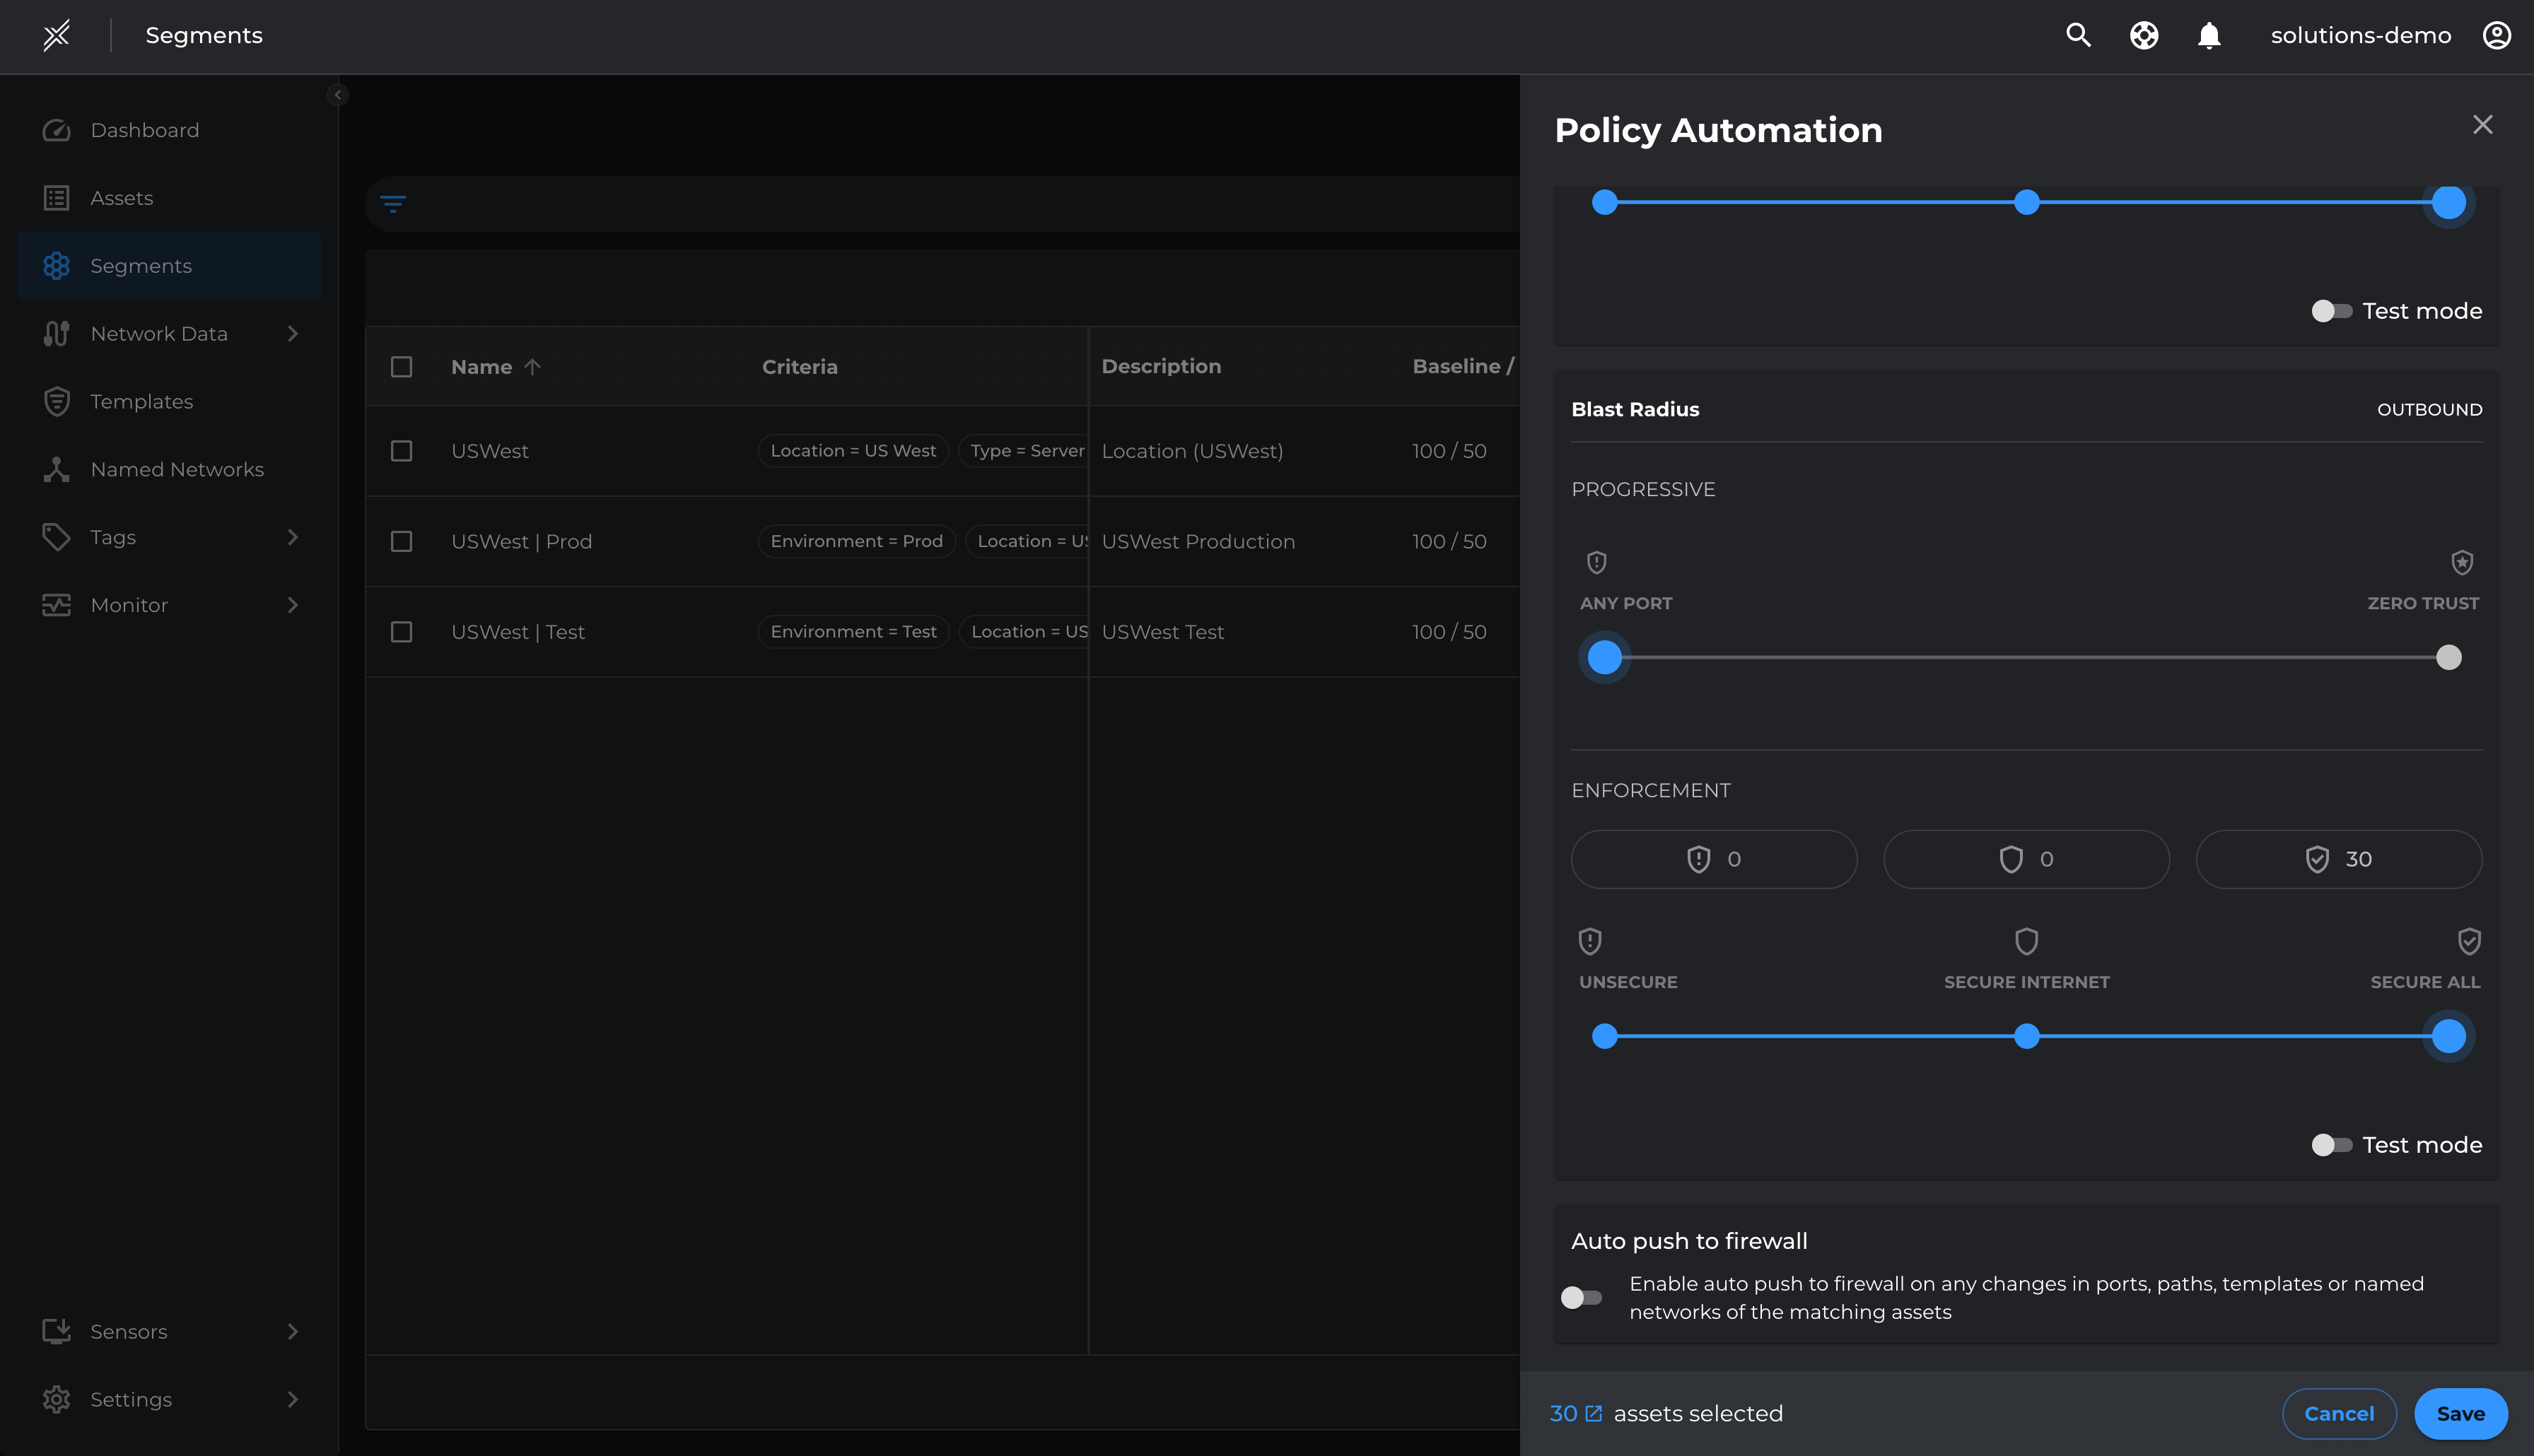
Deploy Outbound Test-Mode
With templates set for allowing essential outbound communications, we will move assets to Oubound Enforcement in Test Mode, applying policies without blocking non-template traffic by-default.
- Go to each Microsoft Defender segment > click on the 3 dots at the end > click on configure policy automation
- Move the slider on Blast Radius Enforcement to Secure All. Ensure Test Mode is selected > Save
- Repeat the same on all 3 segments
Resolve Violations and Enforce
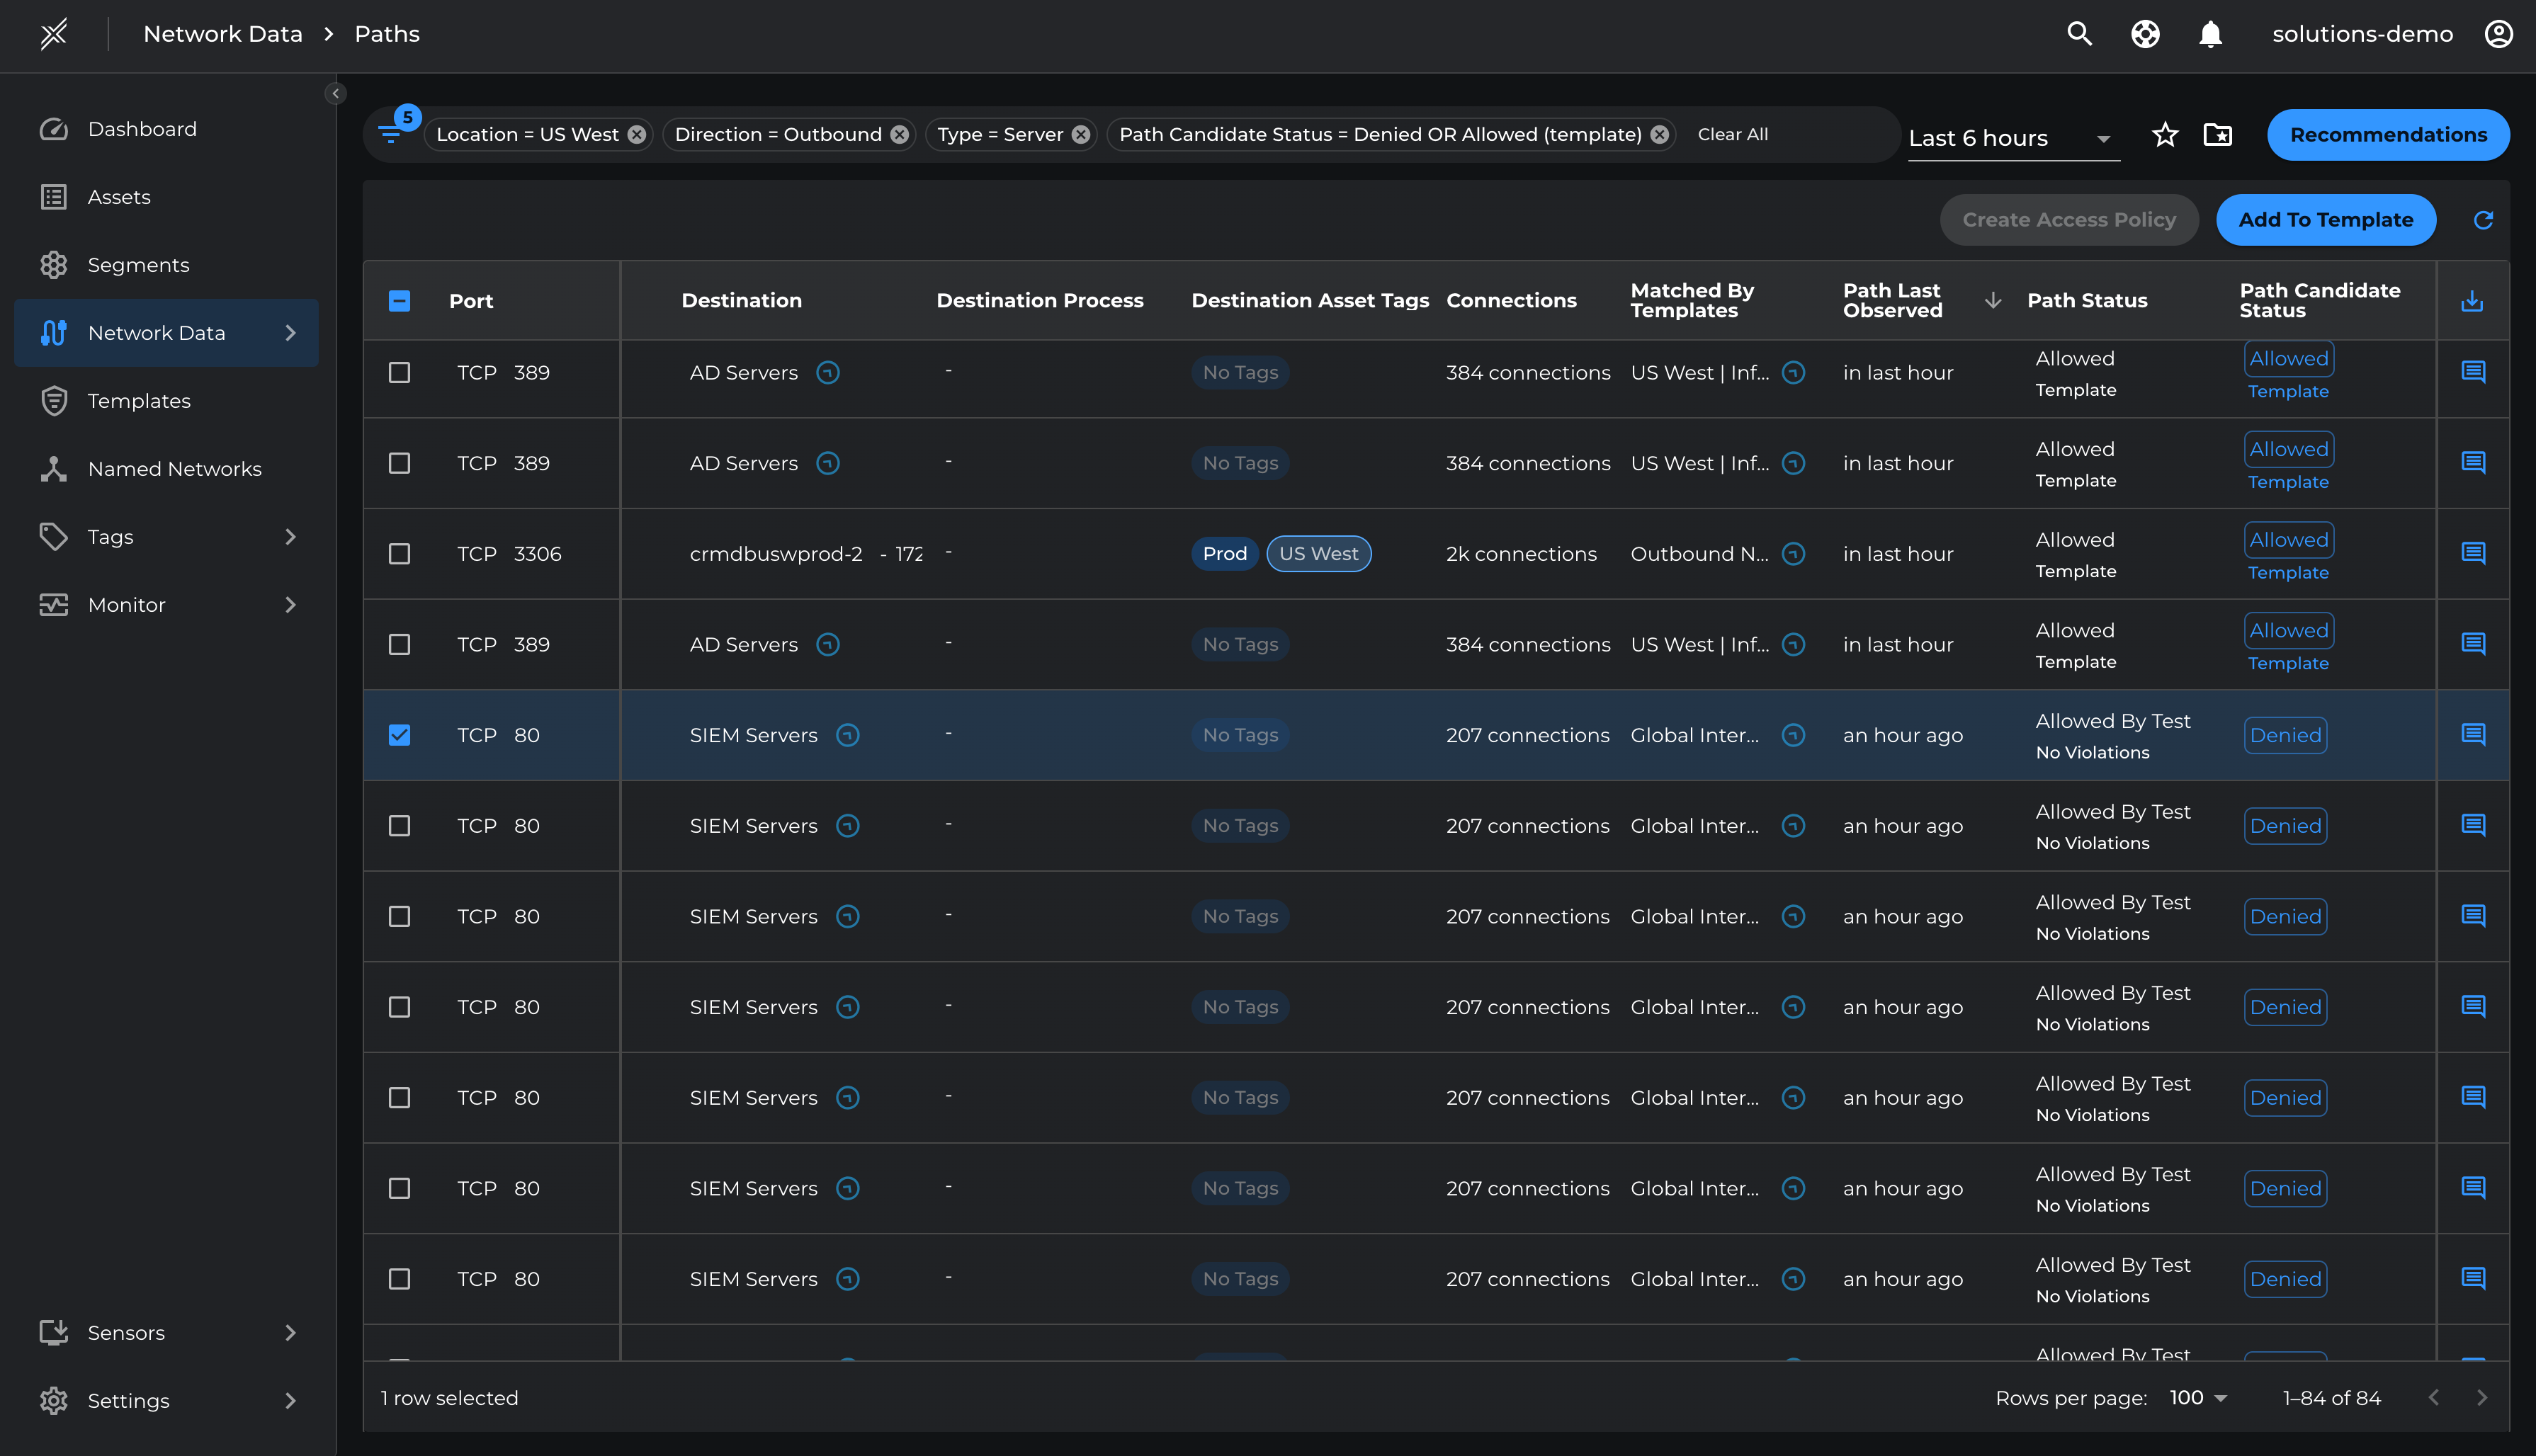
Review the paths with Path Candidate Status 'Allowed Template' and 'Denied'. These paths will be enforced once assets move from Outbound Test Mode to Outbound Enforce Mode.
Review Paths with 'Allowed Template' and 'Denied' Status
- Navigate to Network Data > Paths.
- Apply filters:
- Location = US West
- Type = Server
- Direction = Outbound
- Path Candidate Status = Denied, Allowed (Template)
- Verify whether traffic is authorized or unauthorized:
- To allow a path, select it and click 'Add To Template'.
- Choose the appropriate Template and click 'Save'.
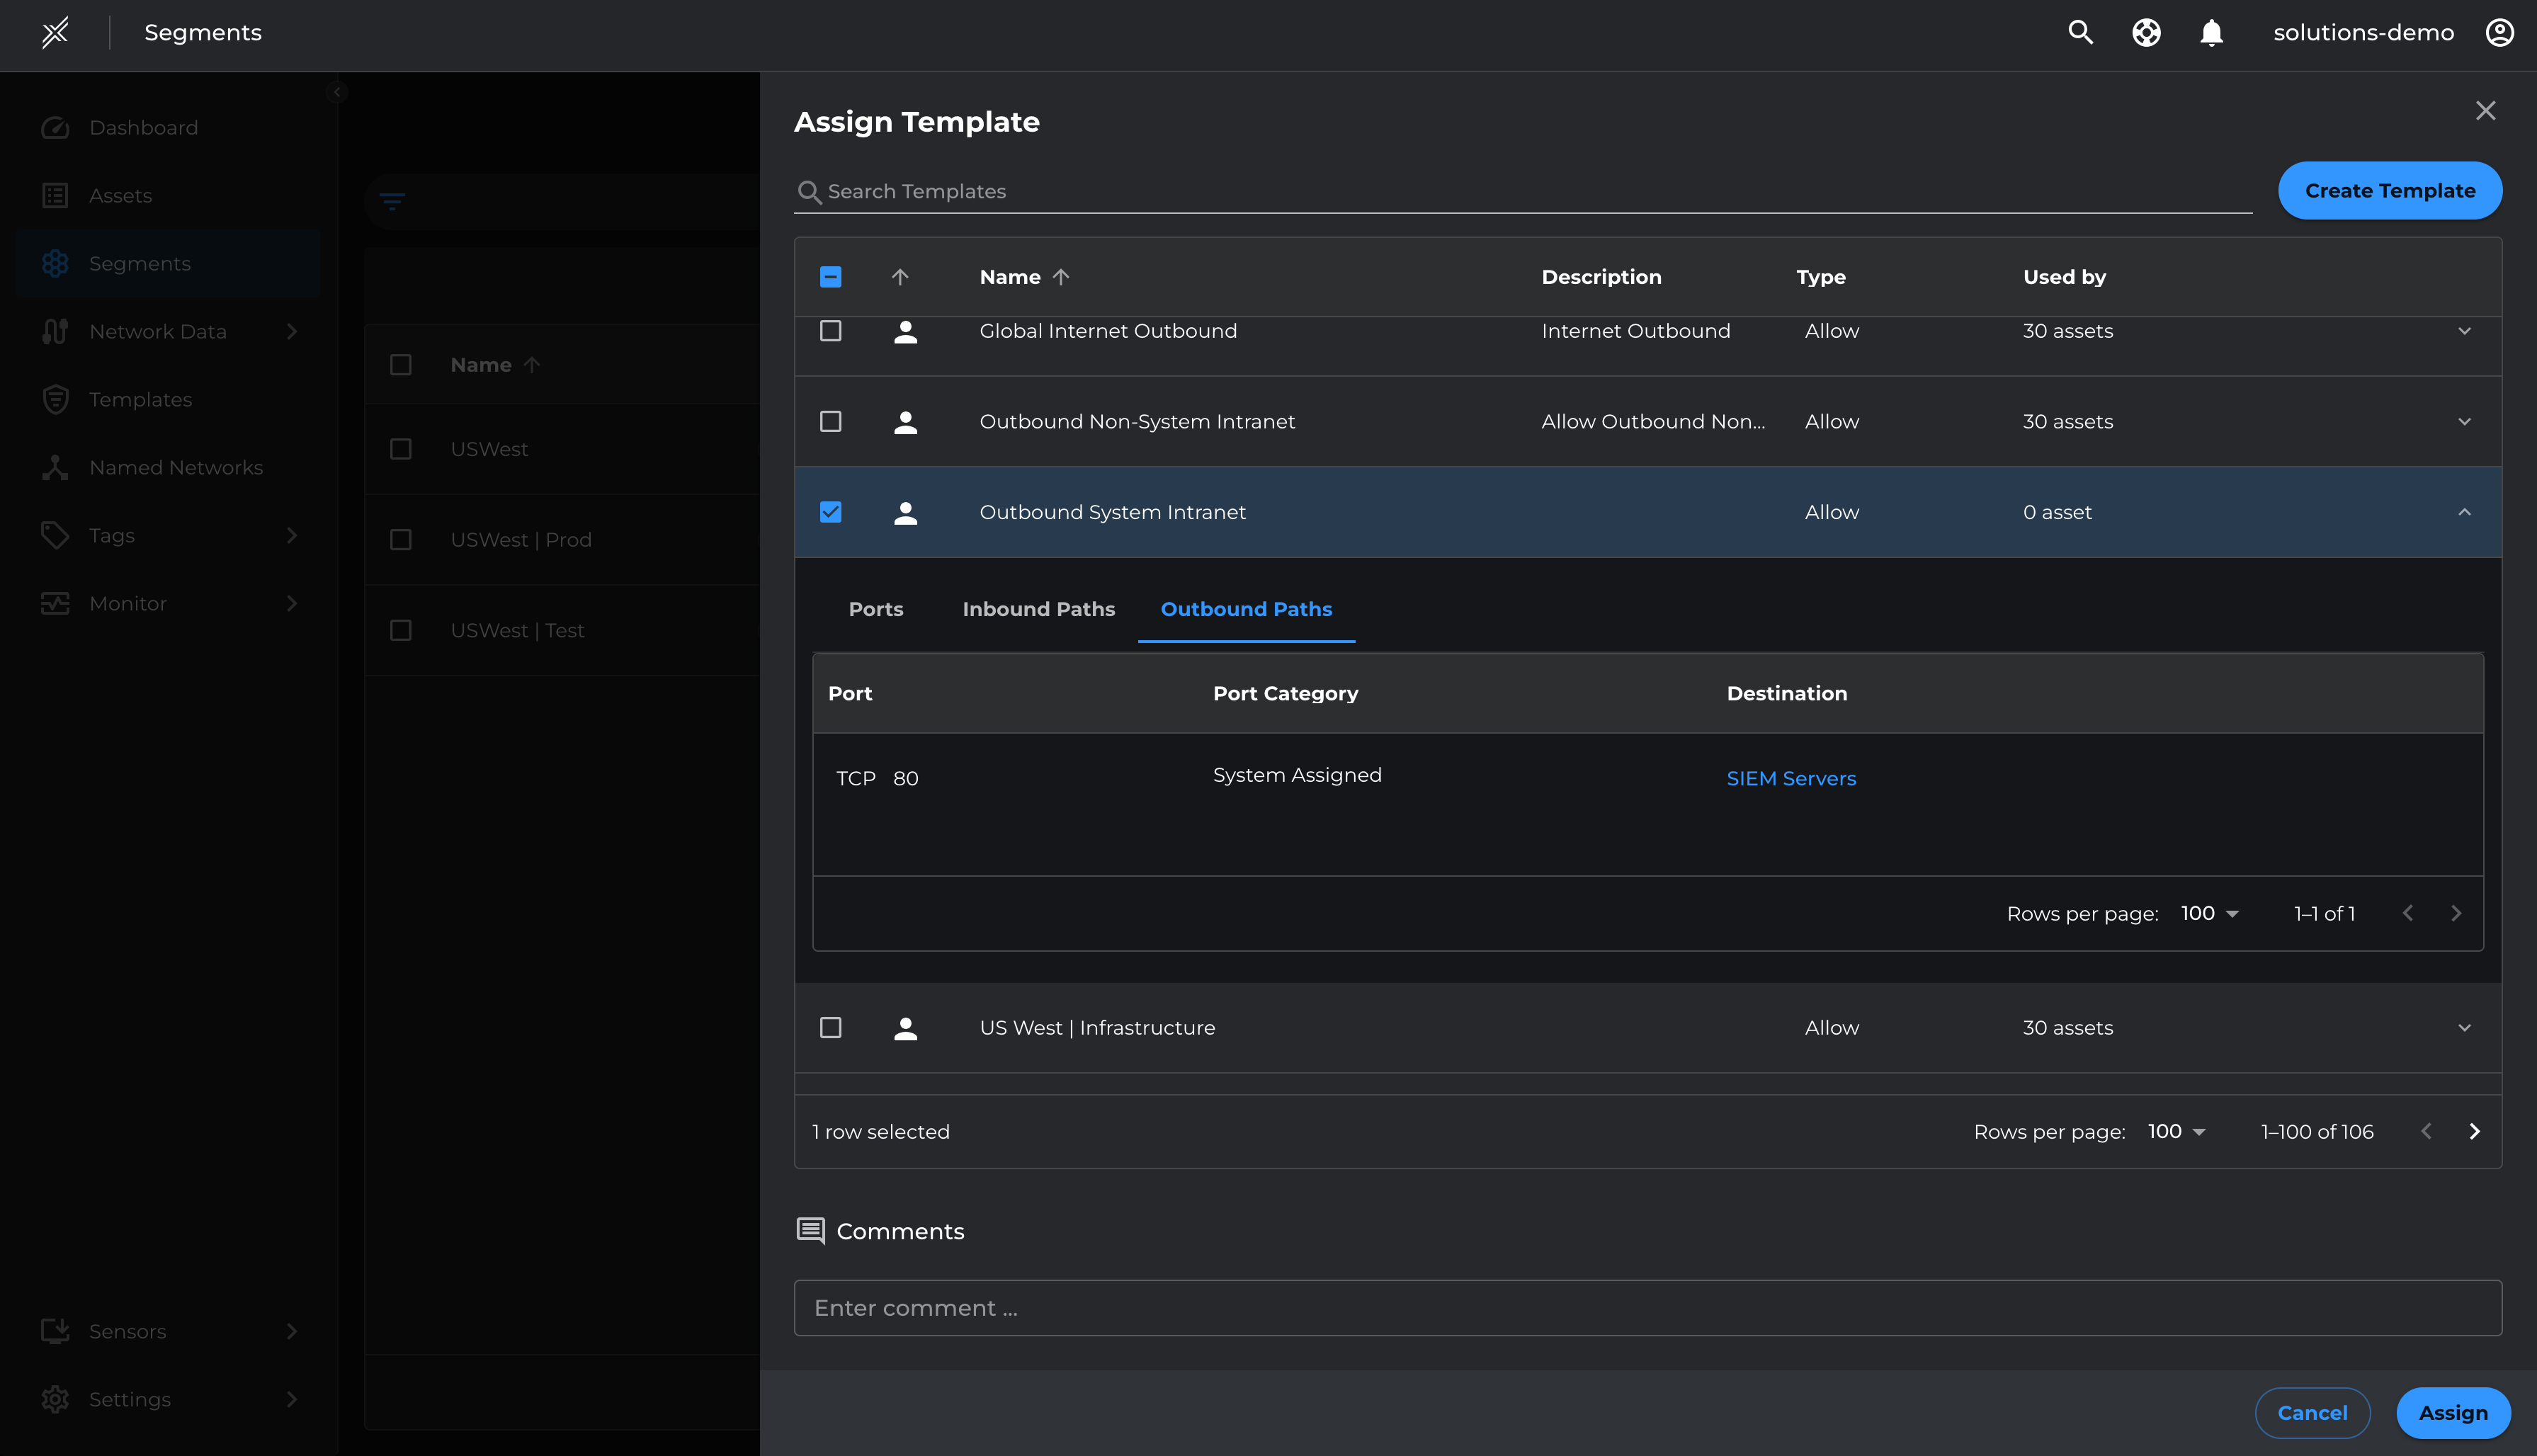
Allow Outbound TCP 80 to SIEM Server
- Select the Outbound TCP 80 to SIEM Server path.
- Click 'Add To Template' > 'Create Template' > 'Outbound System Intranet' > 'Create'.
- Navigate to Segments > US West > Manage Templates.
- Click 'Assign Template' > 'Outbound System Intranet' > 'Assign'.
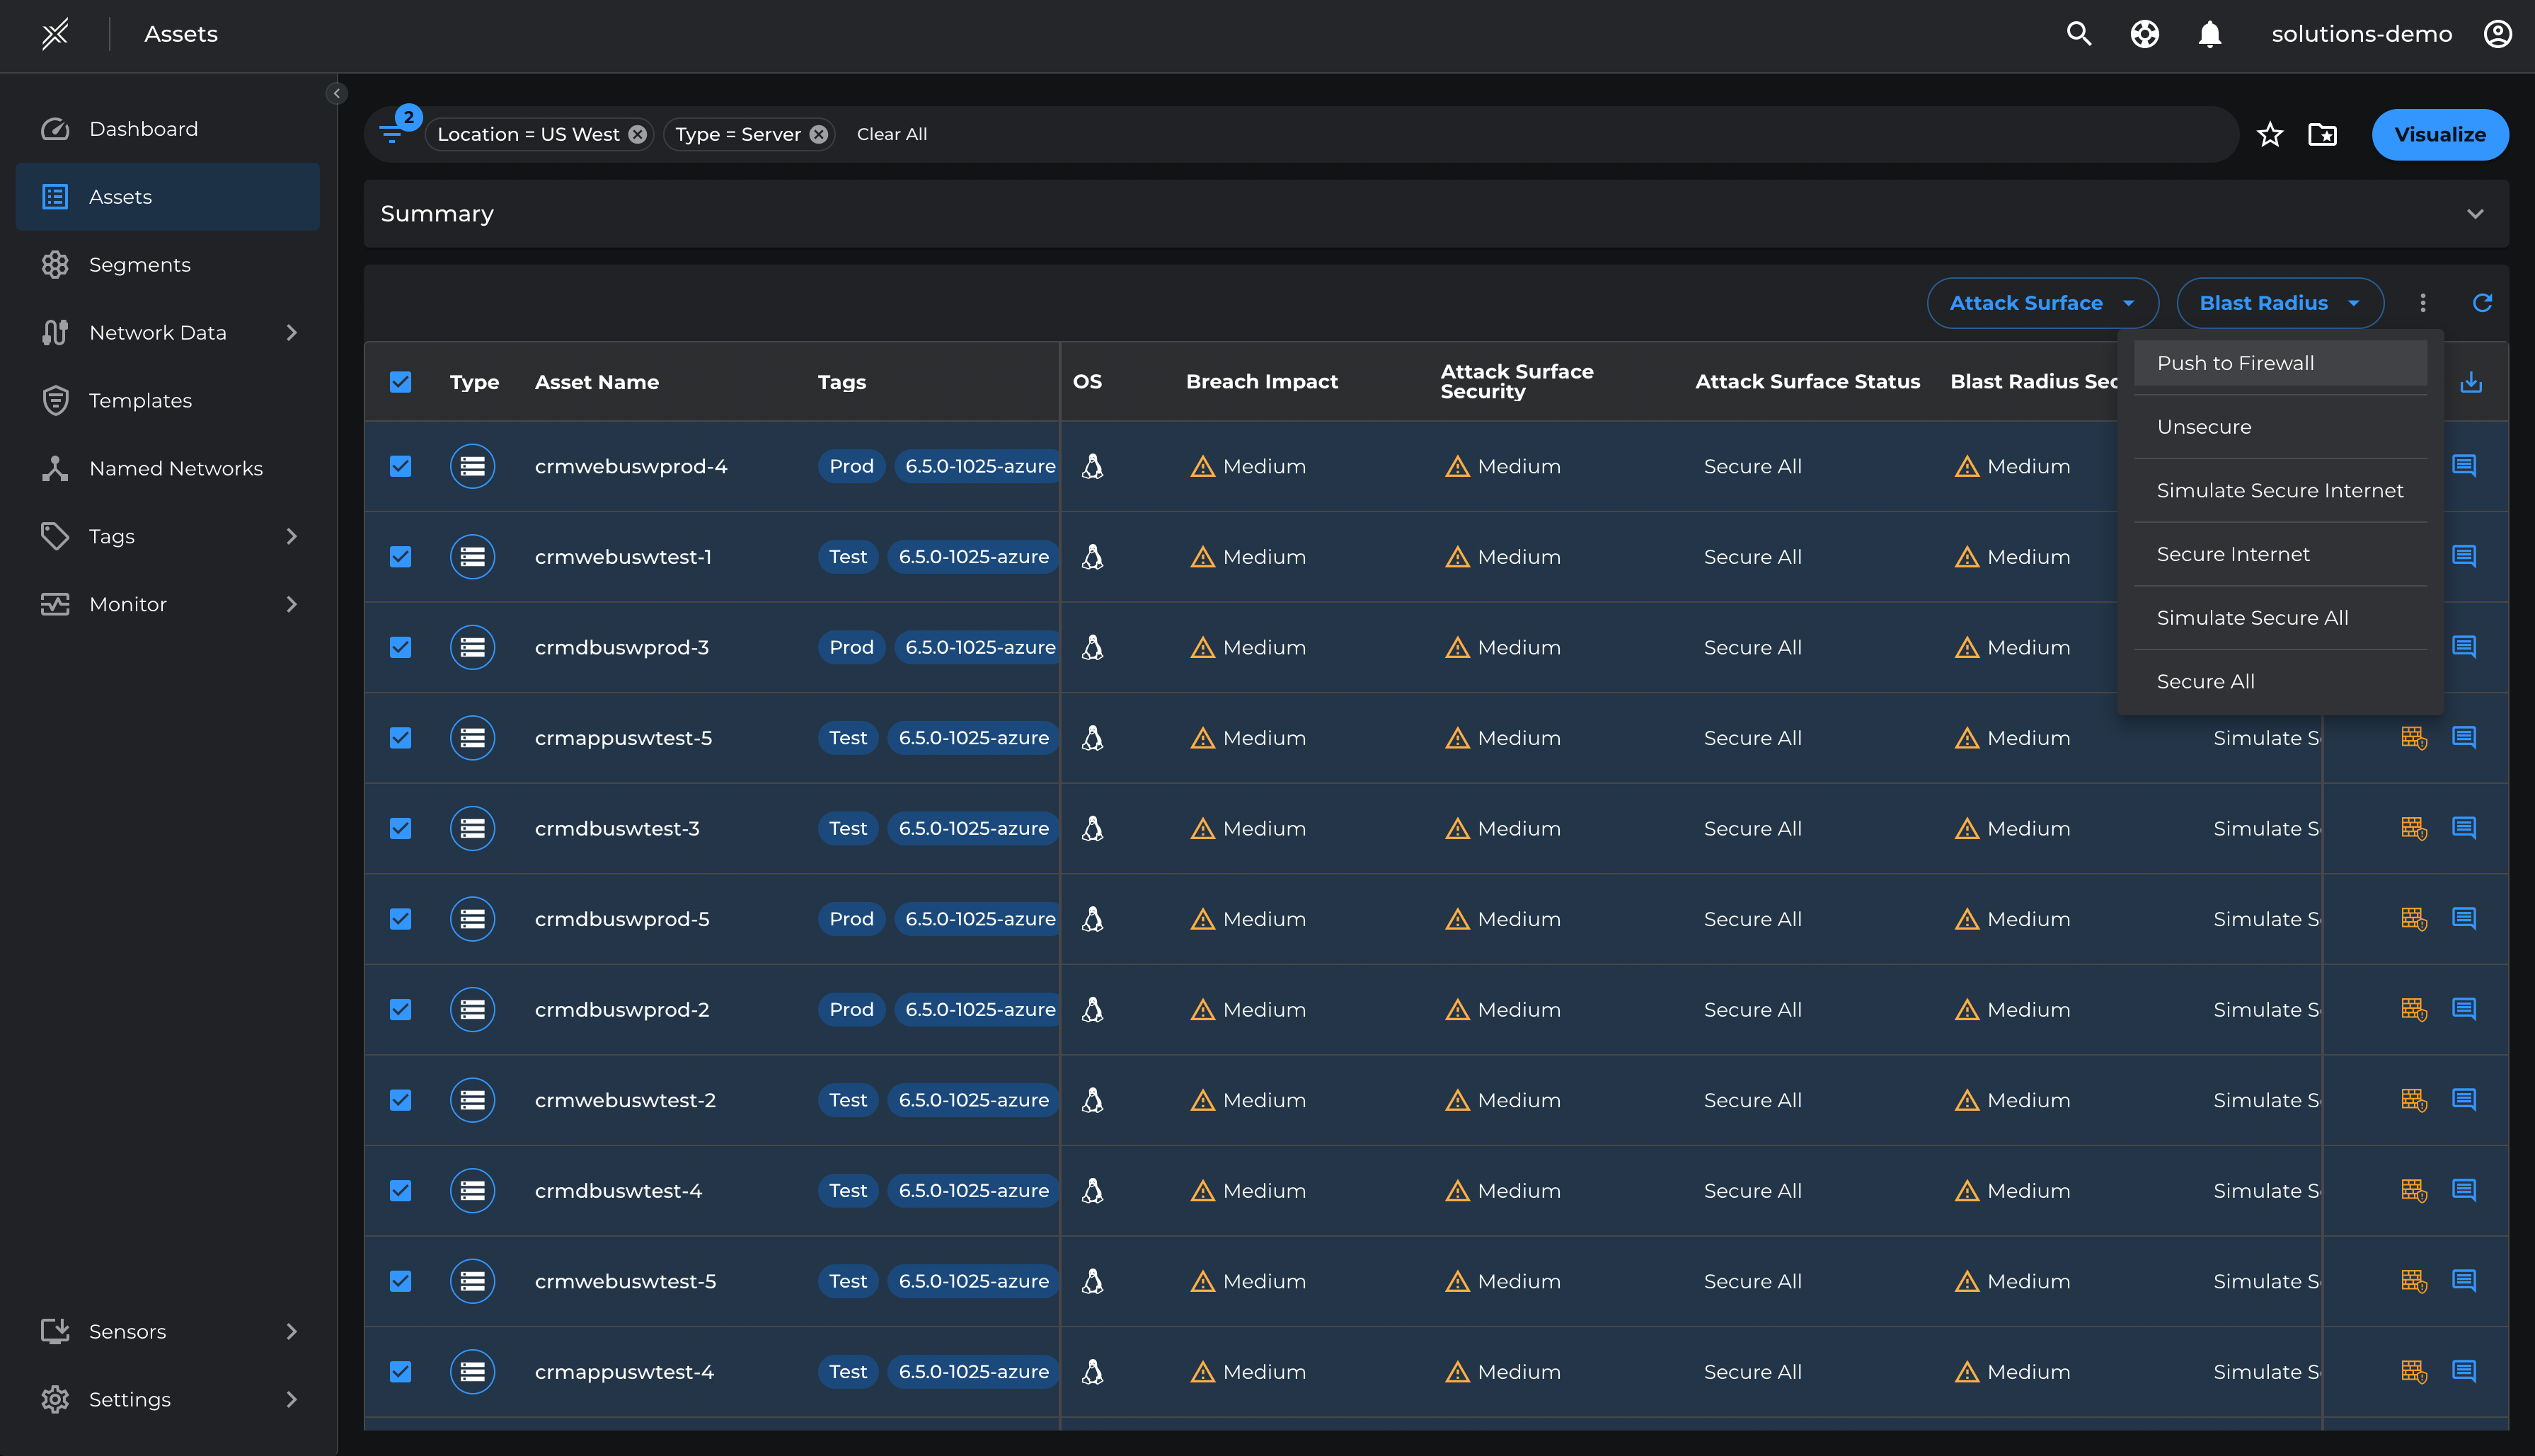
Push Updated Policy to Firewall
- Go to the Microsoft Defender Segments page.
- Select Policy Automation by clicking on three dots at the end of Microsoft Defender segment and Enable the Auto-Push to Firewll check-box and Save to apply the updated policy.
Once violations are addressed, proceed with Attack Surface Enforcement.
Steps to Enforce
- Navigate to each Microsoft Defender segment.
- Click the three dots at the end and select 'Configure Policy Automation'.
- Adjust the Blast Radius Enforcement slider to 'Secure All'.
- Ensure Test Mode is unselected, then click 'Save'.
- Repeat the process for all three segments.
Once the violations are taken care, enforce the Attack Surface
- Go to each Microsoft Defender segment > click on the 3 dots at the end > click on configure policy automation
- Move the slider on Blast Radius Enforcement to Secure All. Ensure Test Mode is unselected > Save
- Repeat the same on all 3 segments
This demonstrates the reduced attack surface and blast radius thus preventing any unauthorized communication between Production and Non-Production environments as well as between the servers and internet.
Enforcement Validation
The Xshield Security Platform offers multiple ways to validate security enforcement.
Firewall Logs & Denied Traffic
- Paths & Ports Pages: Show learned paths and ports as Allowed or Denied, ensuring only authorized traffic flows.
- Firewall Logs: Capture dropped traffic due to zero-trust policies, helping identify misconfigurations.
- Policy Assessment: Review paths and ports to confirm policies effectively restrict unauthorized access.
- Fine-Tuning: Use firewall logs to refine policies, ensuring security without disrupting operations.
Conclusion
In this demo lab, microsegmentation helped prevent lateral movement between Servers by reducing the attack surface and blast radius by applying zero-trust policies step by step, without disrupting legitimate traffic.
We monitored paths, ports, and firewall logs to ensure only authorized traffic was allowed and adjusted policies based on logged data.
This approach provided scalable, flexible security, ensuring protection while maintaining business continuity.
Overall, it demonstrated how gradual policy enforcement enhances network security with minimal impact.