Deployment Guide
This document provides comprehensive guidance to install, upgrade, and uninstall the ColorTokens Xshield Agent across macOS, Windows, and Linux platforms.
General Prerequisites
- Tenant on the Xshield SaaS Platform
- Access to the Xshield Management Portal
- Administrative/root privileges on the target asset
- Internet or network access to retrieve packages (or local copy of the agent)
The Xshield Agents need to communicate with multiple components of the Xshield Security Platform. Before installing the agents, customers must whitelist the following Fully Qualified Domain Names (FQDN) on their perimeter firewall (for outbound communications) depending on which SaaS instance the customer tenant is configured. Without those rules the Xshield agent will not be able to communicate with the Xshield Security Platform.
Tenant URLs for whitelisting
The following URLs must be whitelisted by customers to allow Xshield agents to successfully communicate with the Xshield SaaS platform for heartbeat, telemetry, log forwarding, artifact retrieval (APT repo), and related services. These are region specific and you should connect with your ColorToken's representative to identify the region where your tenant is located.
North America
ng.colortokens.com
telemetry.ng.colortokens.com
logs.ng.colortokens.com
artifacts.ng.colortokens.com
apt-ng.colortokens.com
Asia-Pacific (APAC)
syd.colortokens.com
telemetry-syd.colortokens.com
logs-syd.colortokens.com
artifacts-syd.colortokens.com
apt-syd.colortokens.com
South Asia
bom.colortokens.com
telemetry.bom.colortokens.com
logs.bom.colortokens.com
artifacts.bom.colortokens.com
apt-bom.colortokens.com
Europe, Middle East and Africa (EMEA)
fra.colortokens.com
telemetry-fra.colortokens.com
logs-fra.colortokens.com
artifacts-fra.colortokens.com
apt-fra.colortokens.com
1. Installation Steps
The Xshield agent installation and operation is a multi step process as follows:
- Copy the approrpiate installation instructions (command line argument) from the Xshield Portal 'Agent Installation' page that is relevant to the host operating system and hardware.
- Execute the command line operation on the host platform terminal window. This command must provide the deployment key (tenant specific) along with the tenant's portal URL and the type (server, user).
- Register the Xshield agent instance on the host with the Xshield Platform. This results in the discovery of the agent by the platform.
- Start the registered ctagent (Xshield agent) service. This starts the telemetry collection and periodic heart beats to the platform.
The following is a sample manual instruction of installation of the agent on the host machine. The command will be different for each operating system.
1.1 Install Agent on macOS
Prerequisites:
- Admin privileges
- Packages:
curl,brew,libpcap
Steps:
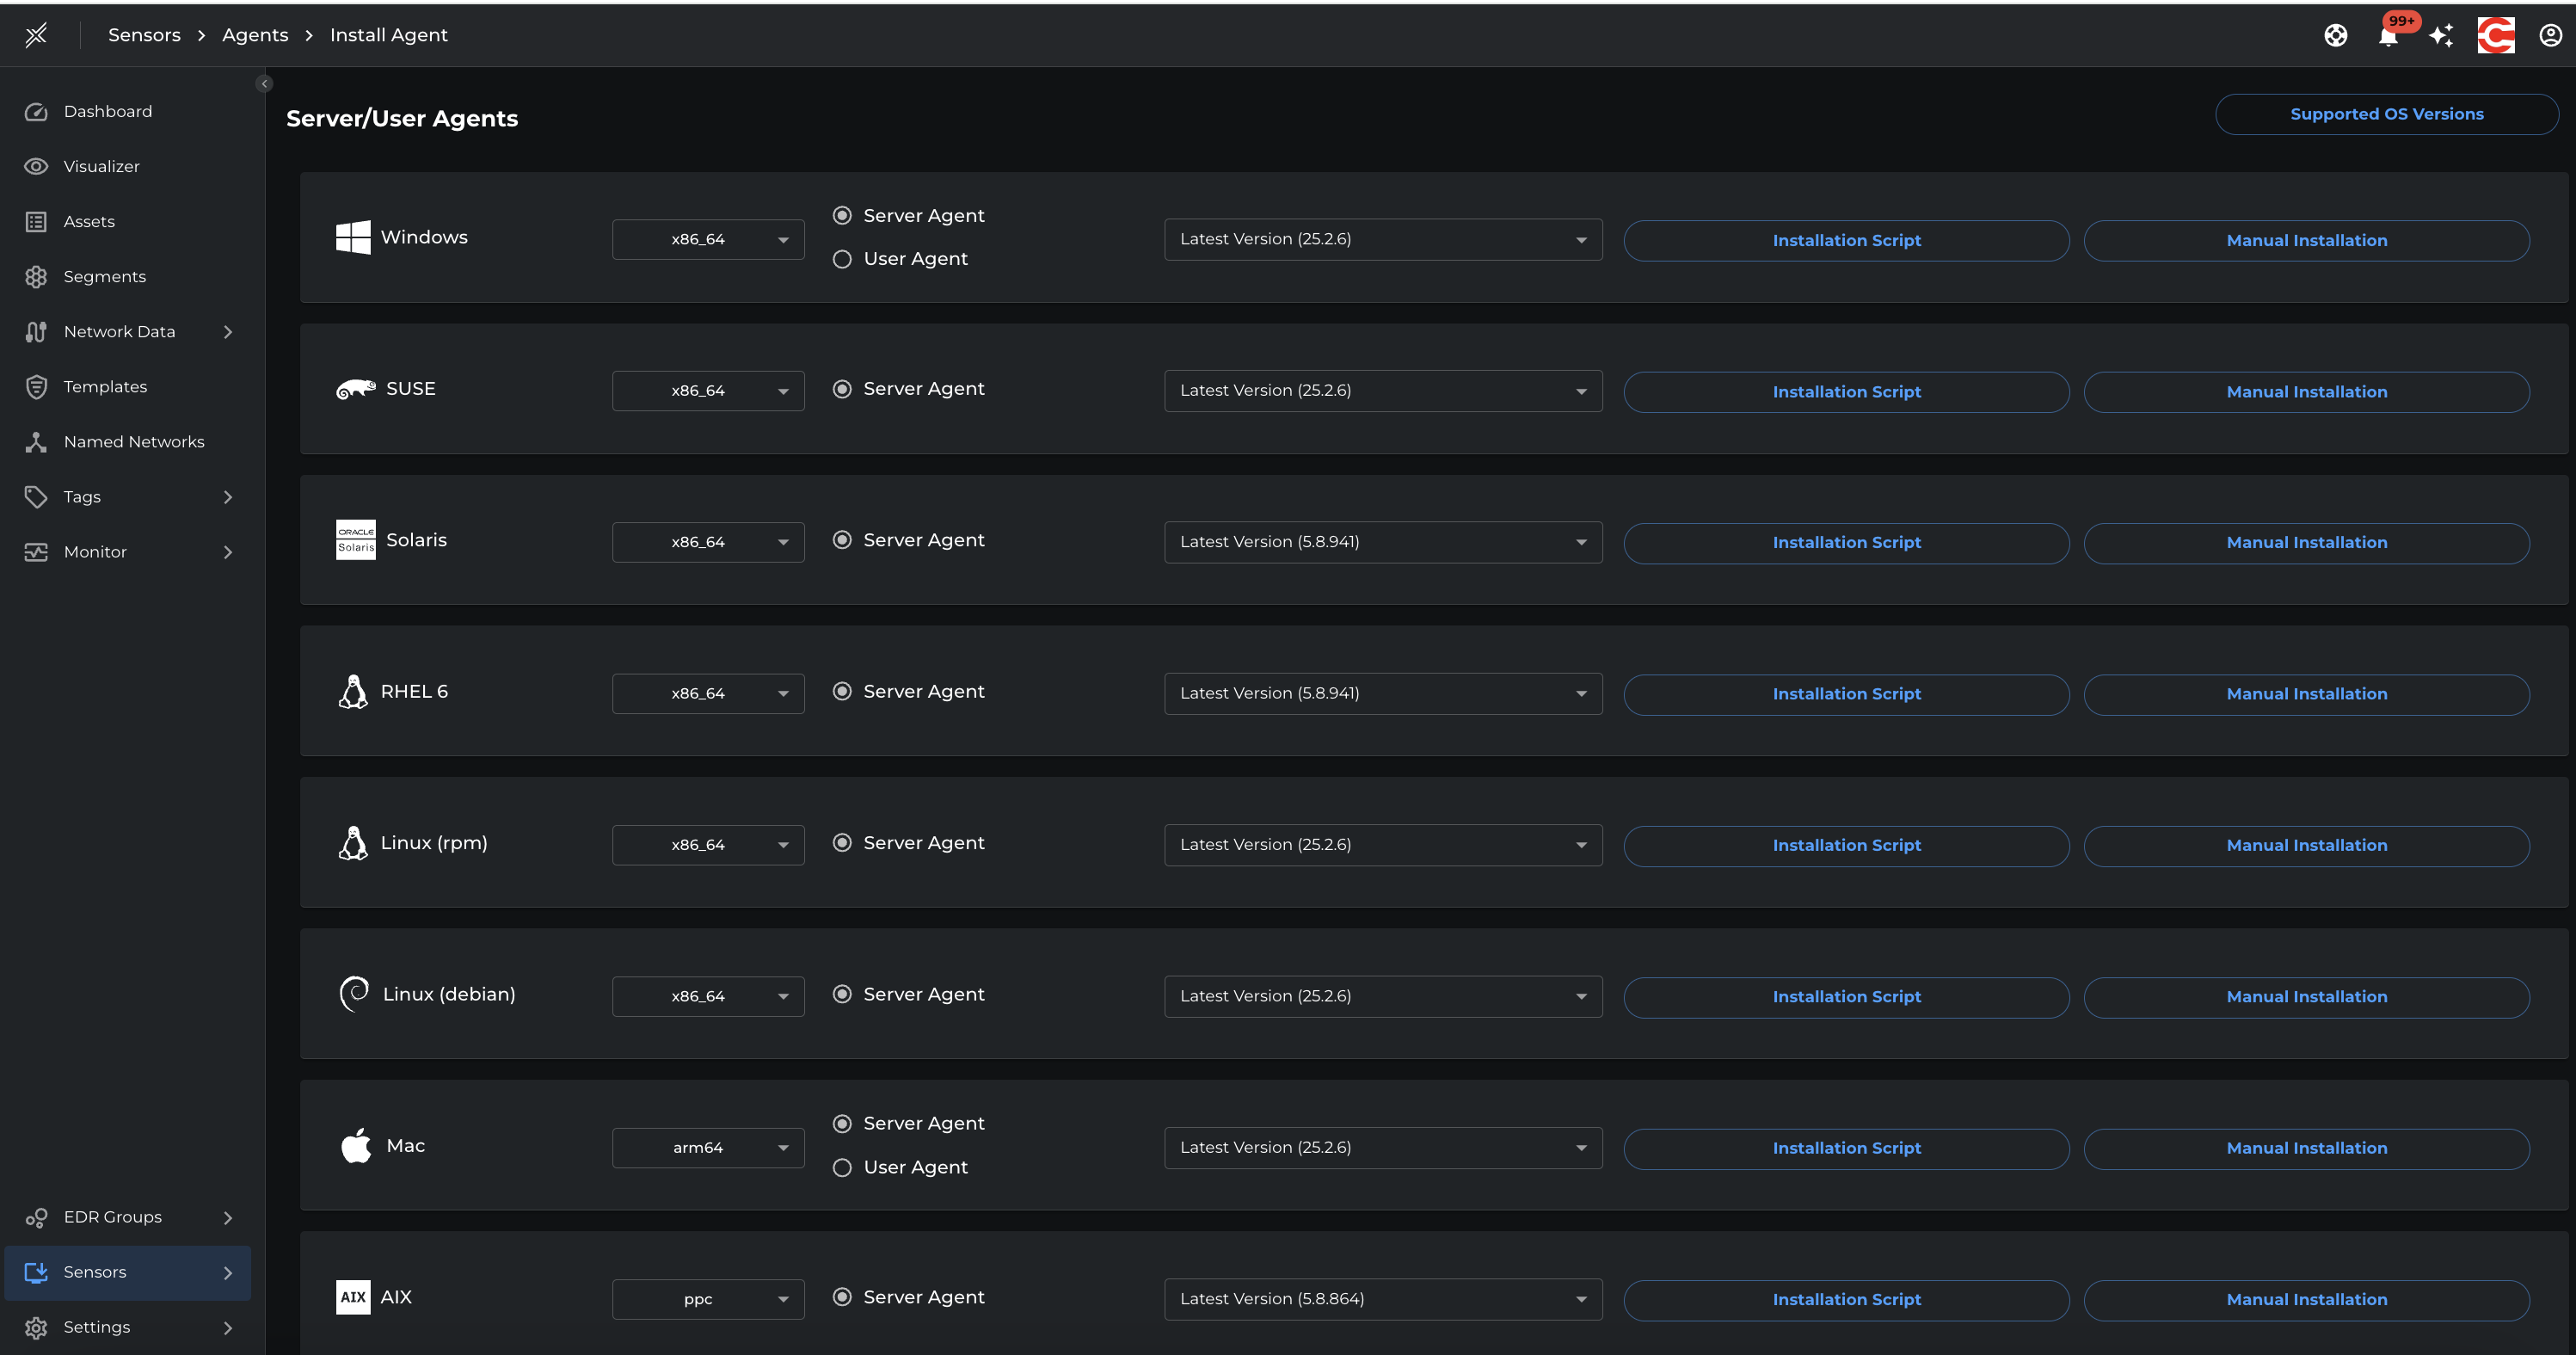
- Sign in to the Xshield portal and navigate to the Install Agent page.
- In the Mac section, configure the following:
2.1. Asset Architecture – Select the appropriate architecture (
x86_64orarm64). 2.2. Agent Type – Choose the required type (ServerorUser). 2.3. Agent Version – Select the version to install. The latest version is selected by default. - Select an installation method: 3.1. Installation Script – Provides an automated script for installation. 3.2. Manual Installation – Displays detailed, step-by-step instructions for manual setup.
- Click the preferred option to view and follow the corresponding installation steps.
[!NOTE] The latest agent version is selected automatically. You can change this if you require a specific version.
[!TIP] Use the Installation Script option for faster setup. Choose Manual Installation only if you need more granular control over the installation process.
1.2 Install Agent on Windows
Prerequisites:
- Admin privileges
- PowerShell enabled
- WFP service running
Steps:
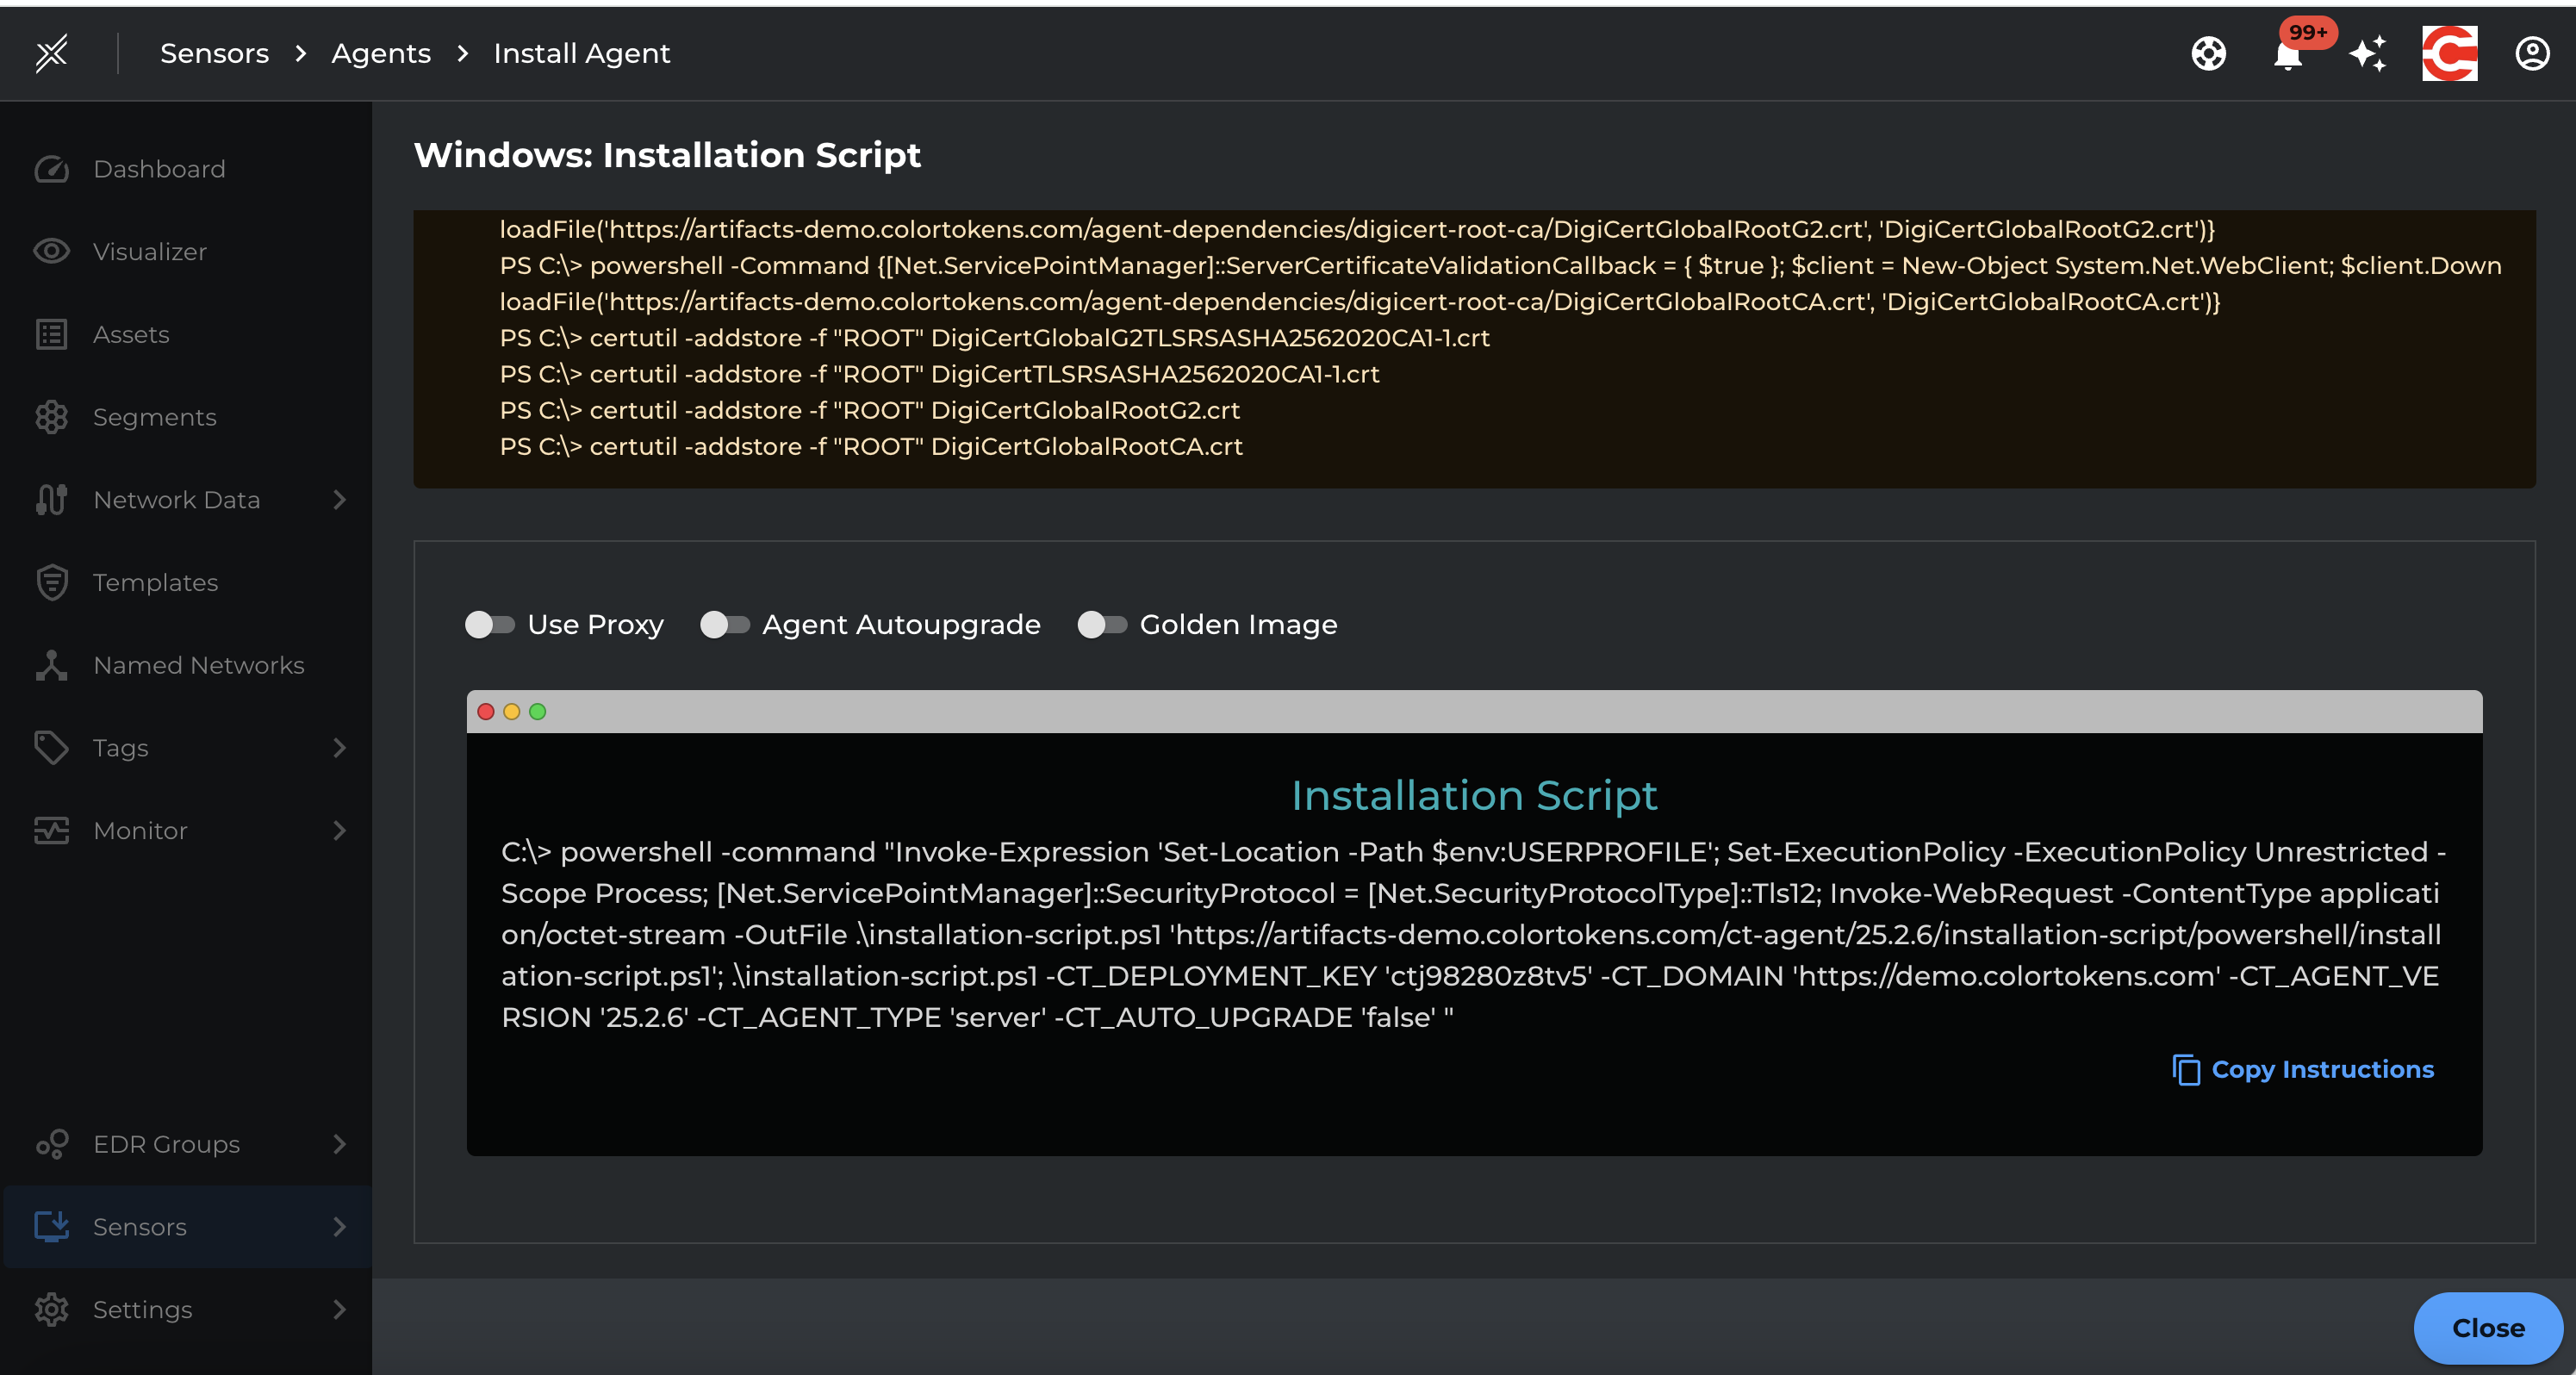
- Sign in to the Xshield portal and navigate to the Install Agent page.
- In the Windows section, configure the following:
2.1. Agent Type – Choose the required type (
ServerorUser). 2.2. Agent Version – Select the version to install. The latest version is selected by default. - Select an installation method: 3.1. Installation Script – Provides an automated script for installation. 3.2. Manual Installation – Displays detailed, step-by-step instructions for manual setup.
- Click the preferred option to view and follow the corresponding installation steps.
[!NOTE] The latest agent version is selected automatically. You can change this if you require a specific version.
[!TIP] Use the Installation Script option for faster setup. Choose Manual Installation only if you need more granular control over the installation process.
1.3 Install Agent on Linux (RPM)
Prerequisites:
- Root privileges
- Packages:
curl,iptables,nftables,libpcap,rpcbind
Steps:
- Sign in to the Xshield portal and navigate to the Install Agent page.
- In the Linux(RPM) section, configure the following:
2.1. Asset Architecture – Select the appropriate architecture (
x86_64orarm64). 2.2. Agent Version – Select the version to install. The latest version is selected by default. - Select an installation method: 3.1. Installation Script – Provides an automated script for installation. 3.2. Manual Installation – Displays detailed, step-by-step instructions for manual setup.
- Click the preferred option to view and follow the corresponding installation steps.
[!NOTE] The latest agent version is selected automatically. You can change this if you require a specific version.
[!TIP] Use the Installation Script option for faster setup. Choose Manual Installation only if you need more granular control over the installation process.
1.4 Install Agent on RHEL 6 (Linux Legacy)
Prerequisites:
- Root privileges
- Packages:
curl,libpcap,iptables,logrotate,lshw,rsyslog
Steps:
- Sign in to the Xshield portal and navigate to the Install Agent page.
- In the RHEL 6 section, configure the following: 2.1. Agent Version – Select the version to install. The latest version is selected by default.
- Select an installation method: 3.1. Installation Script – Provides an automated script for installation. 3.2. Manual Installation – Displays detailed, step-by-step instructions for manual setup.
- Click the preferred option to view and follow the corresponding installation steps.
[!NOTE] The latest agent version is selected automatically. You can change this if you require a specific version.
[!TIP] Use the Installation Script option for faster setup. Choose Manual Installation only if you need more granular control over the installation process.
1.5 Install Agent on AIX
Prerequisites:
- Root privileges
- Packages:
curl
Steps:
- Sign in to the Xshield portal and navigate to the Install Agent page.
- In the AIX section, configure the following: 2.1. Agent Version – Select the version to install. The latest version is selected by default.
- Select an installation method: 3.1. Installation Script – Provides an automated script for installation. 3.2. Manual Installation – Displays detailed, step-by-step instructions for manual setup.
- Click the preferred option to view and follow the corresponding installation steps.
[!NOTE] The latest agent version is selected automatically. You can change this if you require a specific version.
[!TIP] Use the Installation Script option for faster setup. Choose Manual Installation only if you need more granular control over the installation process.
1.6 Post-Installation Verification
- Ensure the asset and telemetry appear in the portal.
- If issues arise, refer to the troubleshooting guide or contact support.
2. Upgrade Steps
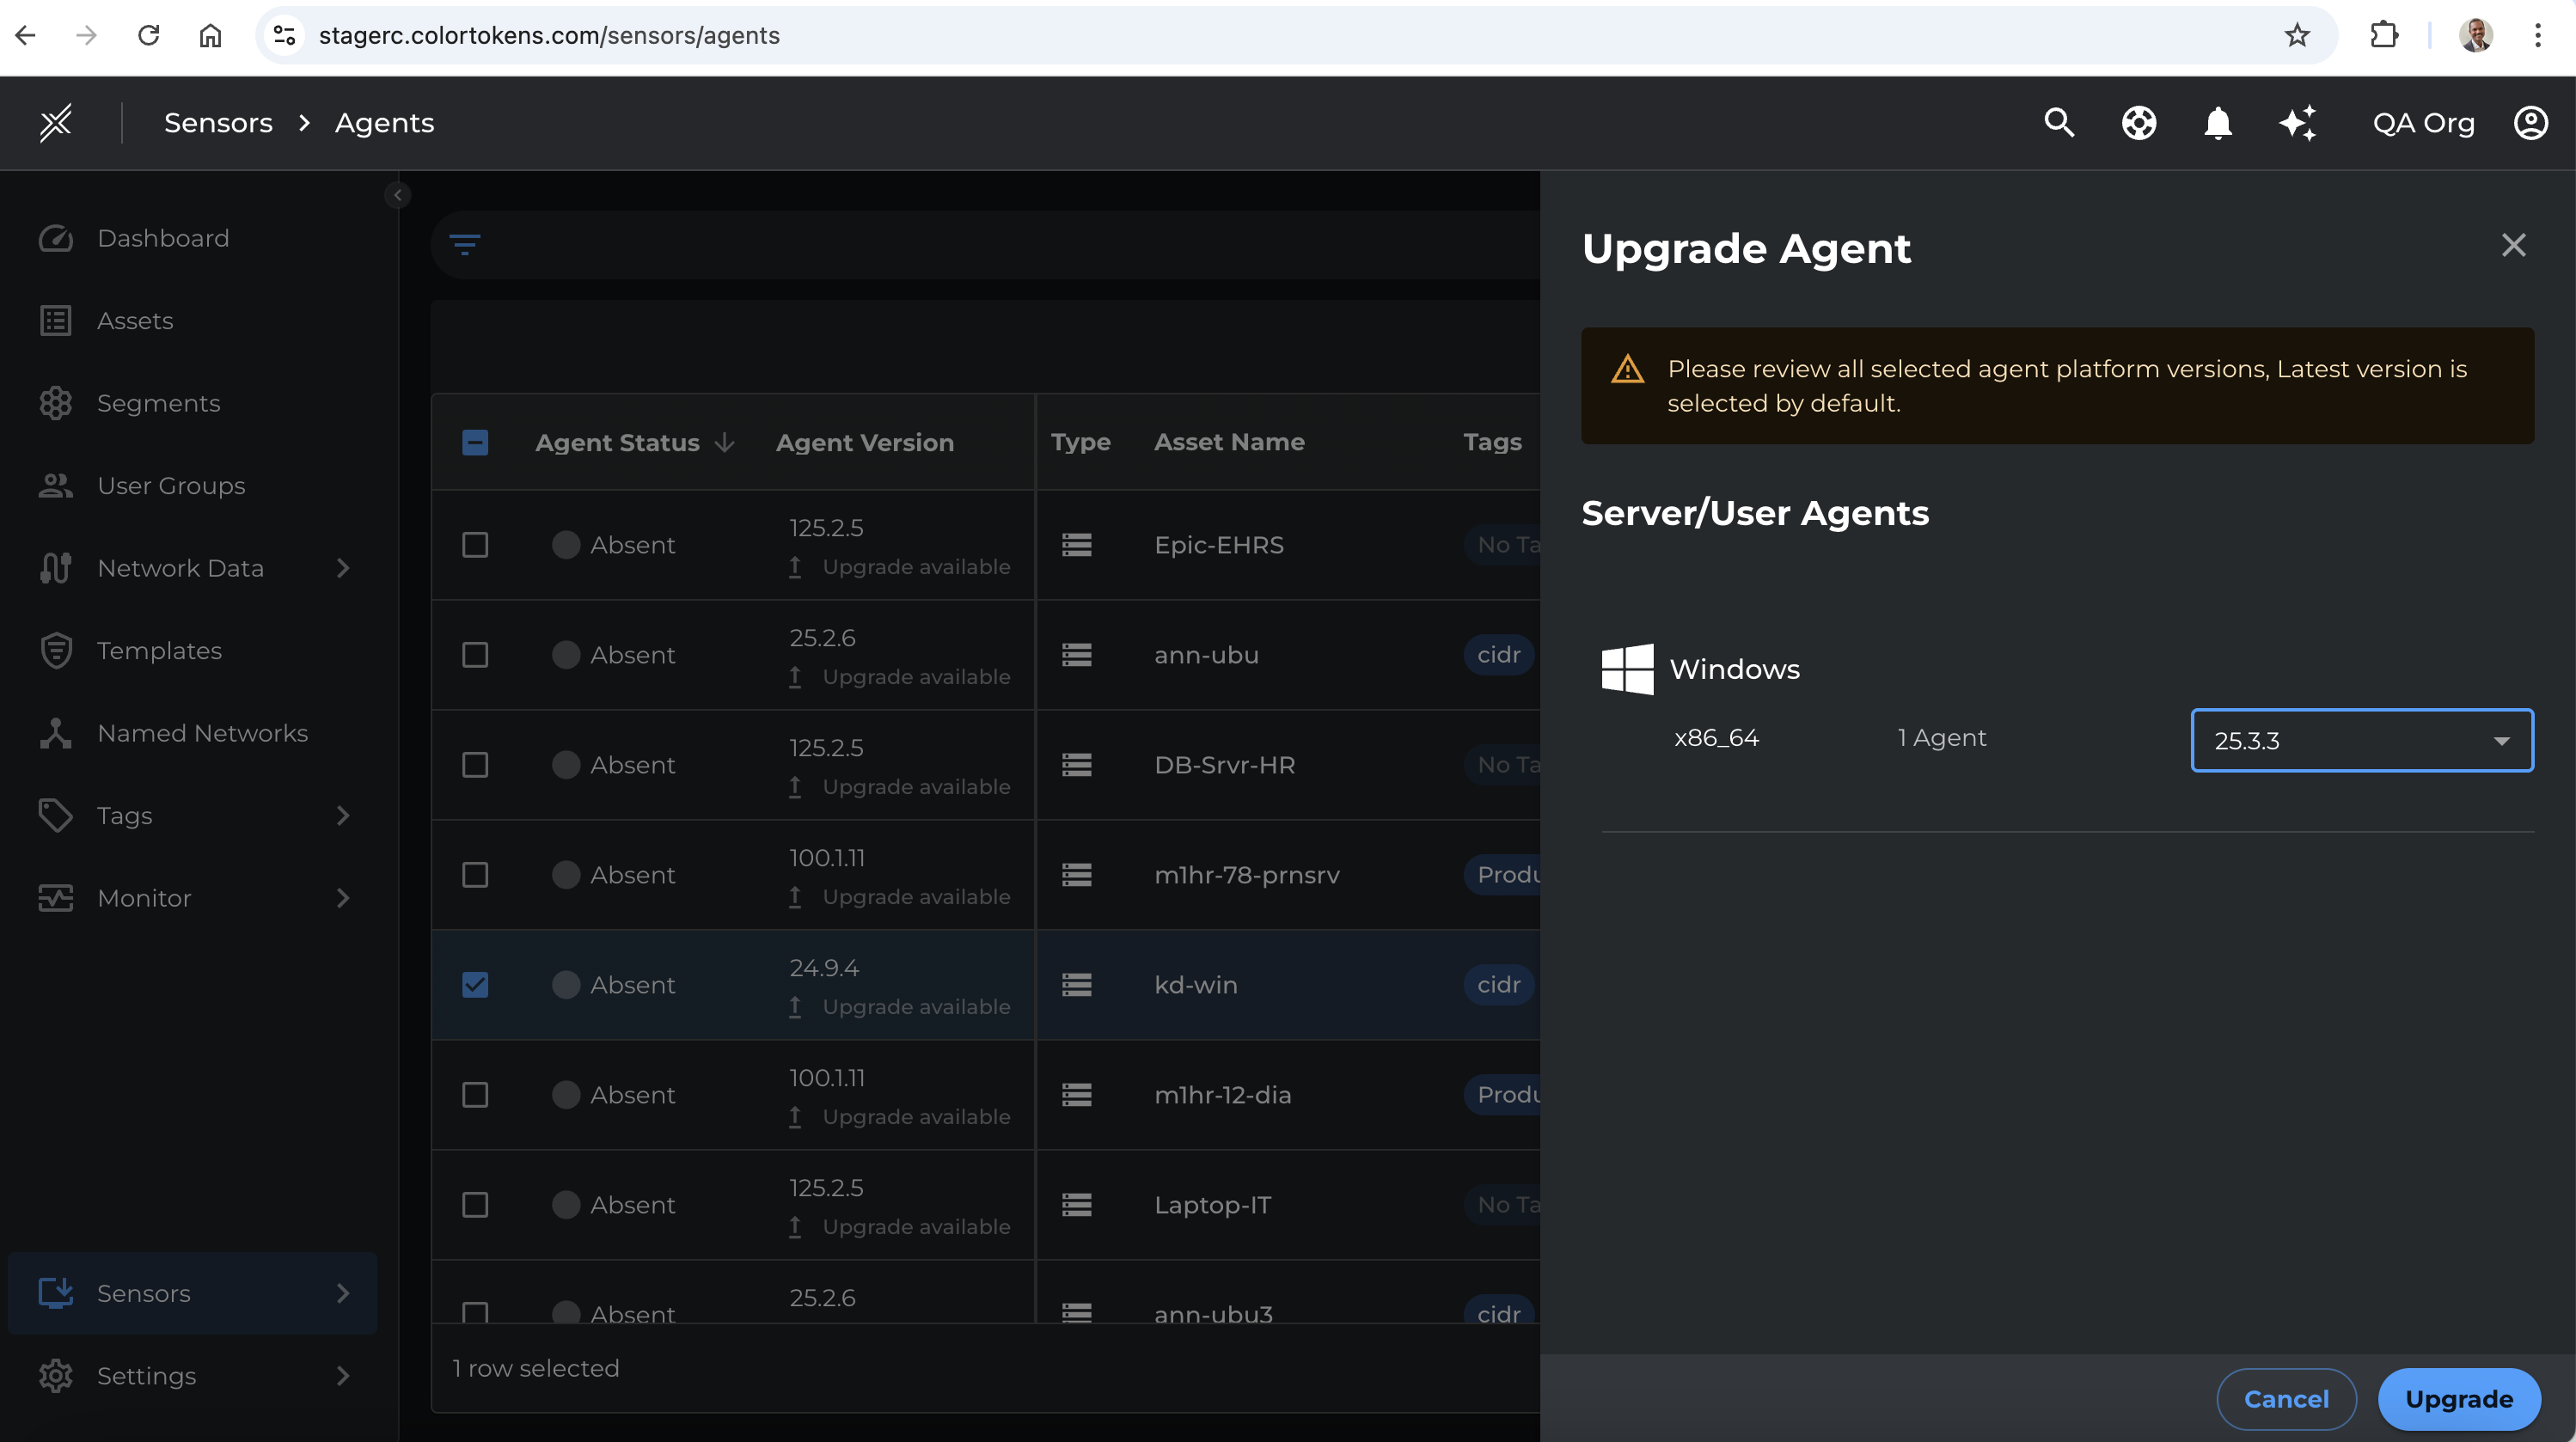
2.1 Manual Upgrade via Xshield Portal
- Go to the Agent Upgrade section in the portal.
- Select agents or groups.
- Specify the target version.
- Trigger the upgrade.
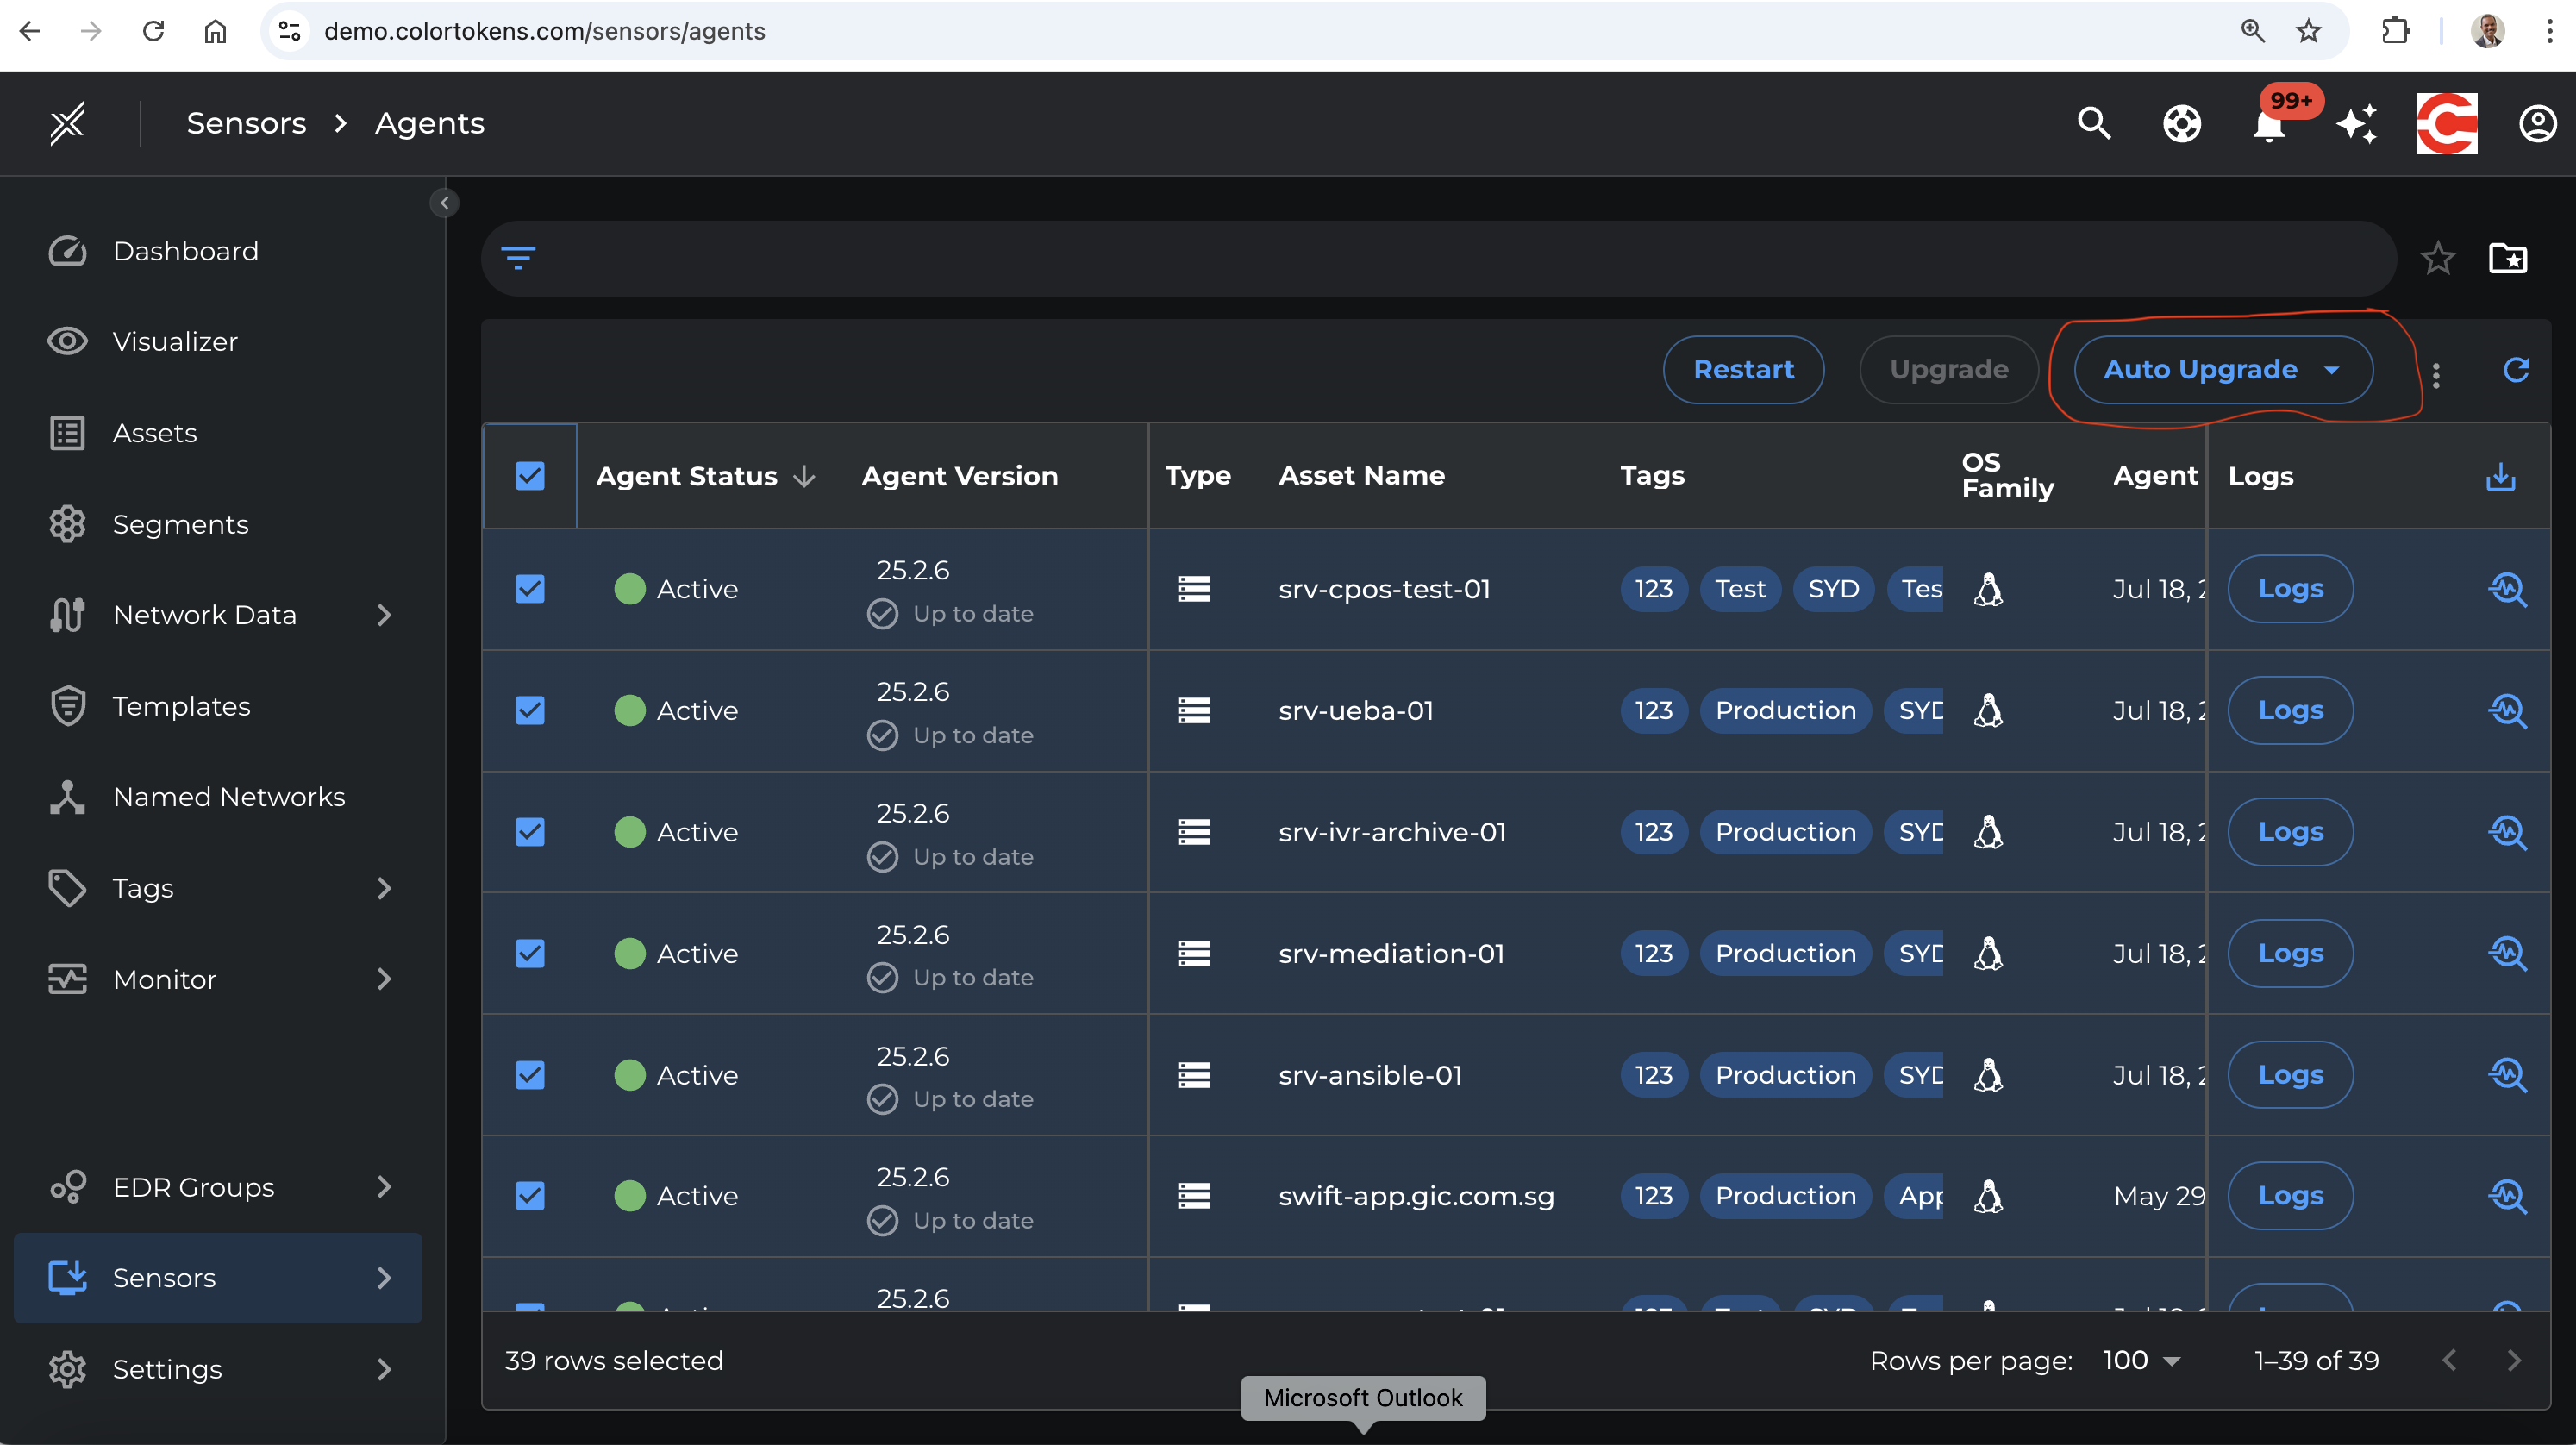
2.2 Auto-Upgrade (Optional)
- Enable auto-upgrade in the portal (disabled by default).
- Platform will automatically upgrade agents when new versions are published.
⚠️ Note: Not recommended for customers with strict change control policies.
2.3 Local (Offline) Upgrade via Enterprise Tools
- Download agent package manually.
- Use tools like SCCM, Tanium, or BigFix to distribute the package.
- Trigger local upgrade using:
ctagentcmd upgrade
Best For: Large-scale rollouts, low-bandwidth environments, phased deployments.
2.4 Upgrade Monitoring
- The Xshield platform will generate events and alerts for any upgrade failures.
- Integrate with monitoring tools for automated remediation.
3. Uninstallation Steps
3.1 Pre-Uninstallation Checklist
- For Active Agents: Trigger Decommission from the portal.
- For Enforced State: Change to Unsecure state first.
- For Absent State: Proceed directly with uninstallation.
3.2 Decommission via Portal
- Login to Xshield portal → Navigate to Sensors > Agents
- Select assets → Click on Ellipsis (⋮) → Choose Decommission
- Confirm action
⚠️ Requires Admin or Asset Owner privileges.
3.3 Basic Uninstallation
Windows
cd "C:\Program Files\ColorTokens\xshield-monitoringagent"
.\ctagentcmd.exe uninstall
Linux
sudo /etc/colortokens/ctagentcmd uninstall
3.4 Additional Platform-Specific Cleanup
Windows
- Uninstall via Control Panel if remnants remain.
Linux
- RPM-based:
rpm -e xshield-monitoring-agent-cmd
- Debian-based:
dpkg -P xshield-monitoring-agent-cmd
3.5 Post-Uninstallation Verification
Windows
- Confirm absence of
ctagentservice viaservices.msc. - Confirm removal of binaries and Control Panel entries.
Linux
- Check that
/etc/colortokensdirectory is removed. - Ensure service and package are no longer present:
dpkg -l | grep "xshield-monitoring-agent"
⚠️ Important Notes on Decommissioning
- All tags, templates, and segments are deleted from backend.
- Reinstallation on same asset requires fresh tagging.
- Other servers in Enforced state will deny traffic to this asset until retagged.
Known Issues and Limitations
Windows 2019 Server Agent Installation Can Terminate Existing Network Connections
When installing the Xshield agent, the installer will also install the npcap software. This is used for packet capture functions to collect and build telemetry. The Windows 2019 Server Operating System has a well known issue of terminating active network connections during the installation of the npcap driver. This may have an impact to the operation of the application running on the instance of the operating system.
This is documented at https://github.com/nmap/npcap/issues/53
There is no known workaround for this issue. Please note that this issue occurs only during the installation and not during agent upgrades.
Windows 2008 R2 Server Installation Failure
The Xshield agent uses third party software 'npcap' and the Windows Filtering Platform for collecting network telemetry and programming the host firewall respectively. Both these applications requires the operating system to have the service pack SP1 and additional KB articles to work correctly. If there is an installation failure of the agent on this operating system, kindly verify that the OS is patched for:
- Service Pack SP1
- KB2568167, KB4474419 and KB4490628
Without the service pack and the KB articles, the npcap installation will fail on this server. Without these patches, the Windows Filtering Platform cannot support configuring firewall rules with port ranges via the WFP API. This will result in only the lower port of the range getting programmed for the rule leading to unexpected enforcement.